Ventilation systems, along with adequate lighting, are two critical environmental components essential for successful cultivation within a tent or enclosed growing environment. We have received numerous inquiries regarding the proper setup and configuration of ventilation systems. Therefore, we aim to provide a comprehensive guide to share insights and recommendations on this subject. We will systematically break down the process, accompanied by illustrative diagrams, to facilitate straightforward setup procedures, enabling you to establish optimal growing conditions efficiently.
What is the Required Equipment?
- An inline fan: An inline fan is a tube-shaped fan that helps push large volumes of air through a space—measured in cubic feet per minute (CFM). It works to ensure plants get fresh air and CO2 while helping control temperature and humidity in an enclosed space.
- A carbon filter: An inline fan usually works with a carbon filter. The main function of a carbon filter is to remove odors. While a carbon filter isn’t required, it helps keep your ventilation system clean and removes smells–one filter usually lasts a single grow cycle. We would recommend adding it to your setup!
- Ducting: Ducting is basically a tube that connects your grow space to an exterior space, to channel fresh air to the tent, which is moved with a fan. It is made with aluminum and metal wire and is flexible yet able to be cut.
8 steps to set up a ventilation system
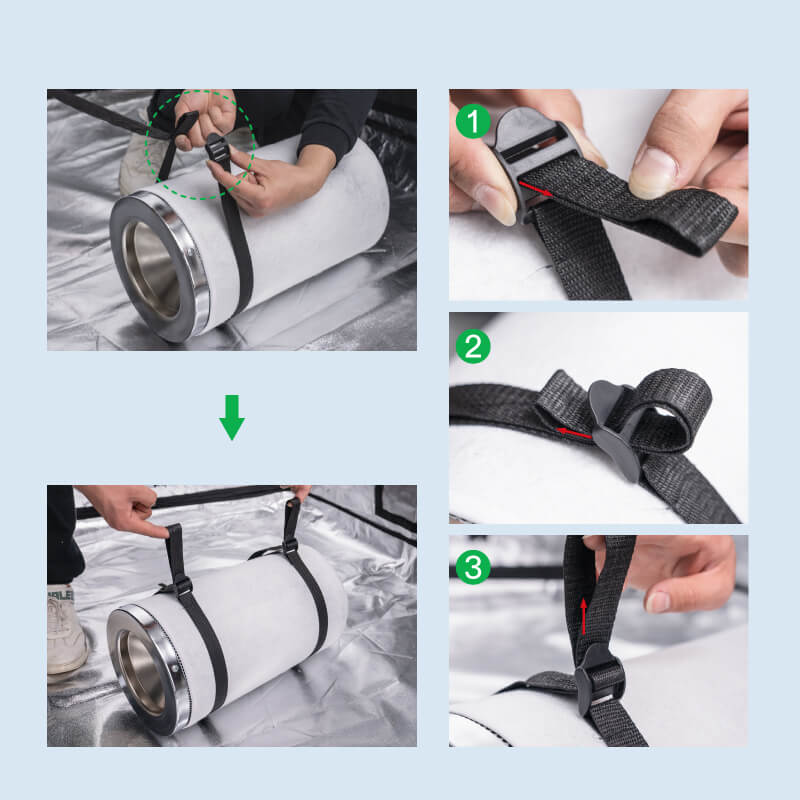
Step 1: Tie up the carbon filter belt
When you open the VIVOSUN 6”carbon filter package, you will receive a carbon filter, a changeable pre-filter, and belts. If you’re going to be using a filter, we wanted to make it easy to set up! The first thing you’ll need to do is to check if the pre-filter is on the carbon filter—it’s the white fabric around the filter. If it isn’t, be sure to put that on before hanging up the filter.
- Put one belt under the carbon filter; Fold the belt at about 20-25 inches away from the buckle; Make sure the folded belt and the buckle are on the same horizontal line.
- Push the folded belt through the second buckle hole and then conversely push it through the first buckle hole; Make sure the belt has been tied up as tightly as possible.
- Repeat to tie up the second belt.
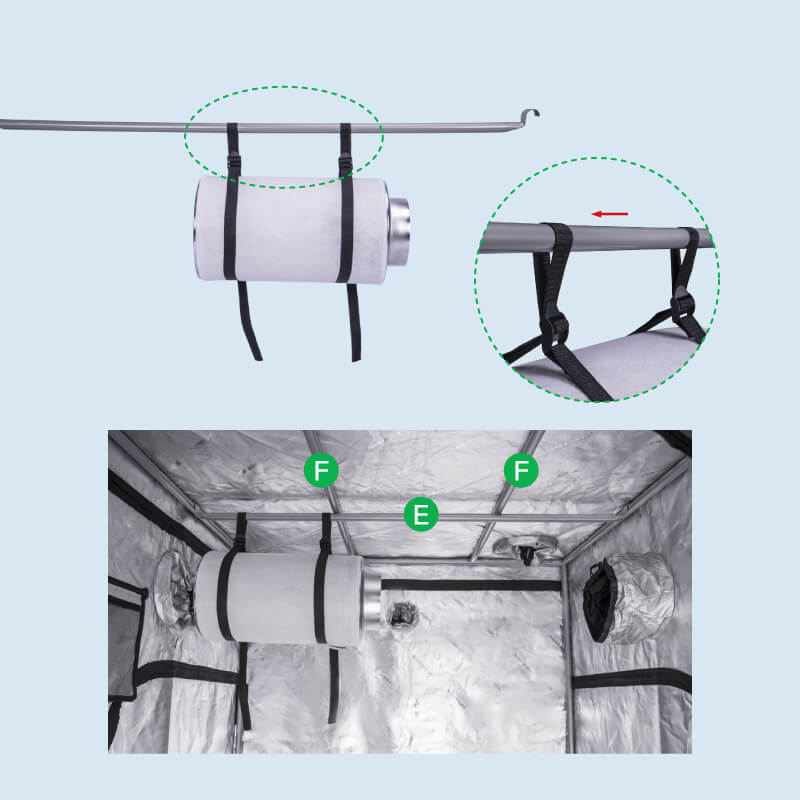
Step 2: Hang up the carbon filter
- Take off the E pole from the tent; Cross the E pole through the belts you have just tied up.
- Re-hang the E pole back to the tent.
- Don’t let the carbon filter lean against anything since this will reduce ventilation—also make sure that the filter isn’t tilting up or down, you’ll want to keep it horizontal and parallel to the support poles. Just adjust the straps if the filter is tilted.
Step 2.1: Alternative to hanging the filter
- You can also place your carbon filter outside the tent. We don’t recommend it because it’s better to filter air before it enters the inline fan, but it is possible. Your setup will look a little different than what we are outlining in this article. If you do decide to place the filter outside the tent, you can hang it in a similar way that you would hang it in the tent or you can place it directly on the ground. If you do want to place it outside the tent, check out this diagram to get an idea of what that could look like:

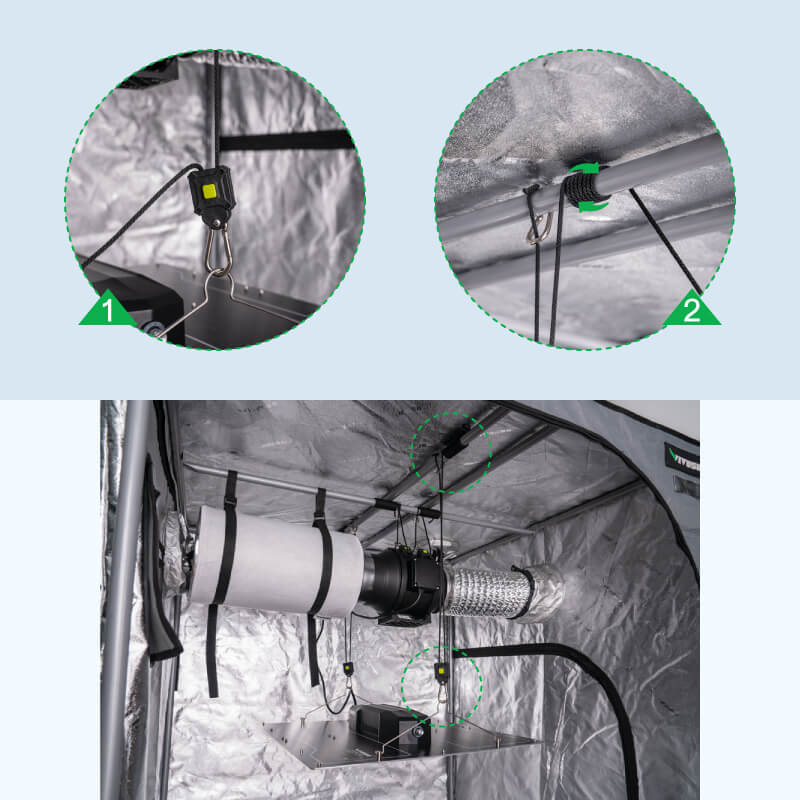
Step 3: Tie up the rope hanger
- We definitely recommend using rope rachet hangers since they make adjusting the fan height very easy. Thread the rope hanger through the base of the inline fan. The adjustable hook should be a little lower than the other side.
- Hook the adjustable hook to the rope on the opposite side of the fan.
- Repeat the process with the second hanger on the other side of the fan.
- Wrap the longer side rope (the side with a fixed hook) around the E pole; Hook the rope with the fixed hook.
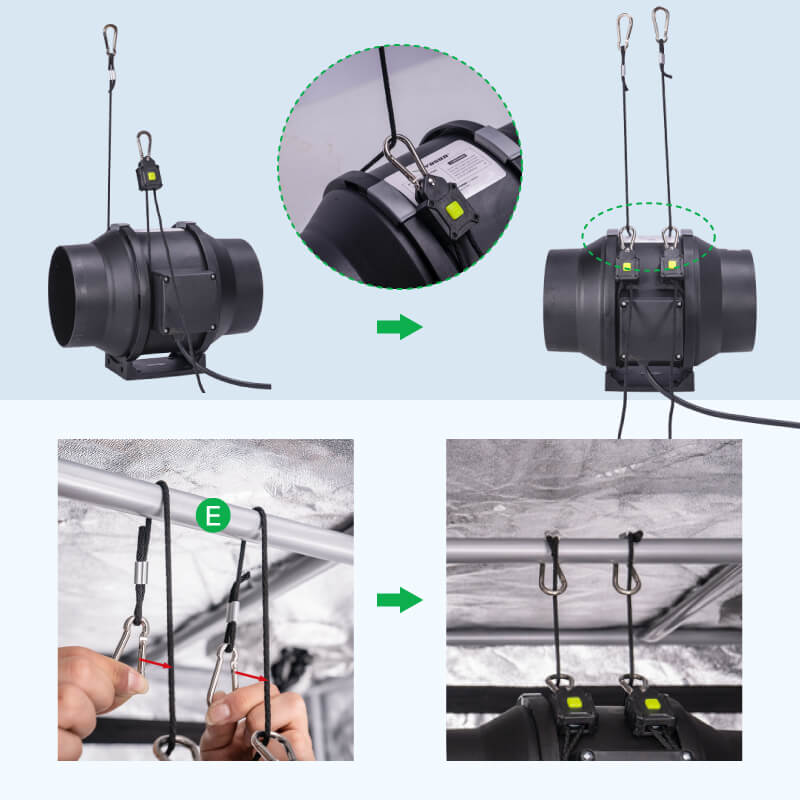
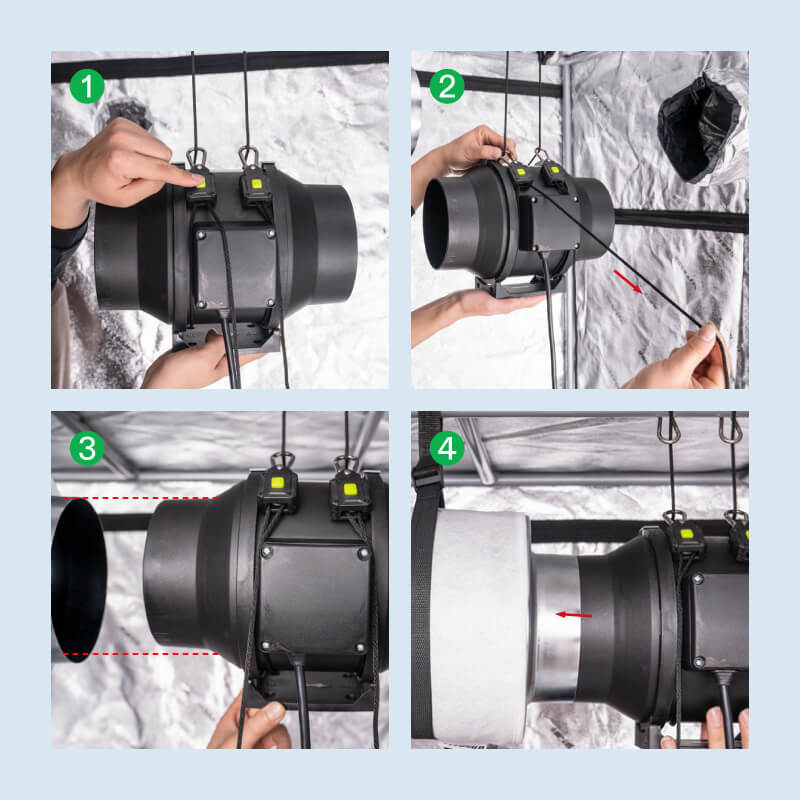
Step 4: Hang up the inline fan
As you can see in the picture, there is a yellow button on the adjustable hook—this yellow button is used to adjust the hanging height of the inline fan. Be careful when you adjust the height since if you’re not supporting the fan while adjusting the height you might drop it. Hold the base of the inline fan with your hands in case the fan falls off.
When the carbon filter and the inline fan are at the same level, you can fit the flange of the fan tightly into the carbon filter. We recommend connecting them together with some ventilation tape to make sure the seal is airtight.
Step 4.1: Alternative to Using the Rope Hangers
- Of course, not everyone has rope hangers! You can repeat the process with 1/8” thick strings by tying them around the fan.
- Alternatively, you can use bungee cords to attach the fan to the cross bars.
- Another alternative is to use zip ties to attach the fan—this one will be a little trickier. On the mounting plate, there are four screw holes through which you can thread zip ties, which can then be wrapped around the cross beams.
- Finally, the fan has a mounting bracket attached to it in case you want to attach it firmly to another surface. If you have a 2×4 board available and power tools, you can drill screw holes into a 2×4 that is nailed to a solid structure. Then, you can hang the fan on screws (just make sure you tighten the screws so the fan doesn’t vibrate off).
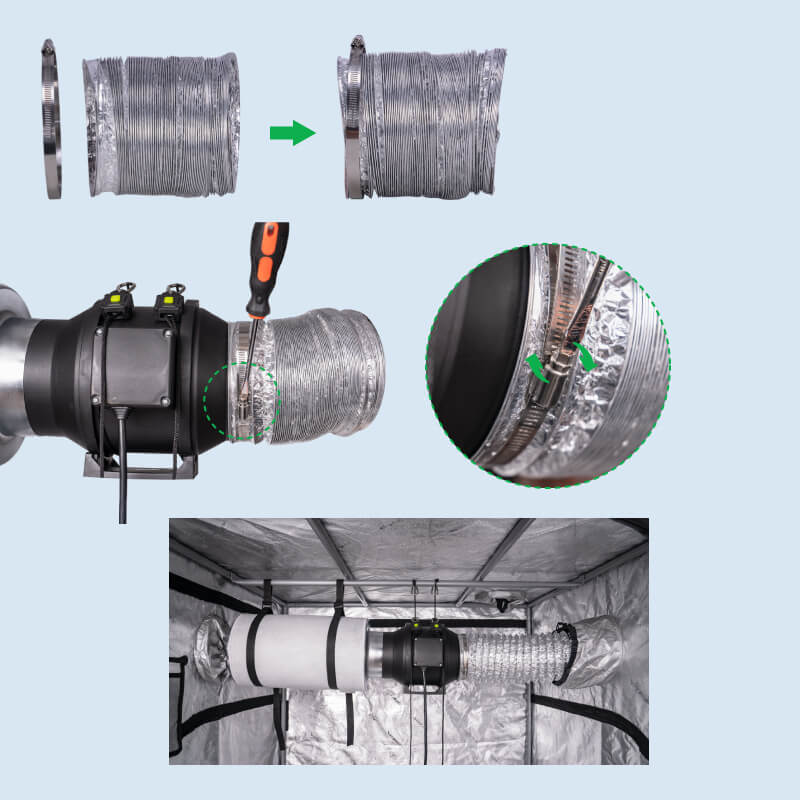
Step 5: Connect the ducting with the fan
- Ducting comes packaged like a spring without the tension—simply pull it to extend it as far as you need. If it is too long or you want multiple pieces, you can cut the ducting with scissors and a wire cutter.
- To secure the ducting tightly to your fan, use a ducting clamp—slide it onto the ducting before you attach the ducting to the fan, and then slide the ducting clamp over the connection point.
- Look at the ducting clamp and you’ll see a small screw that you can tighten with a screwdriver or electric drill. Tighten the clamp enough so that the connection is airtight.
- After these steps are done, you have finished about 90% of your ventilation system setup.
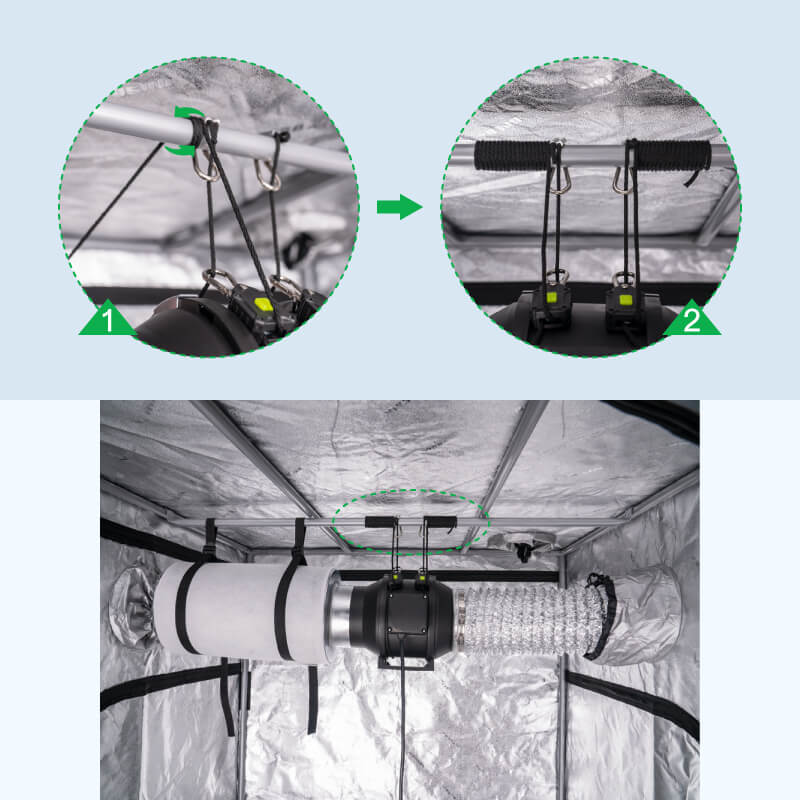
Step 6: Tuck away the excess rope
Given the necessary length of rope to suspend the tent fan from an overhead support, there will be a considerable amount of excess rope hanging down into the interior of the tent after installation. To manage this excess rope and prevent it from becoming a tripping hazard or nuisance, we advise coiling the remaining rope around the same vertical pole or support from which the fan is hung. Once coiled, tuck the free end of the rope beneath the wrapped coils to secure it in place. Please refer to the accompanying diagram in the next figure for a visual representation of this recommended rope management technique.
Step 7: Hang up your grow light
We’re going to assume that you’re using an LED here since most growers have switched to this new tech. After you have finished setting up your ventilation system, you’ll need to set up your grow light. All of the VIVOSUN grow lights are also equipped with rope hangers.
Please note, we do not recommend hanging the grow light before you’ve hanged up the ventilation, and because of the weight it can only be hung from the F pole (either F pole works), and it should be hung up lower than the ventilation system.
Since an LED grow light is much heavier than a carbon filter and an inline fan, we really recommend you use a rope hanger (the adjustable hook side) to connect the hook of the LED first and then hang it to the F pole.
As we mentioned before, just wrap the excess rope to the F pole to get it out of the way.
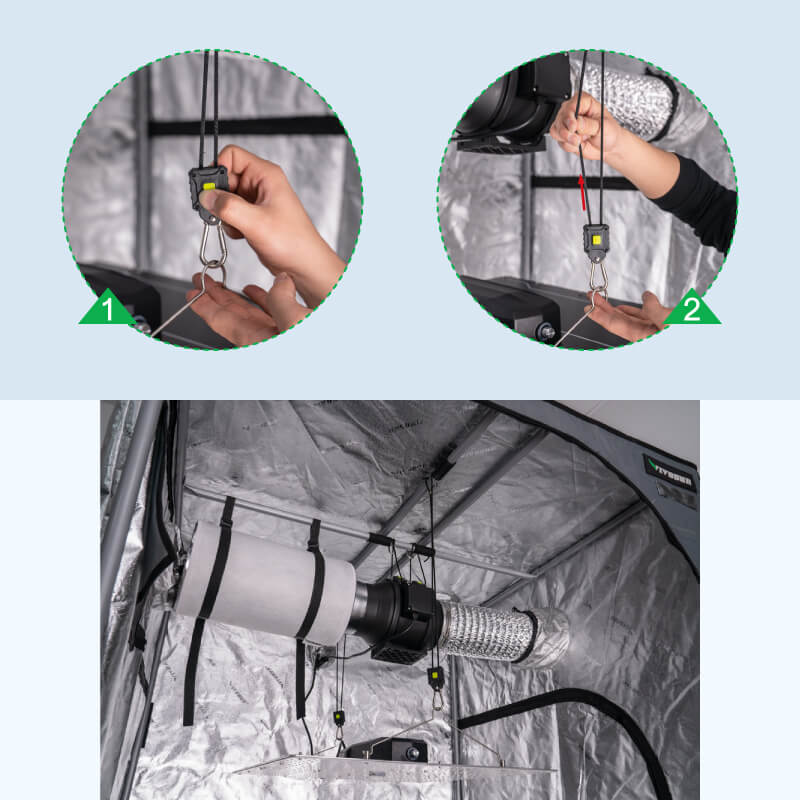
Step 8: Adjust the height of your light
If you need to adjust the height of your LED, press the yellow button and pull the left side of the rope up. Hold the hook of the LED light when you adjust the height. Check out the following diagram for a visual.
That’s it! This has mainly been focused on the 4×4 grow tent ventilation setup but you can follow these instructions for any size of tent, of course, there will be minor adjustments.
If you have any questions, please don’t hesitate to reach out to us!
And be sure to check out our other blog posts for useful tips on becoming a great grower!
Subscribe to the VIVOSUN newsletter for growing tips, grower stories, and special offers, and get 12% off your first order!
We love the new VIVOSUN Smart Grow System and we are certain that you too will love it once you try it.
And join our Facebook farmer’s community for even more exclusive contests and prizes!
Download VIVOSUN App to get 18% off and explore more information!

You may also like articles about how to set up a ventilation system:
How Often Should I Run My Grow Tent Ventilation
VIVOSUN AeroZesh: Fully Controllable Ventilation