

English
AeroLab P30 Manual
Safety Information
Before use, carefully read and follow all safety rules and operating instructions in this manual.
-
This product is for measuring liquids only.
-
Do not fully submerge the product in water.
-
Do not use it in extremely cold temperatures. Ensure the device is at room temperature before use.
-
Do not use the device if it is damaged, malfunctioning, dropped, or broken. A damaged device may give incorrect readings or pose safety risks.
-
Do not remove the screw cap that holds the sensor, as this may damage the sensor.
-
Keep the device and calibration powder out of reach of children and pets. This product is not intended for use by children.
-
If the device will not be used for an extended period, remove the batteries to prevent leakage that could damage the device.
-
Wear protective gear when handling calibration powder to avoid contact with skin, eyes, or inhalation. If contact occurs, rinse with water immediately.
-
A protective liquid is used during production to keep the probe moist, which may cause salt crystals to form. This is normal and does not indicate that the product has been previously used.
Product Contents
| Image | Name | Quantity |
|---|---|---|
|
pH Meter |
1 pc |
|
AAA Battery |
4 pcs |
|
pH 4.01 Buffer Powder |
2 pcs |
|
pH 6.86 Buffer Powder |
2 pcs |
|
pH 9.18 Buffer Powder |
2 pcs |
|
50ml Measuring Cup |
1 pc |
Specifications
pH |
Range |
0~14 pH |
Resolution |
0.01 pH |
|
Accuracy |
±0.01 pH |
|
ORP |
Range |
±1000 mV |
Resolution |
0.1 mV |
|
Accuracy |
±0.1% F.S |
|
Temperature |
Range |
32-122°F (0-50°C) |
Resolution |
0.1°F (0.1°C) |
|
Accuracy |
±0.5°C |
|
Protection Rating |
IP67 |
|
Power |
AAA Battery*4 |
|
Dimensions |
1.65*1.65*7.52in (42*42*191mm) |
|
Weight |
4.23oz(120g) |
|
Operation
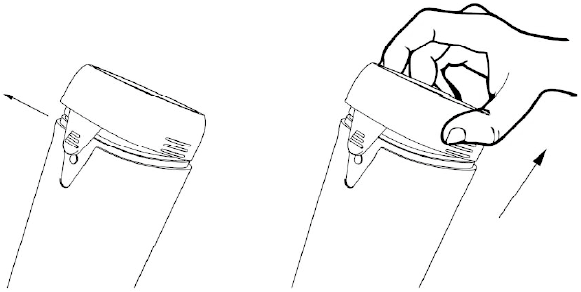
1. Installing the Batteries
Step 1
Remove the top cover.
Step 2
Gently pull out the battery compartment and correctly insert 4x AAA batteries as shown in the diagram.
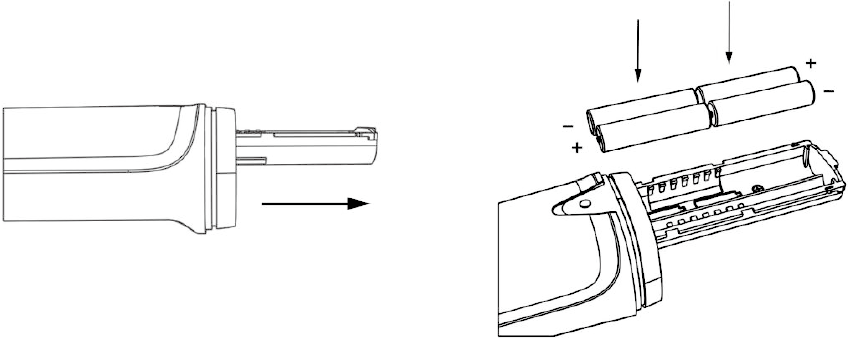
Step 3
Push the battery compartment back in and securely replace the top cover. The batteries are now installed.
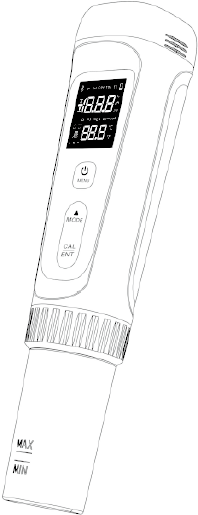
2. Buttons and Display
Buttons
| Button | Short Press | Long Press |
|---|---|---|
|
|
|
|
Adjust Current Parameters – When in the settings menu. |
Temporarily Switch Temperature Units – When in the measurement screen. |
|
|
Enter Calibration – When in the measurement screen |


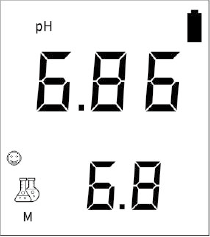
Display
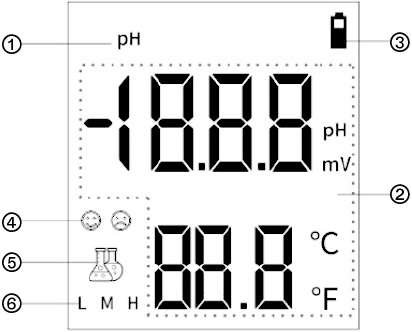
-
Mode Icon: A solid icon indicates measurement mode, while a flashing icon indicates calibration mode.
-
Probe Measurement: Displays the probe measurement and temperature readings.
-
Battery Icon: Displays the current battery level.
-
Probe Status Icon: A smiling face indicates the reading is locked during measurement; a smiling or sad face indicates whether the probe slope is normal or abnormal during calibration.
-
Measurement Stability Icon: A solid icon indicates a stable reading, while a flashing icon indicates an unstable measurement.
-
Calibration Point Icon: Indicates that a calibration point has been successfully completed.
NOTE : When the reading is locked, both the reagent bottle icon and the smiling face icon remain solid.
Settings Menu
Symbol |
Setting |
Parameter |
Factory Setting |
Description |
P01 |
Temperature Unit |
°F / °C |
°F |
Switch the temperature unit for probe reading: °F or °C. |
P02 |
Buffer Standard |
USA/NIS(T) |
NIS(T) |
Switch the type of probe calibration solution: USA (4.00/7.00/10.01) or NIST (4.01/6.86/9.18) |
P03 |
Temperature Calibration |
±9°F (±5°C) |
0 |
Calibrate the temperature reading of the probe, with a calibration range of ±9°F (±5°C). |
P04 |
Auto Power Off |
5~20 min |
5min |
If there is no key operation, the device will automatically power off after the set time. |
P05 |
Auto HOLD |
OFF, 5~20 |
OFF |
After the reading stabilizes for the set time, the device will automatically lock and hold the reading. A short press of the "Calibrate" button can unlock it. |
P06 |
Measurement Mode Switch |
pH / ORP* |
1-pH |
Switch the probe type. |
P07 |
Restore Factory Settings |
ON / OFF |
OFF |
Select "ON" and confirm to clear the pH calibration parameters and restore the settings to factory defaults. |
NOTE: *ORP probe is currently not supported but will be available in future releases.
3. Calibration
A. Calibration Guide
| Calibration | NIST Series | USA Series | Indication | Recommended | ||
|---|---|---|---|---|---|---|
1-Point |
6.86 pH |
7.00 pH |
M |
Accuracy ≥ 0.1 pH |
||
2-Point |
Option 1 |
1st pt: 6.86 pH 2nd pt: 4.01 pH |
Option 1 |
1st pt: 7.00 pH 2nd pt: 4.00 pH |
LM |
Range < 7.00 pH |
Option 2 |
1st pt: 6.86 pH 2nd pt: 9.18 pH |
Option 2 |
1st pt: 7.00 pH 2nd pt: 10.01 pH |
MH |
Range >7.00 pH |
|
3-Point |
1st pt: 6.86 pH 2nd pt: 4.01 pH 3rd pt: 9.18 pH |
1st pt: 7.00 pH 2nd pt: 4.00 pH 3rd pt: 10.01 pH |
MH |
Range >7.00 pH |
||
B. Preparing Calibration Solution
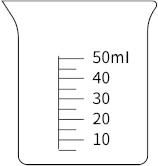
Step 1: Prepare a Container
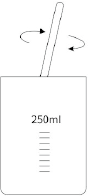
Choose a clean container with a minimum capacity of 250ml.
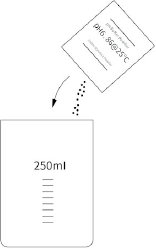
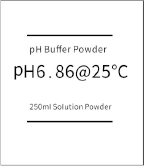
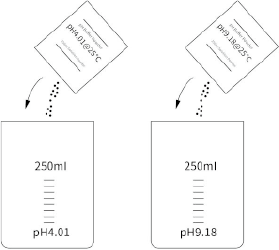
Step 2: Prepare pH 6.86 Calibration Solution
-
Pour all the pH 6.86 calibration powder into the prepared container.
-
Add 250ml of distilled water to the container, and stir thoroughly with a clean plastic or glass rod until the calibration powder is completely dissolved.
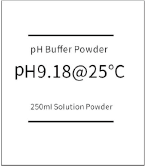
Step 3: Prepare pH 4.01 and pH 9.18 Calibration Solutions
Repeat Steps 1 and 2, using the corresponding pH 4.01 and pH 9.18 calibration powders.
Note :
-
You can use the included 50 ml measuring cup, filling it five times to reach a total of 250 ml of distilled water.
-
It is recommended to prepare the next calibration solution only after completing the current pH calibration.
-
Before preparing calibration solutions again, always clean the container and stirring tools with distilled water and dry them thoroughly to ensure no residue remains, as leftover traces may affect calibration results.
-
Do not use hard materials to wipe the pH probe’s glass electrode, as this can significantly impact its accuracy and lifespan. After cleaning, either shake the electrode dry or gently pat it with a soft, absorbent cloth.
C. Start Calibration
Step 1
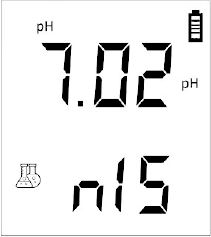
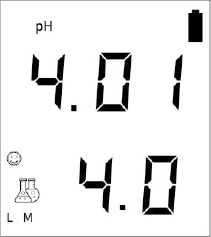
Short press the power button to turn on the pH probe, then long press the CAL button to enter calibration mode: The pH icon will flash, and "NIS" will appear at the bottom.
Step 2
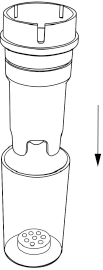
Rinse the probe with distilled water and shake off excess water. Pour the pH 6.86 calibration solution into a 50 ml measuring cup (about 1/3 full) or the pH probe protective cap (between the MAX-MIN marks).
Step 3
Place the pH probe into the pH 6.86 calibration solution, gently stir a few times, and then let it sit still.
Step 4
When the reagent bottle icon in the lower-left corner stays solid and the reading stabilizes, press the CAL button. A smiling face icon will appear, indicating the calibration for this point is complete. The M icon will stay solid, and the next point’s calibration will begin.
Step 5
Start the second point calibration by repeating Steps 1–4, using the pH 4.01 calibration solution. After calibration, the L icon will stay solid.
Step 6
Start the third point calibration by repeating Steps 1-4, using the pH 9.18 calibration solution. After calibration, the H icon will stay solid.
Note:
-
During calibration, do not turn off the pH probe after completing each calibration point. Otherwise, recalibration will be required.
-
The manual uses NIST standard calibration solutions. If you wish to use USA standard calibration solutions, you must first switch the calibration solution type in the settings.
-
After completing the three-point calibration, the pH probe will automatically return to the measurement screen. If only a two-point calibration is needed, press the "Power" button after completing the second calibration point to return to the measurement screen. In this case, only LM or MH will be displayed in the lower-right corner.
4. Measurement
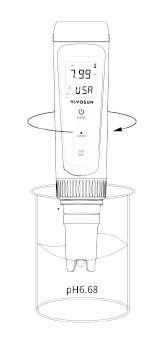
Step 1
Short press the power button to turn on the pH probe, rinse the probe with distilled water, and shake off excess water.
Step 2
Place the pH probe into the solution to be measured, gently stir a few times, then let it sit still. The reagent bottle icon will change from flashing to solid, indicating the reading is stable and the measurement is complete.
NOTE:
-
To make readings easier, you can enable the Auto HOLD feature in the settings or manually press the "Calibrate" button to activate HOLD. A short press of the "Calibrate" button will cancel the HOLD function.
-
When measuring pure water (such as drinking water, RO water, or distilled water), the pH reading may take longer to stabilize (approximately 1–5 minutes). To speed up the measurement without affecting accuracy, you may add a 3 M potassium chloride (KCl) solution to the pure water at a ratio of 1:1000 (1 ml KCl per 1000 ml of pure water).
-
Do not fully submerge the pH probe in the solution.
Maintenance
Probe Cleaning
(1) Daily Cleaning
Before and after each use, the pH probe must be thoroughly rinsed with distilled water or deionized water to ensure accurate readings.
(2) For Stubborn Stains
Use a specialized electrode cleaner or a mild detergent to soak the probe for 30 minutes. Afterward, gently scrub the probe with a soft brush and rinse thoroughly.
Probe Storage
After using the pH probe, always turn off the power and securely attach the probe protective cap to keep the probe moist. Periodically, add 3–5 drops of potassium chloride solution to the circular sponge inside the protective cap.
NOTE:
-
Never store the probe in pure water (e.g., distilled water, RO water, or purified water) as it may affect the probe’s lifespan.
-
If the probe has been stored dry for a long time, soak it in potassium chloride solution for at least 24 hours before recalibrating it.
Probe Replacement
The probe is a consumable item, with a typical lifespan of 1 year, depending on usage frequency and maintenance. It is recommended to replace the probe regularly to ensure optimal performance. Follow these steps for replacement:
Step 1
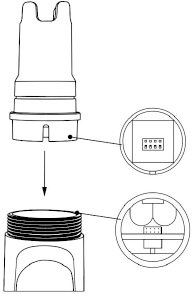
Remove the probe protective cap, unscrew the nut, and then gently pull the old probe out.

Step 2
Insert the new probe, ensuring proper alignment with the pins, then screw the probe in tightly.
Step 3
Soak the new probe in potassium chloride solution for at least 5 minutes, then calibrate it before use.
NOTE:
-
Only replace with Vivosun designated probes, as they are not compatible with other brands.
-
Ensure the nut is tightly screwed to prevent leakage.
Troubleshooting
| Issue | Reason | Correction |
|---|---|---|
The reading is unstable and changes slowly. |
Contaminated probe |
Clean the probe bulb. |
Clogged junction |
Clean the probe bulb, then soak it in KCl solution for at least 24 hours. |
|
Aged probe |
Replace the probe |
|
Testing pure water like tap/drinking/RO/distilled water |
Be patient, wait for 1–5 minutes to reach a fully stabilized reading. If still not stabilizing, add 3M KCl solution to test water at 1:1000 ratio. |
|
Can not calibrate. |
Buffers are inaccurate |
Replace buffers. |
Contaminated probe |
Clean the probe bulb. |
|
Air bubbles around the sensor shield |
Make a quick stir in the solution to remove air bubbles. |
|
Aged probe |
Replace the probe |
|
Dried-out probe |
Soak the probe in the 3M KCl soaking solution for at least 15 minutes. |
| Trouble | Reason | Correction |
|---|---|---|
The reading keeps jumping. |
Probe is not fully submerged in the solution |
Make sure the probe is immersed into solution at least 1 inch. |
Air bubbles around the sensor shield |
Make a quick stir in the solution to remove air bubbles. |
|
The reading always remains the same regardless of the solution. |
Broken probe |
Replace the probe |
The reading is still inaccurate even after successful calibration. |
Aged probe |
Replace the probe |
Comparison with other testers, test strips, or drop tests |
To compare with other pH meters, make sure to calibrate all testers in the same solution. Test strips or drop tests' accuracy is not comparable to pH meters. |
|
Error Code |
ER1: Unable to recognize the buffer solution. |
|
ER2: Measurement is unstable. |
1. Make a quick stir in the solution to remove air bubbles. 2. Wait for the reading to stabilize before confirming. |
|
ER3: Calibration not properly written. |
||
ER4: Zero potential out of range (±60mV). |
1. Check if the calibration solution is correct and recalibrate the probe. 2. Replace the probe. |
|
ER5: Probe slope below 85%. |
More Information
Visit our website to learn more about the AeroLab P30 pH meter.
If you have any issues or questions, you can also contact us at https://vivosun.com/help/contact-us
Warranty
VIVOSUN offers a 2-year limited warranty on this product purchased directly from us or our authorized dealers, beginning on the original date of purchase.
This warranty is provided in addition to, and does not affect, your statutory rights under applicable consumer protection laws in the country where the product was purchased.
For the full Warranty Policy, please visit: https://www.vivosun.com/help/warranty-policy.
Alternatively, you may contact customer service at support@vivosun.com / +1 888-505-8486.
Contents

We help you grow your best green.

We provide the highest quality.

We relentlessly pursue the future.

We make growing more enjoyable.

We support every grower.
Sign up and get 10% off your first order
©2026 Vivosun All Rights Reserved