
English
Pro Grow Tent User Manual
MODEL NAME
-
VST-GTP224
-
VST-GTP236
-
VST-GTP336
-
VST-GTP346
-
VST-GTP426
-
VST-GTP448
-
VST-GTP558
-
VST-GTP848
-
VST-GTP105
KEY FEATURES
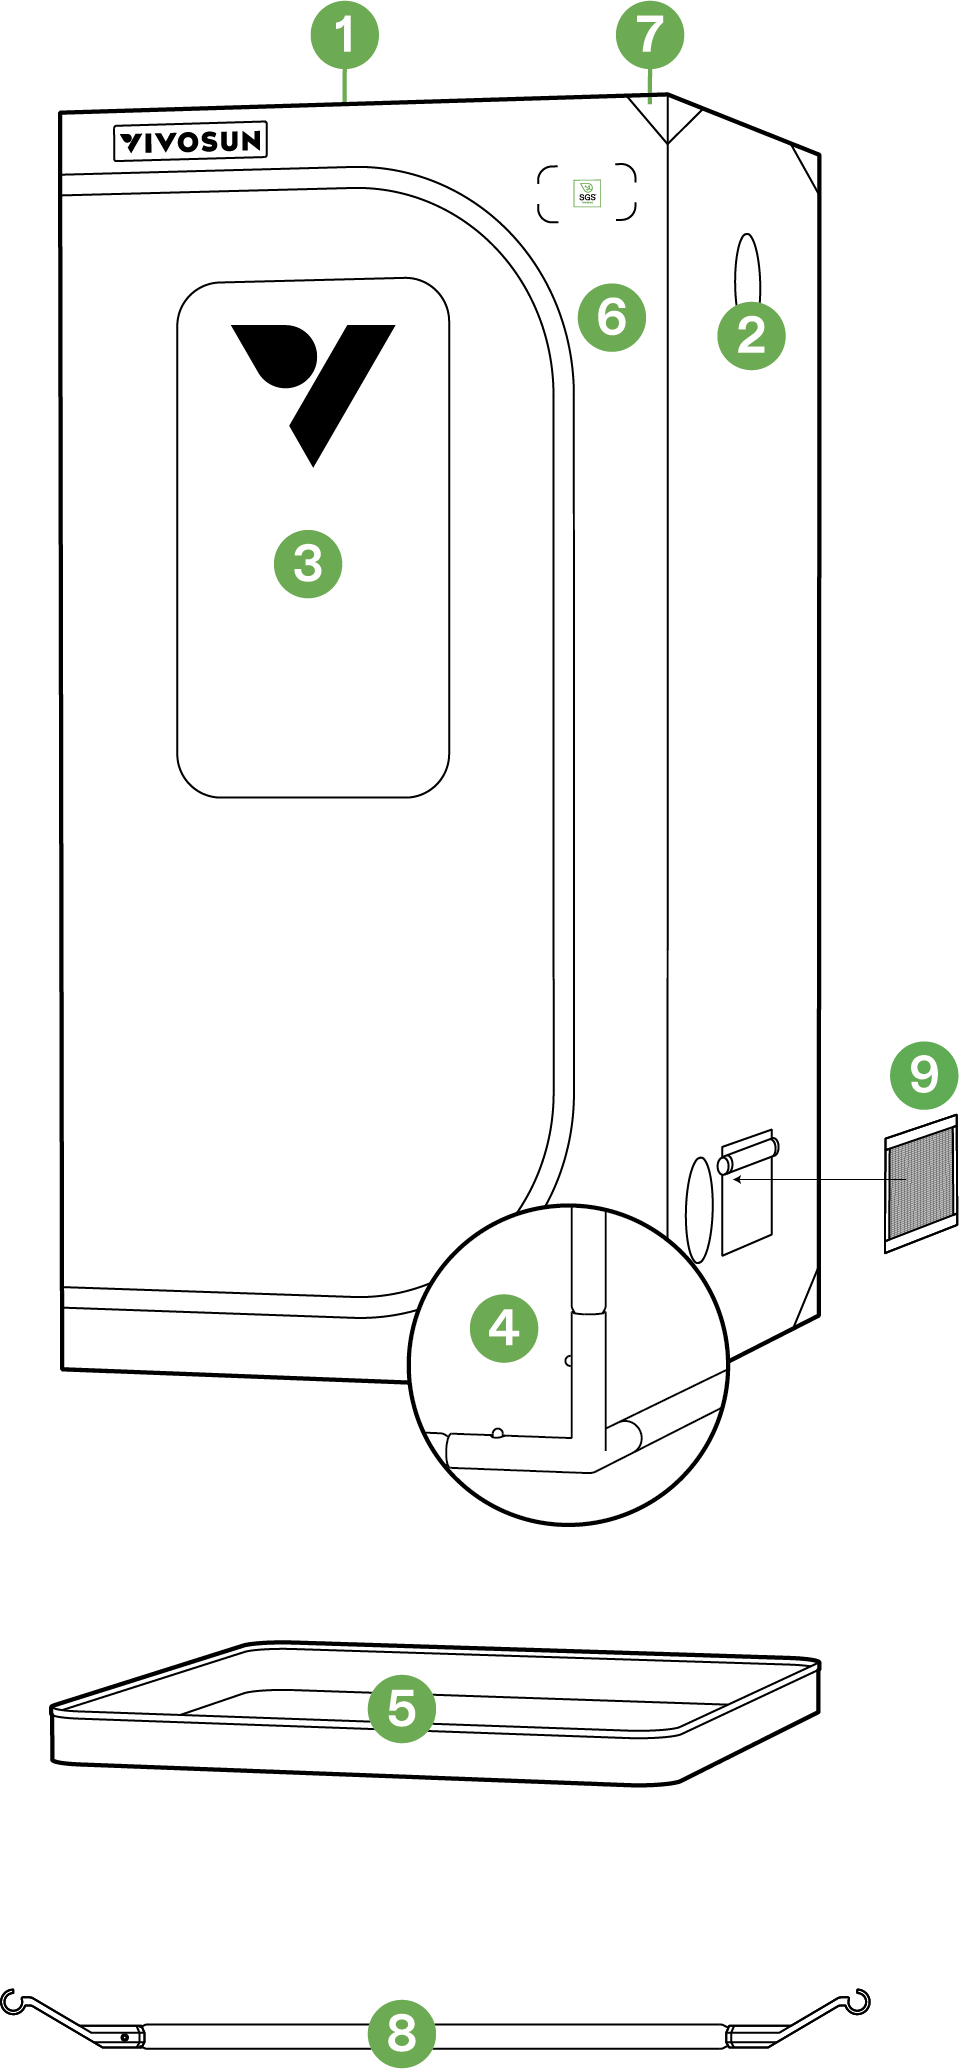
1. Light-Blocking & Highly Reflective Tent Coat : Professional tent coat design with 1200D Oxford Nylon exterior and highly reflective Mylar interior.
2. Ducting Opening : Multiple ducting openings with an adjustable size suitable for different sizes of ductings with no light leakage.
3. Viewing Window : A large window with optional flap cover offers a clear view of the interior of the tent.
4. Heavy-Duty Frame : Thick metal poles and connectors provide for a sturdy structure. Note : All devices must be distributed evenly on the ceilling bars.
5. Waterproof Floor Tray : The tray can hold water, soil and other debris, preventing leakage.
6. Unique Wire Opening : Double-covered wire opening for more convenient connection to the external controller.
7. Triangular Plate : Triangle stiffener increases tentstrength (Not available in VST-P224/VST-P276 dimensions).
8. Support Pole : Additional support rods for increased stability (Not available in VST-P224/VST-P276 dimensions).
9. Air Vent: The vent screen is removable for easy cleaning.
PRODUCT CONTENTS
-
VST-GTP224/P236
|
Tent Coat |
|
1 pcs |
|
Floor Tray |
|
1 pcs |
|
Filter Straps |
|
2 pcs |
|
Corner Supports |
|
8 pcs |
|
Air vent |
|
2 pcs |









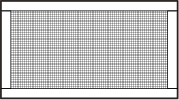
Frame Poles & Ceiling Bars
|
|
8 pcs |
22mm |
|
|
4 pcs |
22mm |
|
|
4 pcs |
22mm |
|
|
1 pc |
22mm |
|
|
2 pc |
22mm |










-
VST-GTP426
|
Tent Coat |
|
1 pcs |
|
Floor Tray |
|
1 pcs |
|
Filter Straps |
|
2 pcs |
|
Corner Supports |
|
8 pcs |
|
Air vent |
|
2 pcs |
Frame Poles & Ceiling Bars
|
|
4 pcs |
22mm |
|
|
4 pcs |
22mm |
|
|
4 pcs |
22mm |
|
|
4 pcs |
22mm |
|
|
1 pc |
22mm |
|
|
2 pc |
22mm |
|
|
2 pc |
19mm |
|
|
2 pc |
19mm |










-
VST-GTP336/346/448/558
|
Tent Coat |
|
1 pcs |
|
Floor Tray |
|
1 pcs |
|
Filter Straps |
|
2 pcs |
|
Corner Supports |
|
8 pcs |
|
Air vent |
|
2 pcs |
Frame Poles & Ceiling Bars
|
|
8 pcs |
22mm |
|
|
4 pcs |
22mm |
|
|
4 pcs |
22mm |
|
|
2 pc |
22mm |
|
|
2 pc |
22mm |
|
|
4 pc |
19mm |






-
VST-GTP848/105
|
Tent Coat |
|
1 pcs |
|
Floor Tray |
|
1 pcs |
|
Filter Straps |
|
4 pcs |
|
Corner Supports |
|
8 pcs |
|
Corner Supports |
|
2 pcs |
|
Corner Supports |
|
2 pcs |
|
Air vent |
|
4 pcs |



Frame Poles & Ceiling Bars
|
|
13 pcs |
22mm |
|
|
6 pcs |
22mm |
|
|
6 pcs |
22mm |
|
|
4 pc |
22mm |
|
|
4 pc |
22mm |
|
|
7 pc |
19mm |






SPECIFICATIONS
| Dimensions | Ducting Opening | Air Vents | Floor Tray | |
|---|---|---|---|---|
VST-GTP224 |
24"x24"x48" |
2x4" |
2 |
24"x24" |
VST-GTP236 |
28"x28"x63" |
2x4" |
2 |
28"x28" |
VST-GTP336 |
36"x36"x72" |
2x4" |
2 |
36"x36" |
VST-GTP346 |
39"x39"x72" |
2x4" |
2 |
39"x39" |
VST-GTP426 |
48"x24"x72" |
2x4" |
2 |
48"x24" |
VST-GTP448 |
48"x48"x80" |
2x4" |
2 |
48"x48" |
VST-GTP558 |
60"x60"x80" |
2x4" |
2 |
60"x60" |
VST-GTP848 |
96"x48"x80" |
2x4" |
4 |
96"x48" |
VST-GTP105 |
120"x60"x80" |
2x4" |
4 |
120"x60" |
Installation
VST-GTP224/236/336/346/448/558
STEP 1
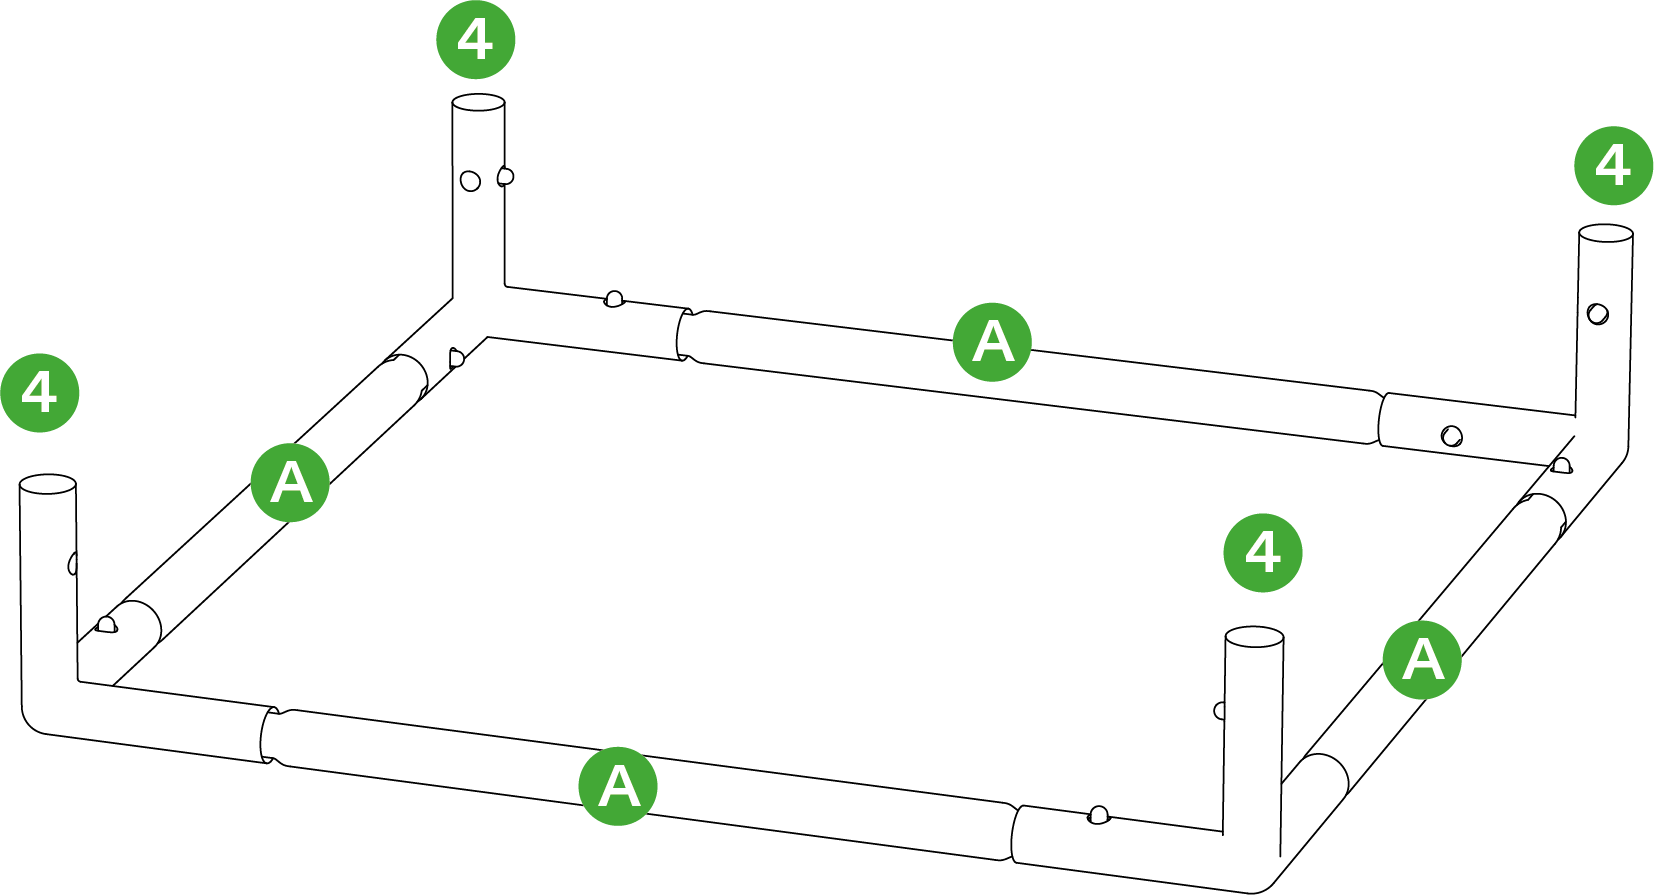
Connect four (A) Poles to four Corner Supports (4) to form the base frame of the tent.
STEP 2
Connect four (B) Poles to the Corner Supports (4) of the tent base.
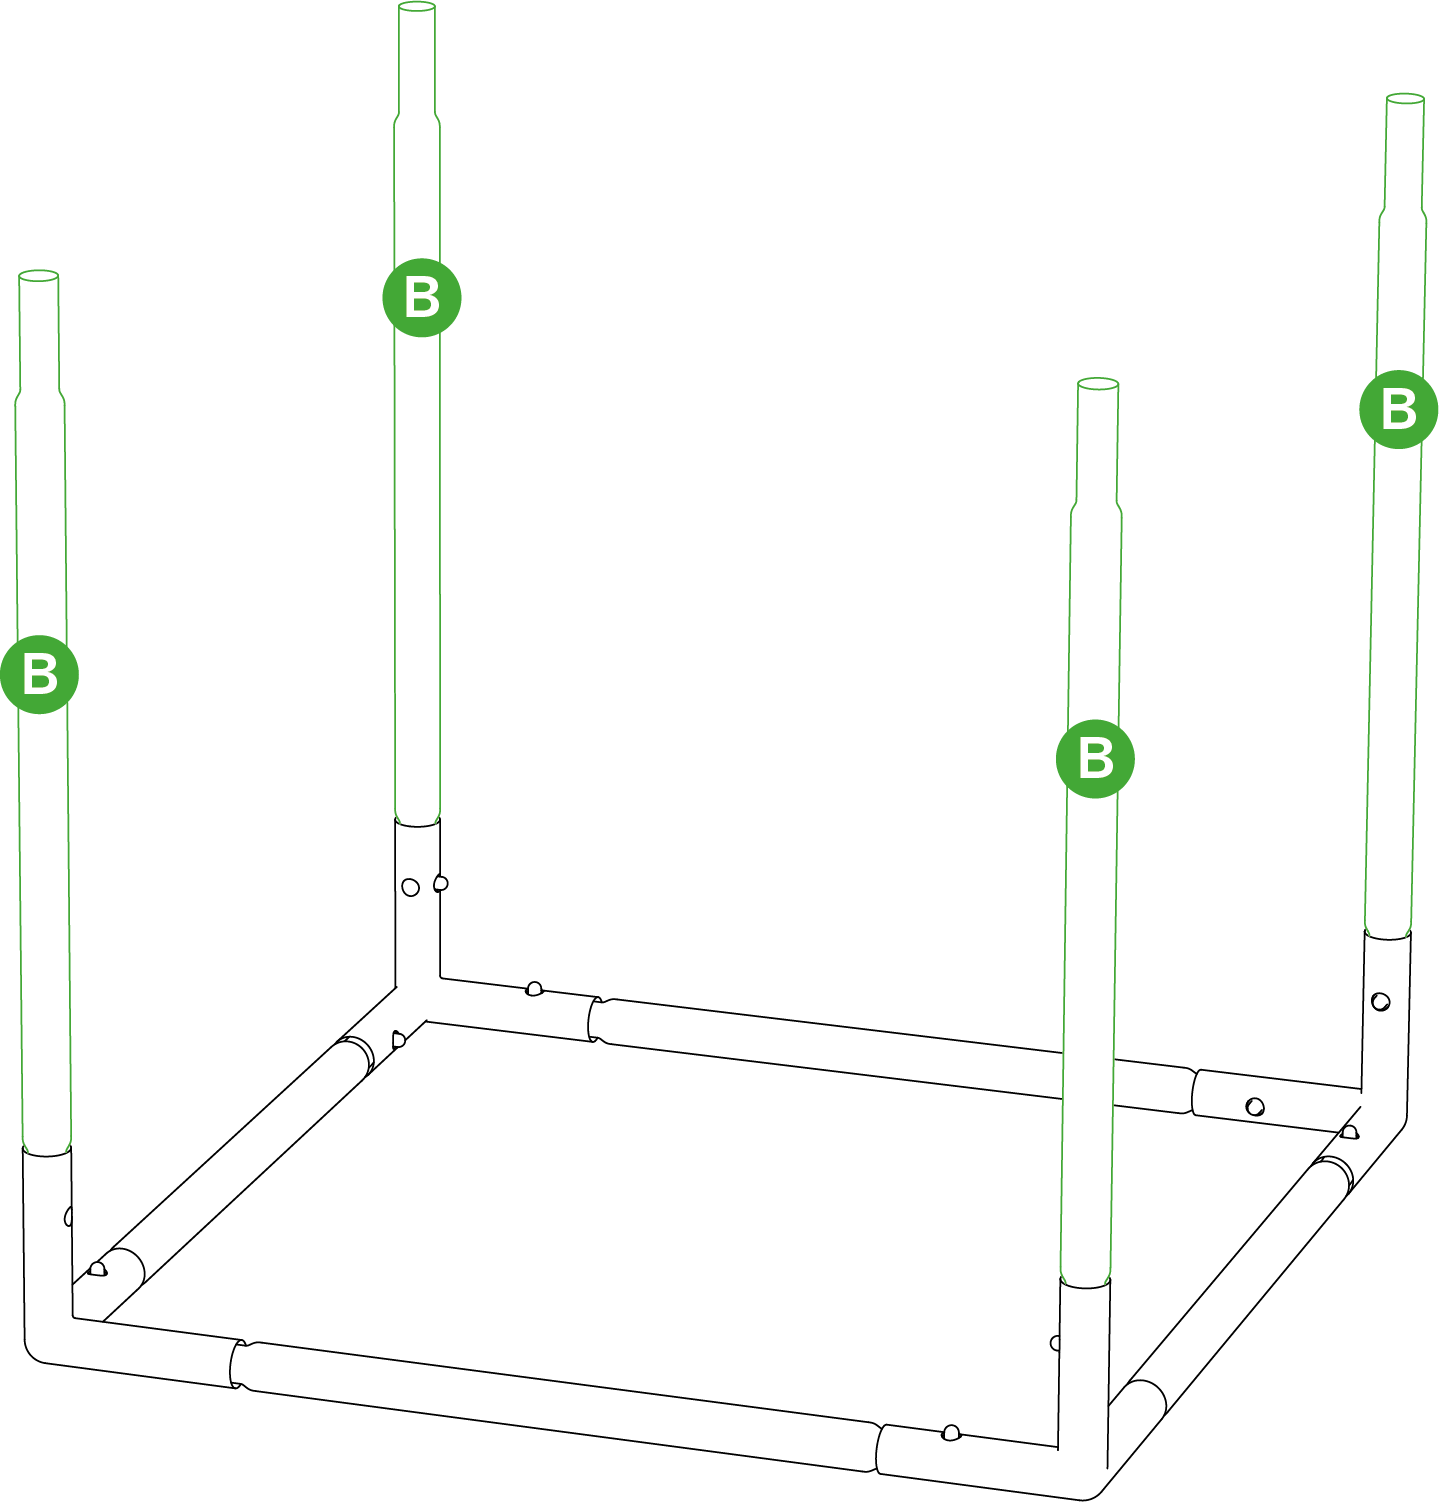
STEP 3
Connect four (C) Poles to the (B) Poles.
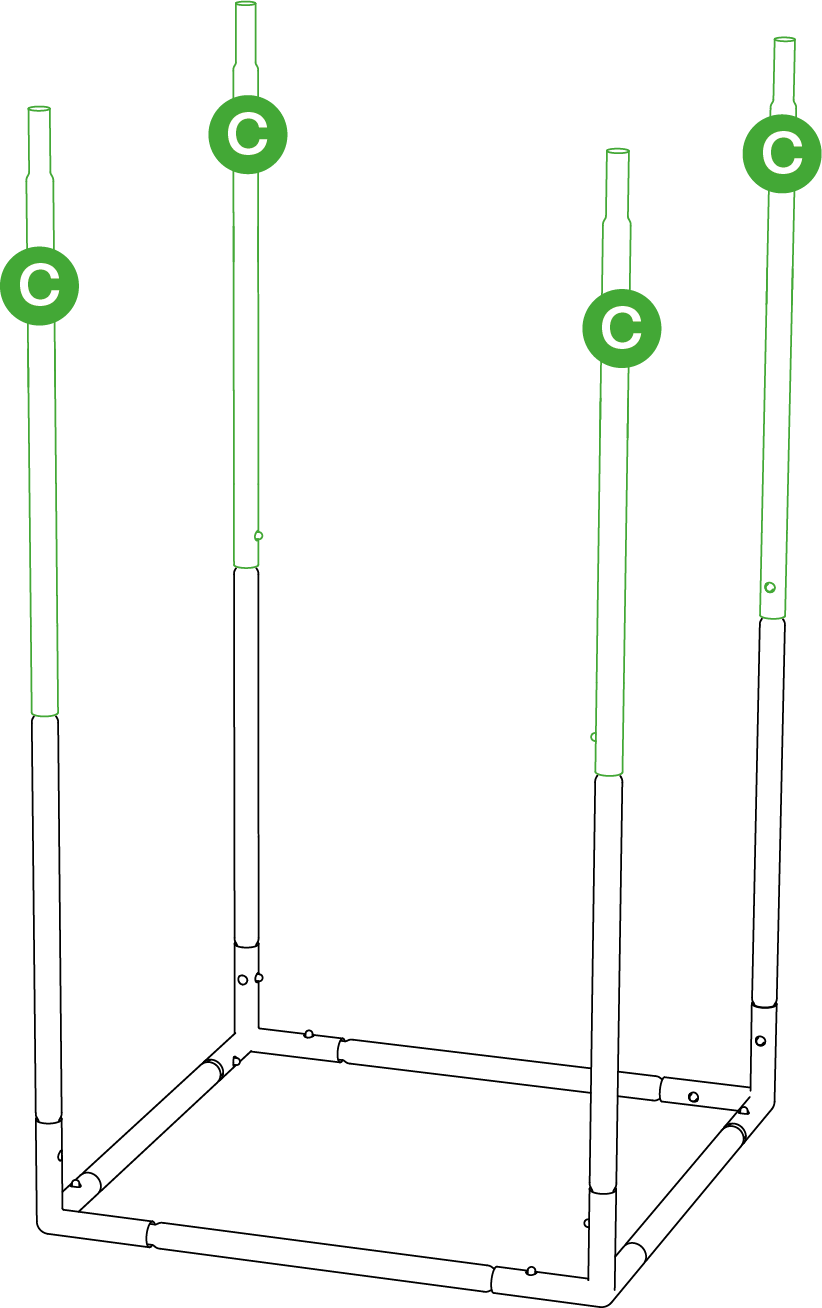
STEP 4
Mount the other four Corner Supports (4) to the (C) Poles as shown.
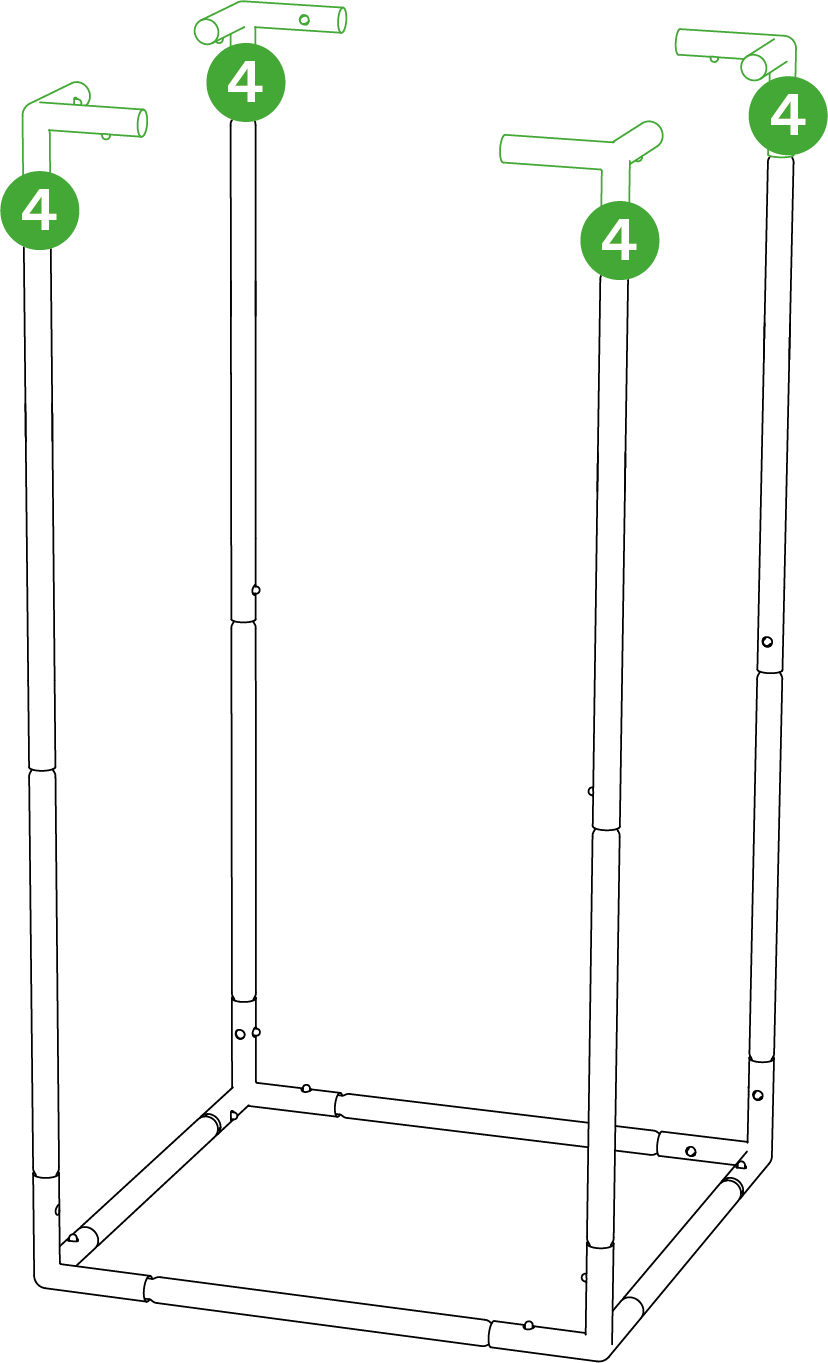
STEP 5
Connect the other four (A) Poles to the Corner Supports (4) to form the top frame of the tent.
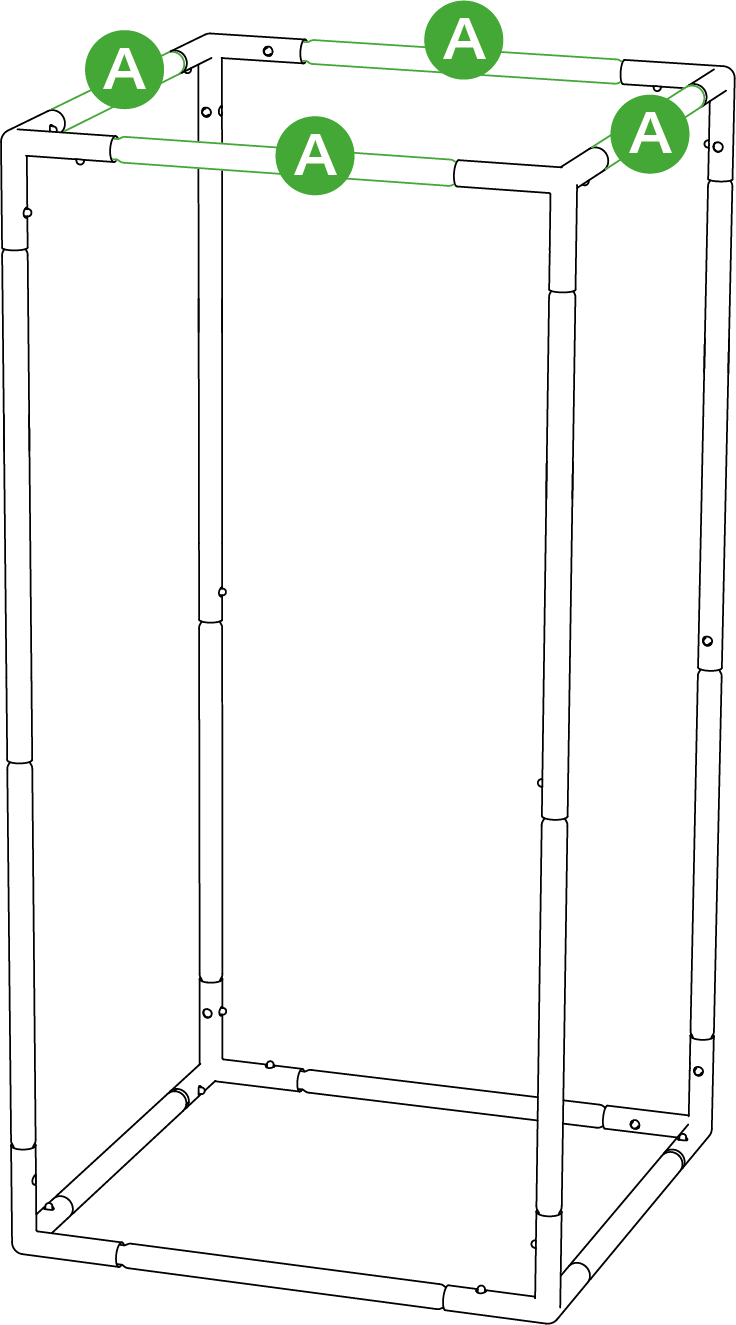
STEP 6
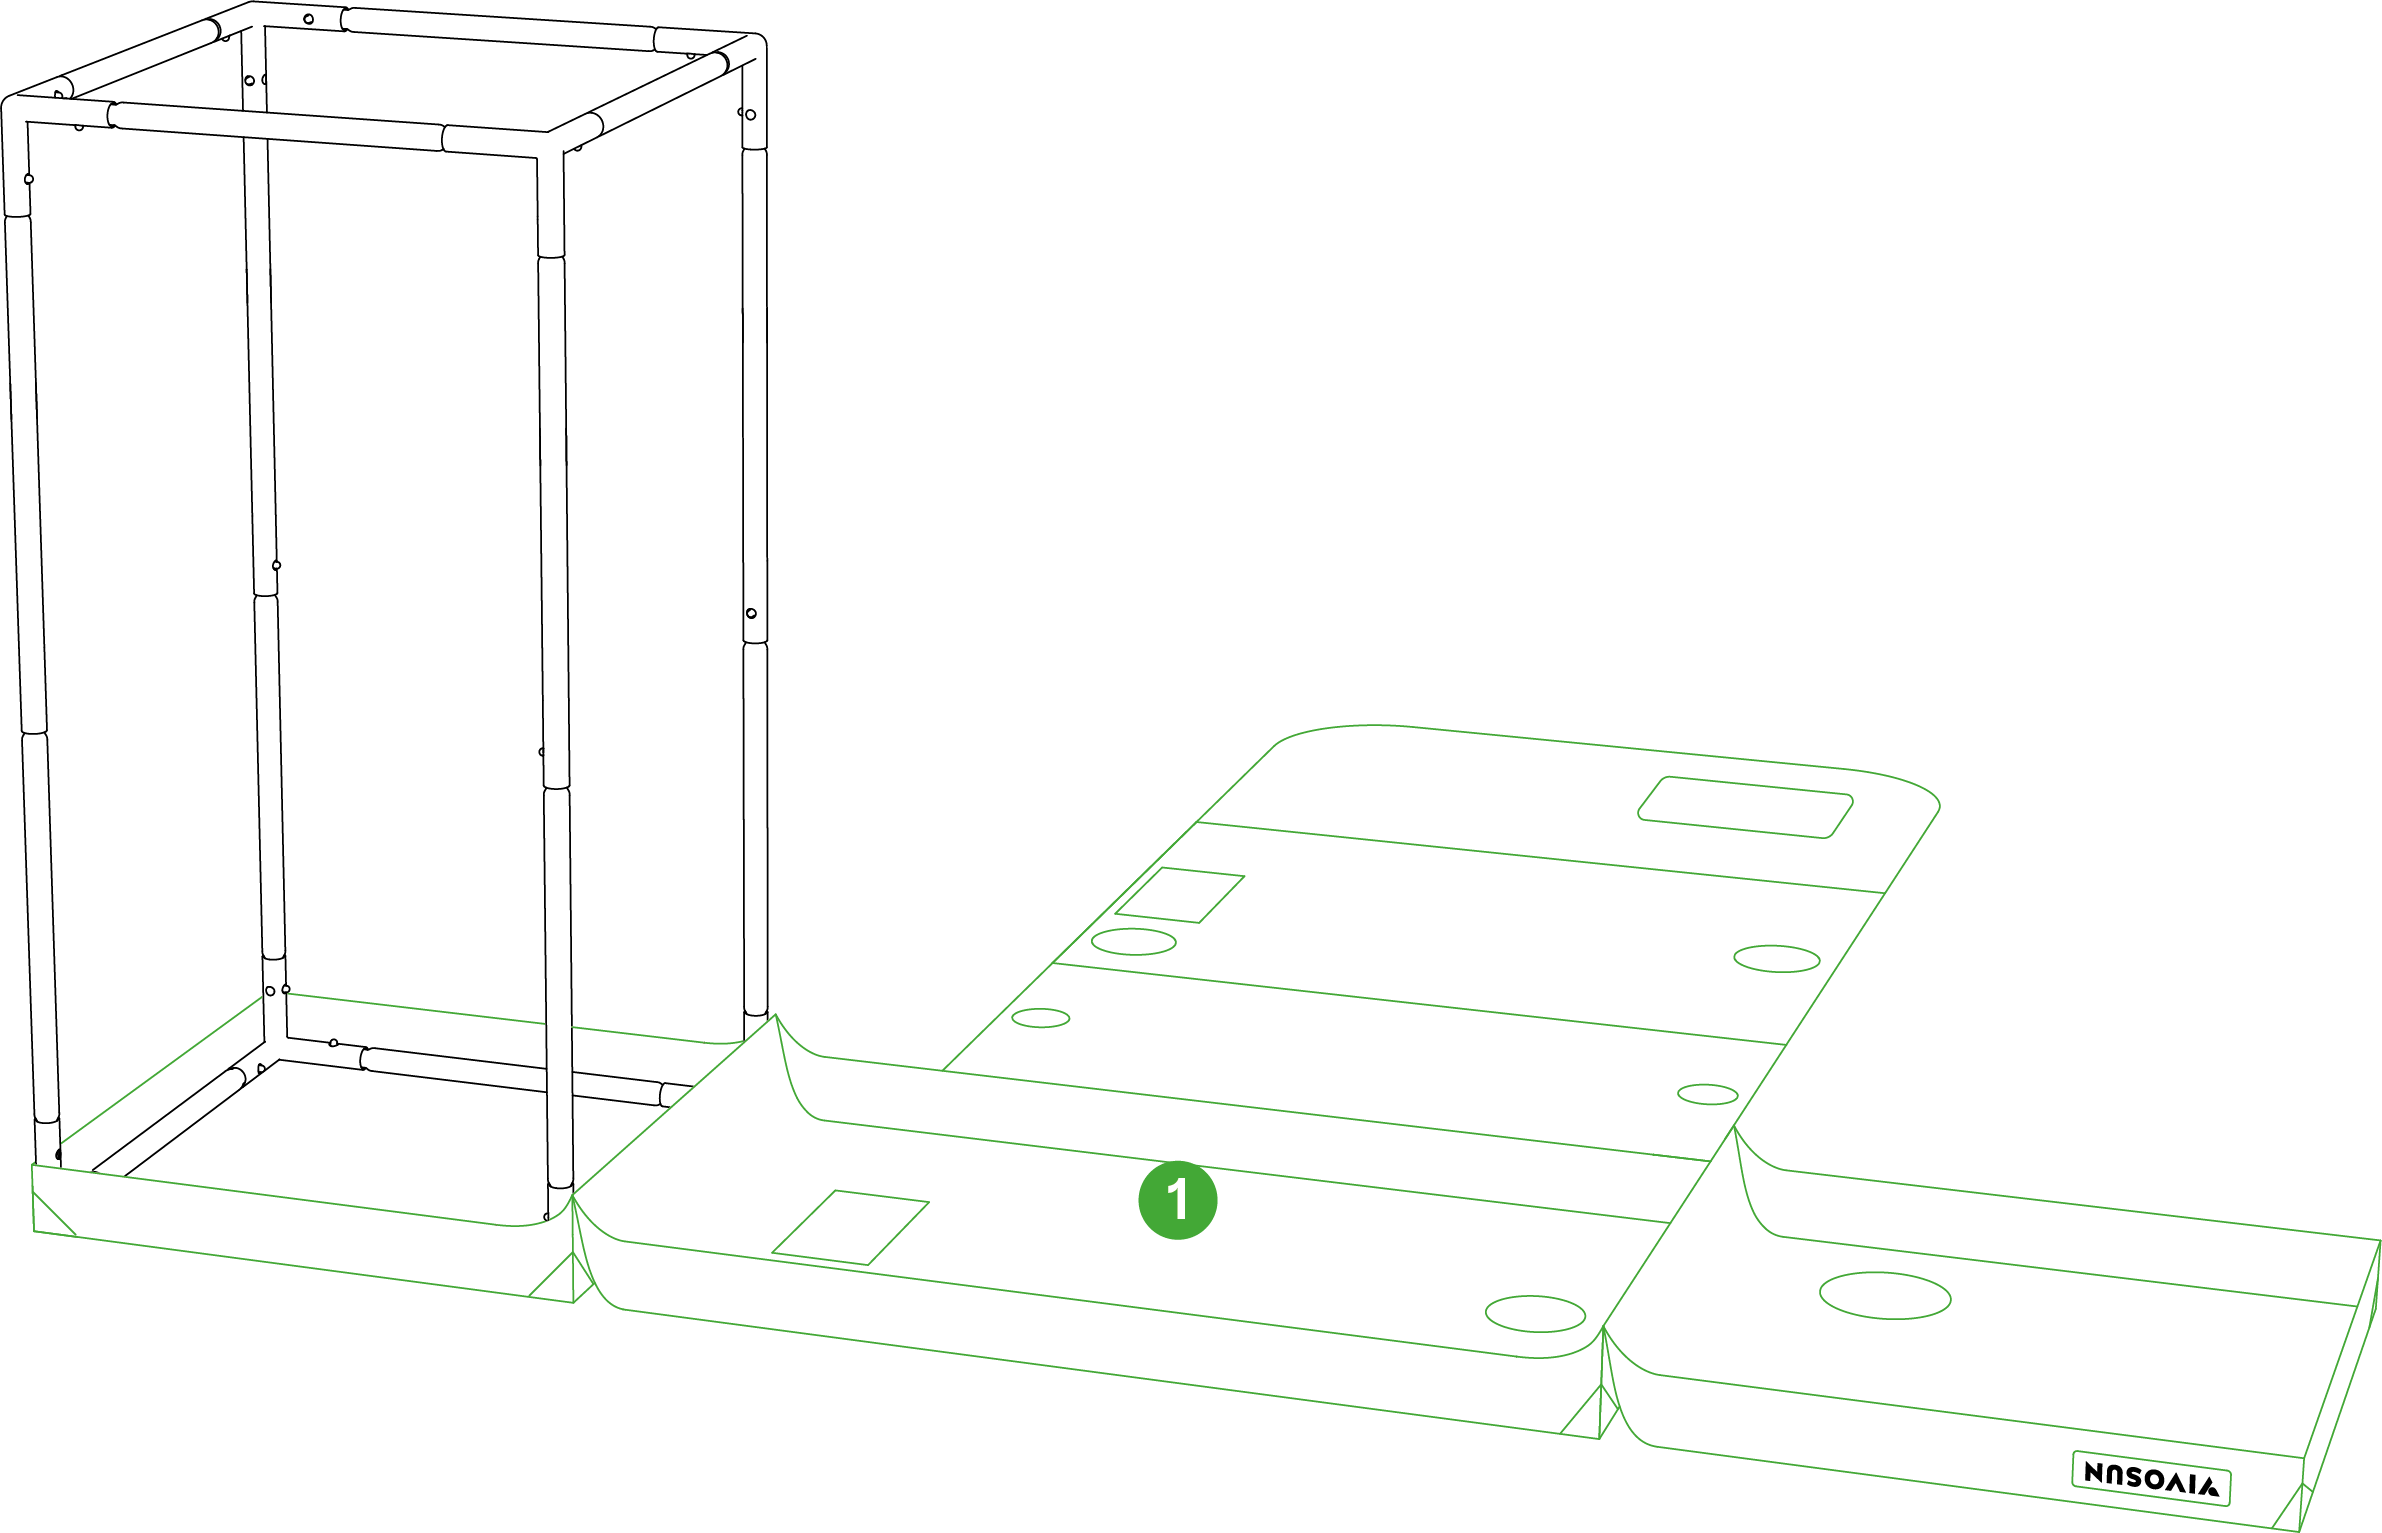
Unzip and unfold the Tent Coat. (1) and place the frame base in the bottom section of the Tent Coat.
STEP 7
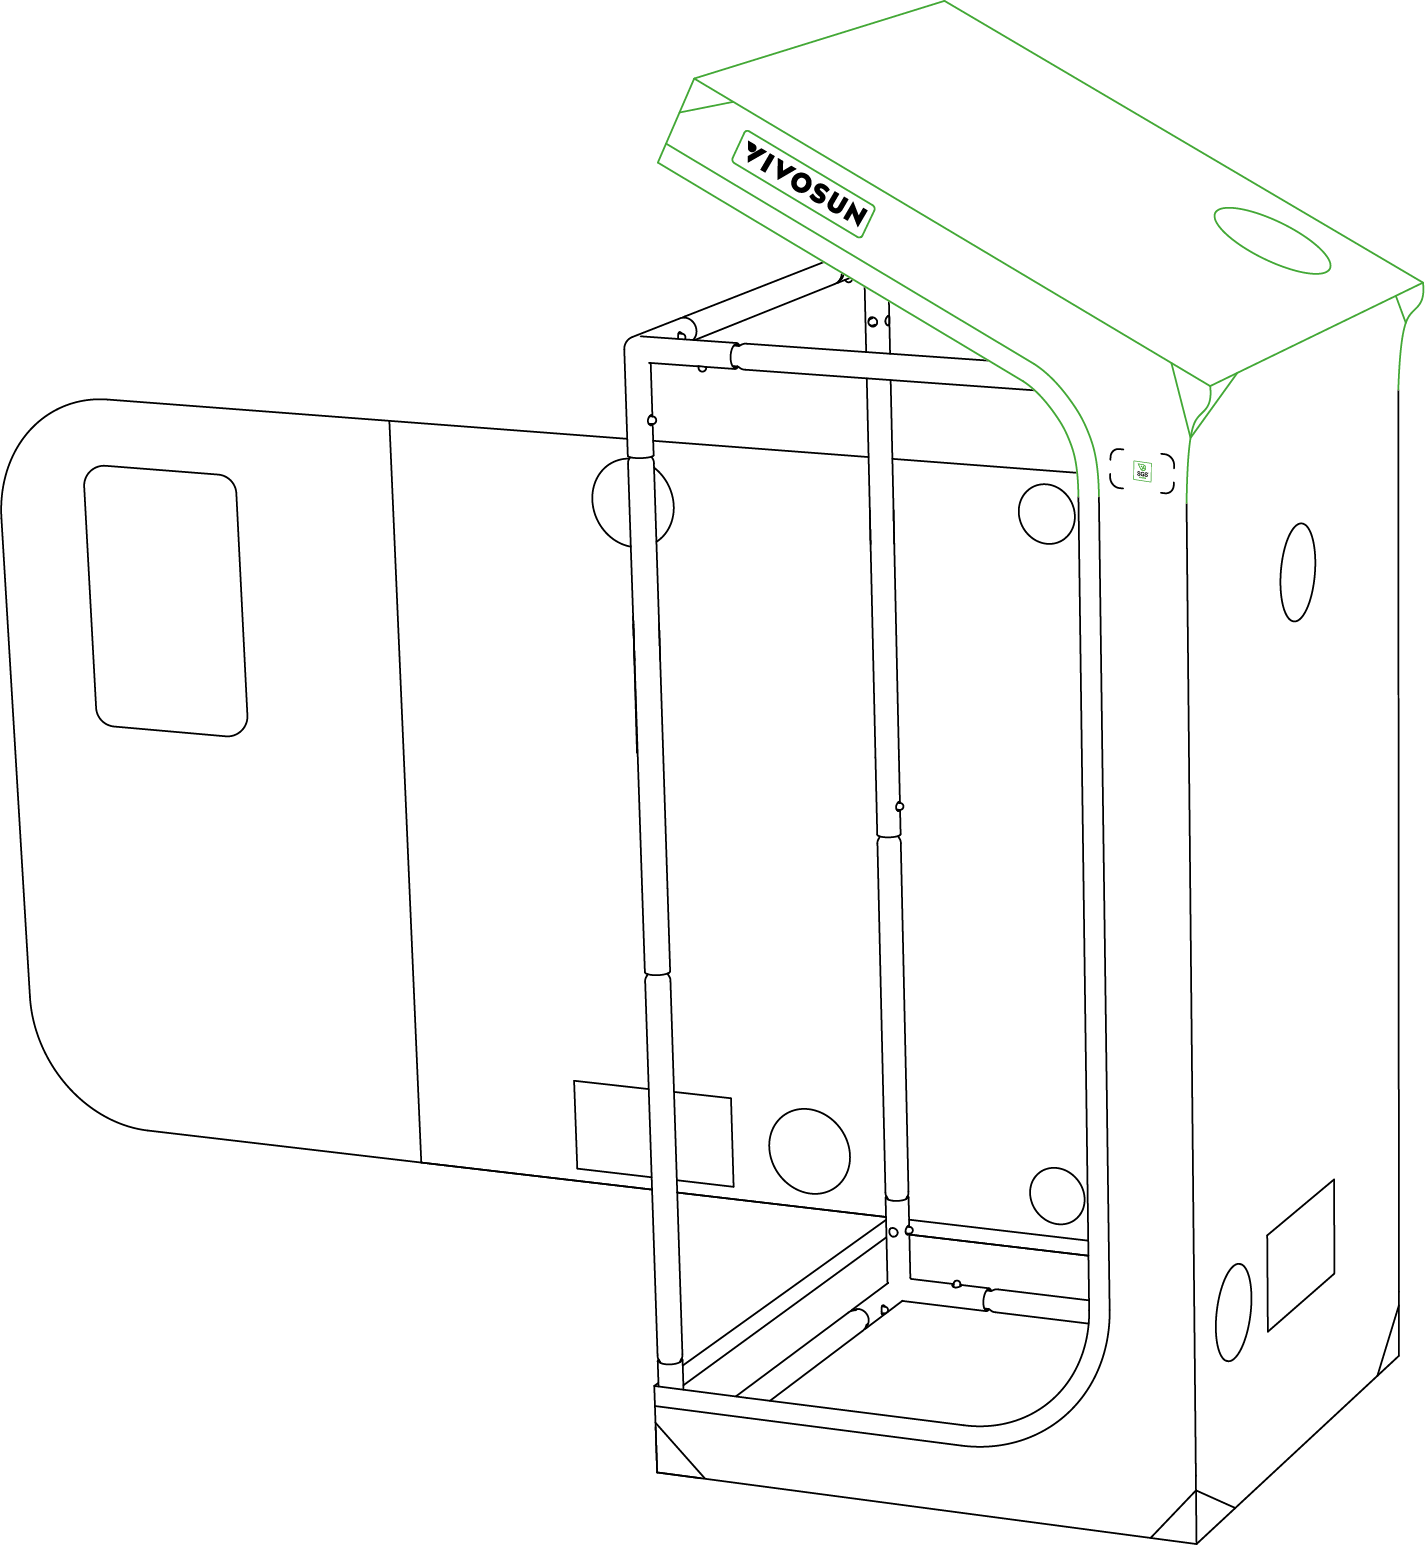
Pull up the tent roof and cover the top of the frame.
STEP 8
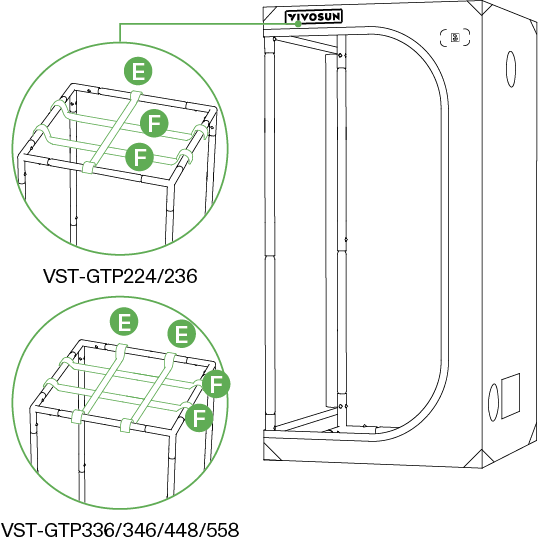
Place the Ceiling Bars (E, F) on the top frame for hanging devices like lights and ventilation. For the VST-GTP336/346/448/558, use two (F) Ceiling Bars and two (E) Ceiling Bars.
STEP 9
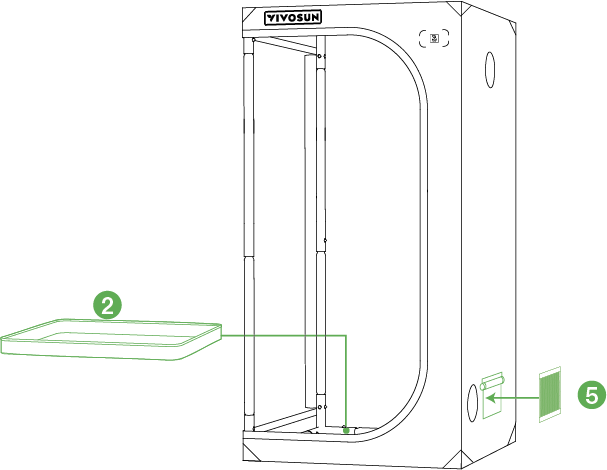
Place the Floor Tray (2) into the tent.
STEP 10
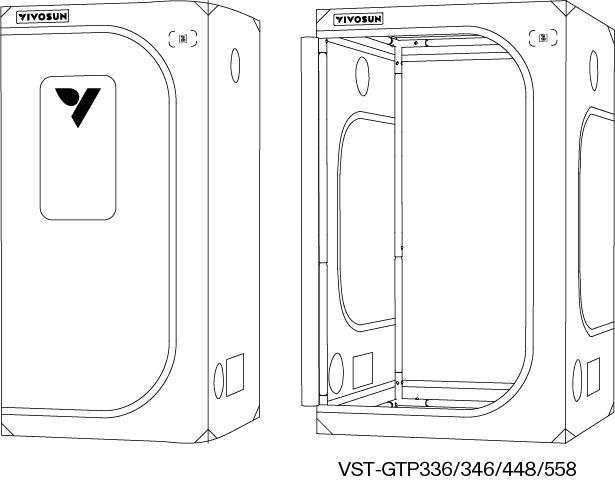
Pull the zippers to close the tent walls and door. Make sure the tent coat fits the frame at the corners. The VST-GTP336/346/448/558 has additional side doors.
STEP 11
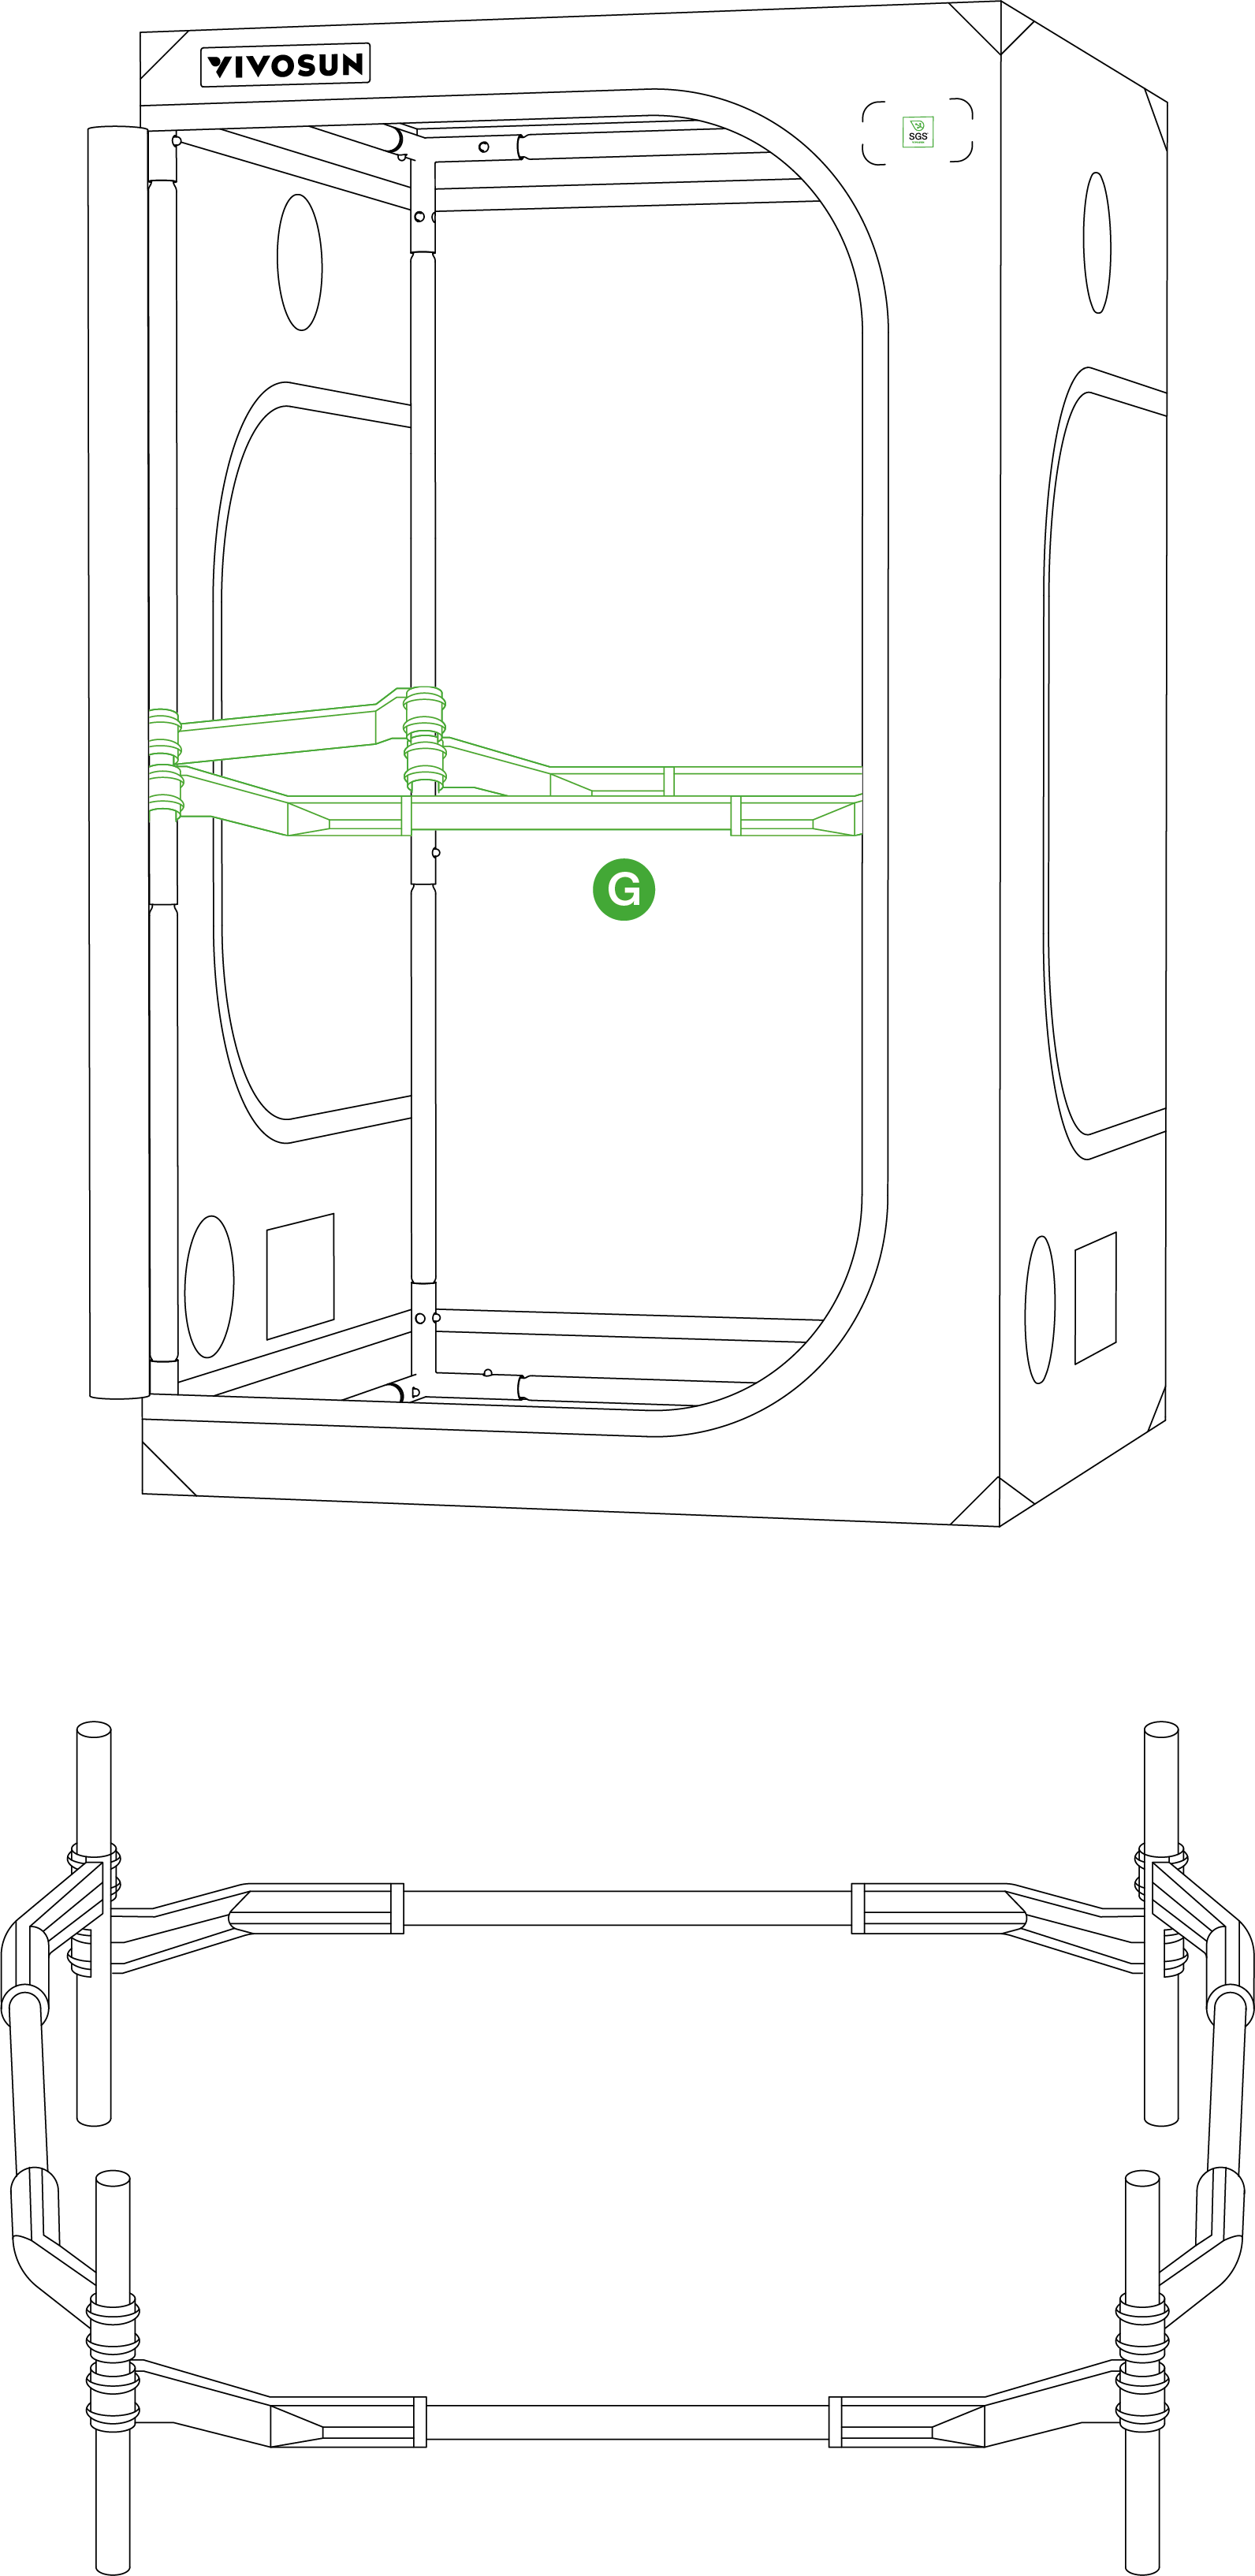
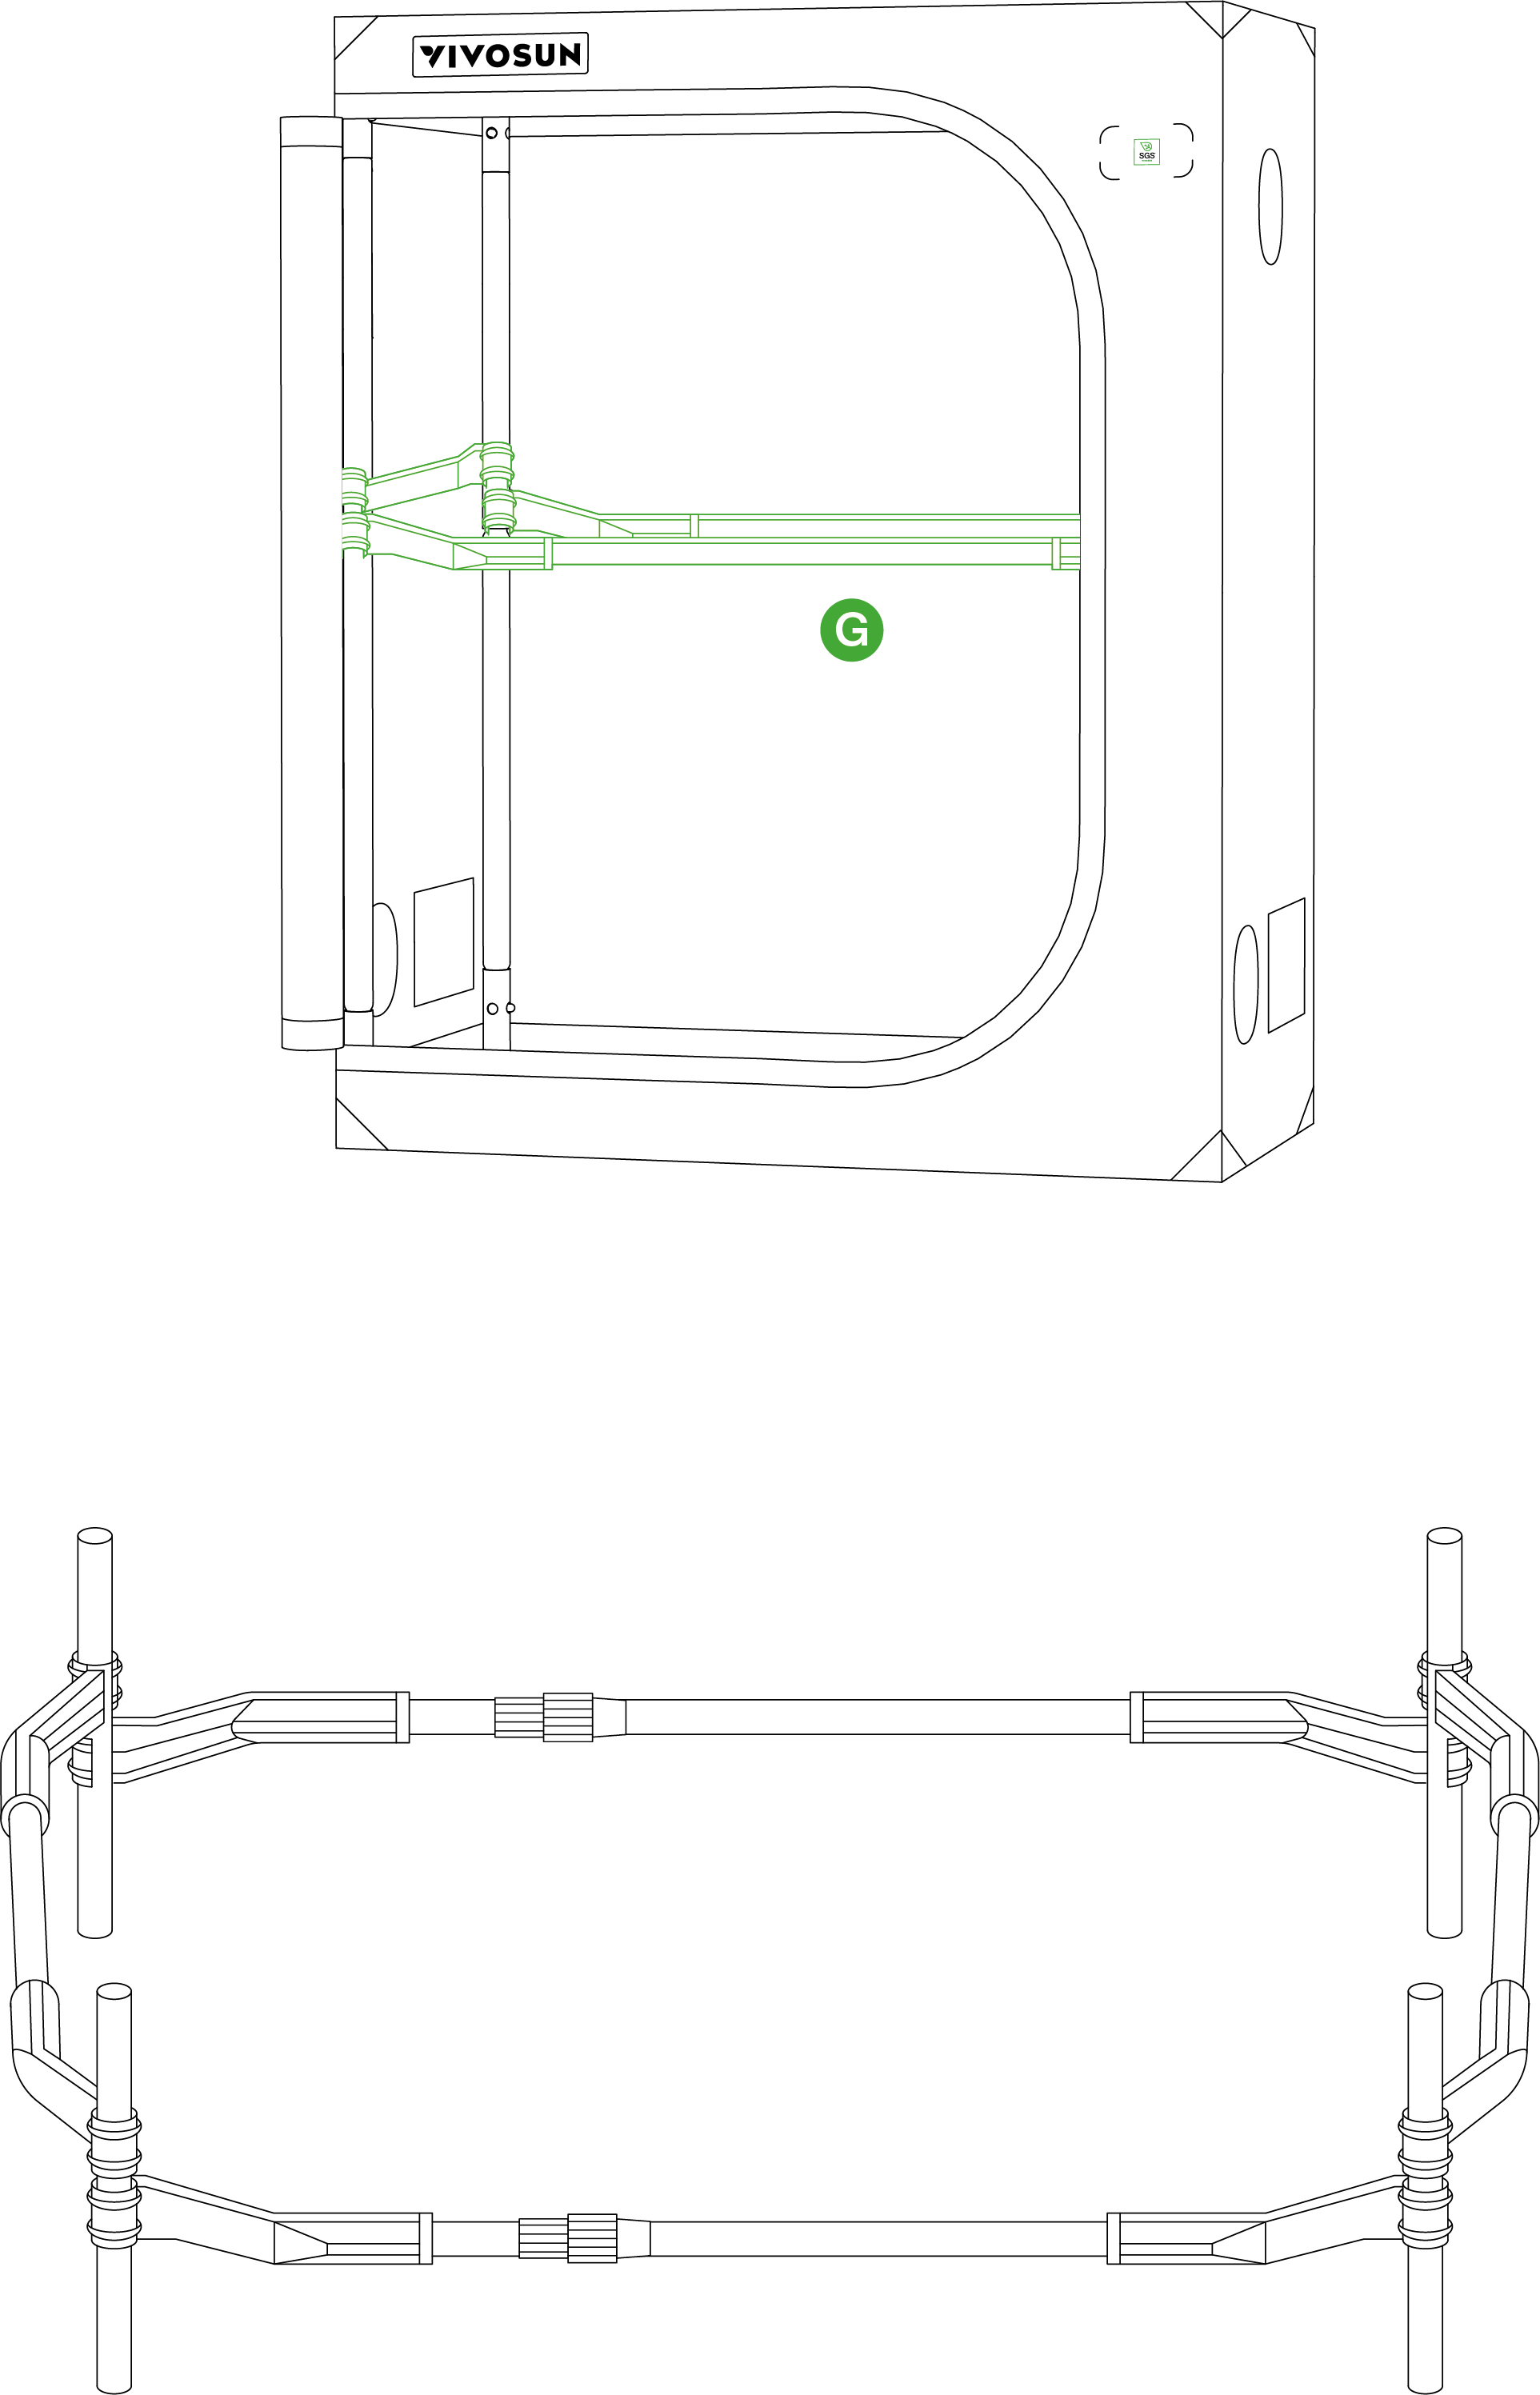
Install horizontal Support Rods (G) in accordance with your specific needs.
Note: Product VST-GTP224/236 does not include these Support Rods (G) .
VST-GTP426
STEP 1
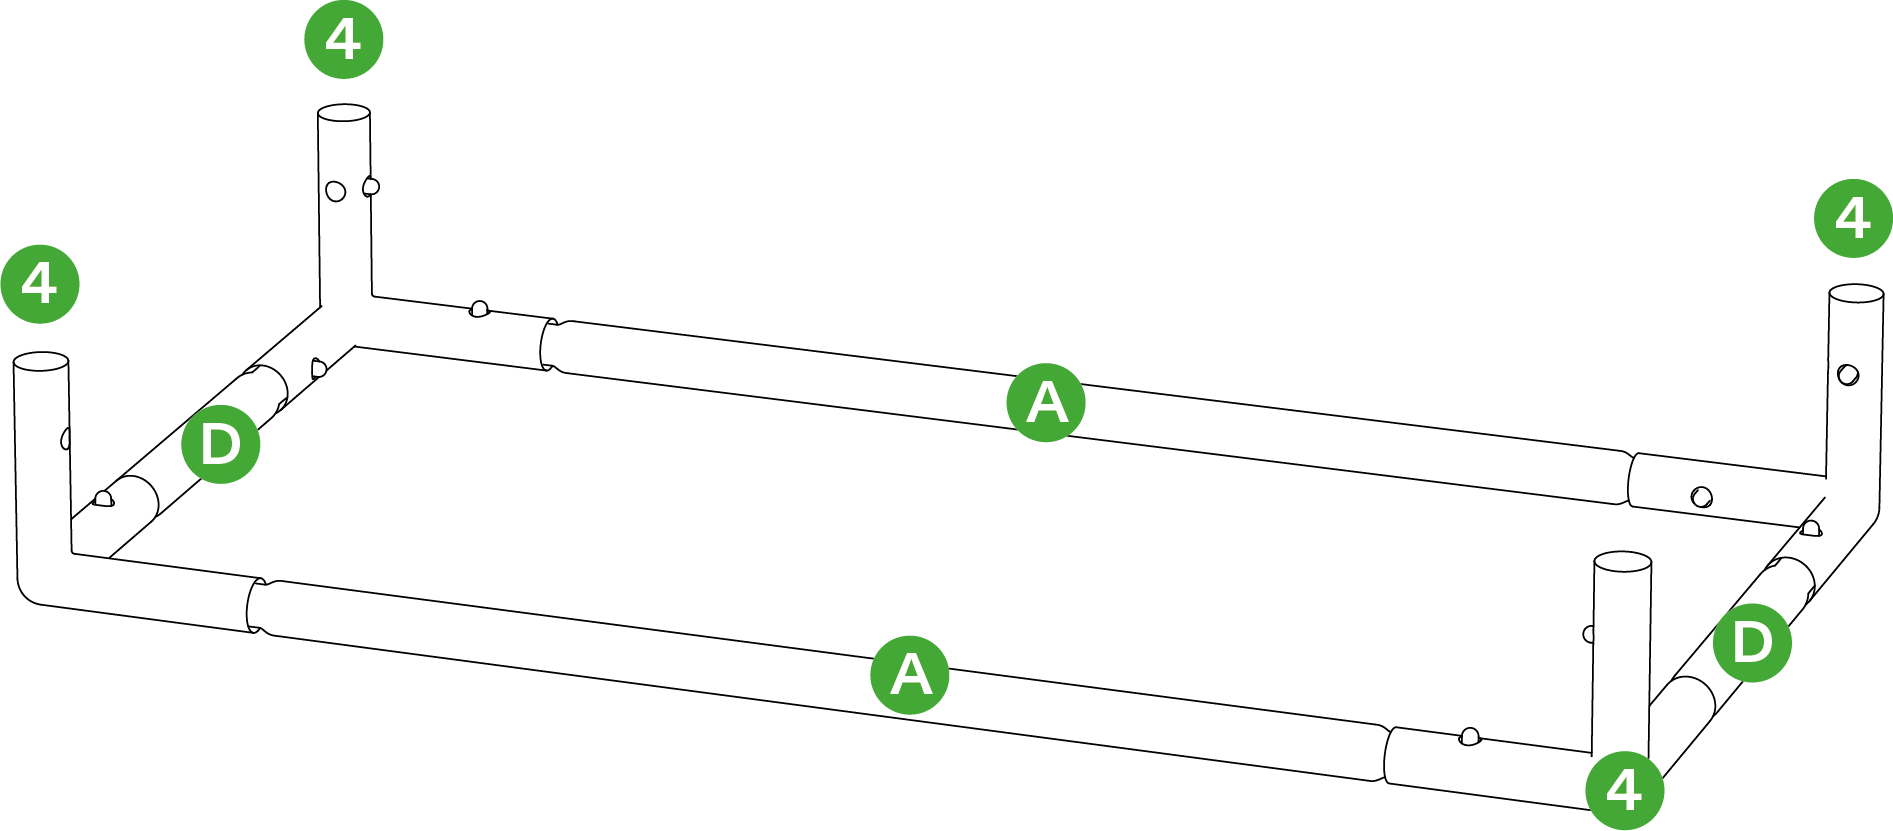
Connect two (A) Poles and two (D) Poles to four Corner Supports (4) to form the base frame of the tent.
STEP 2
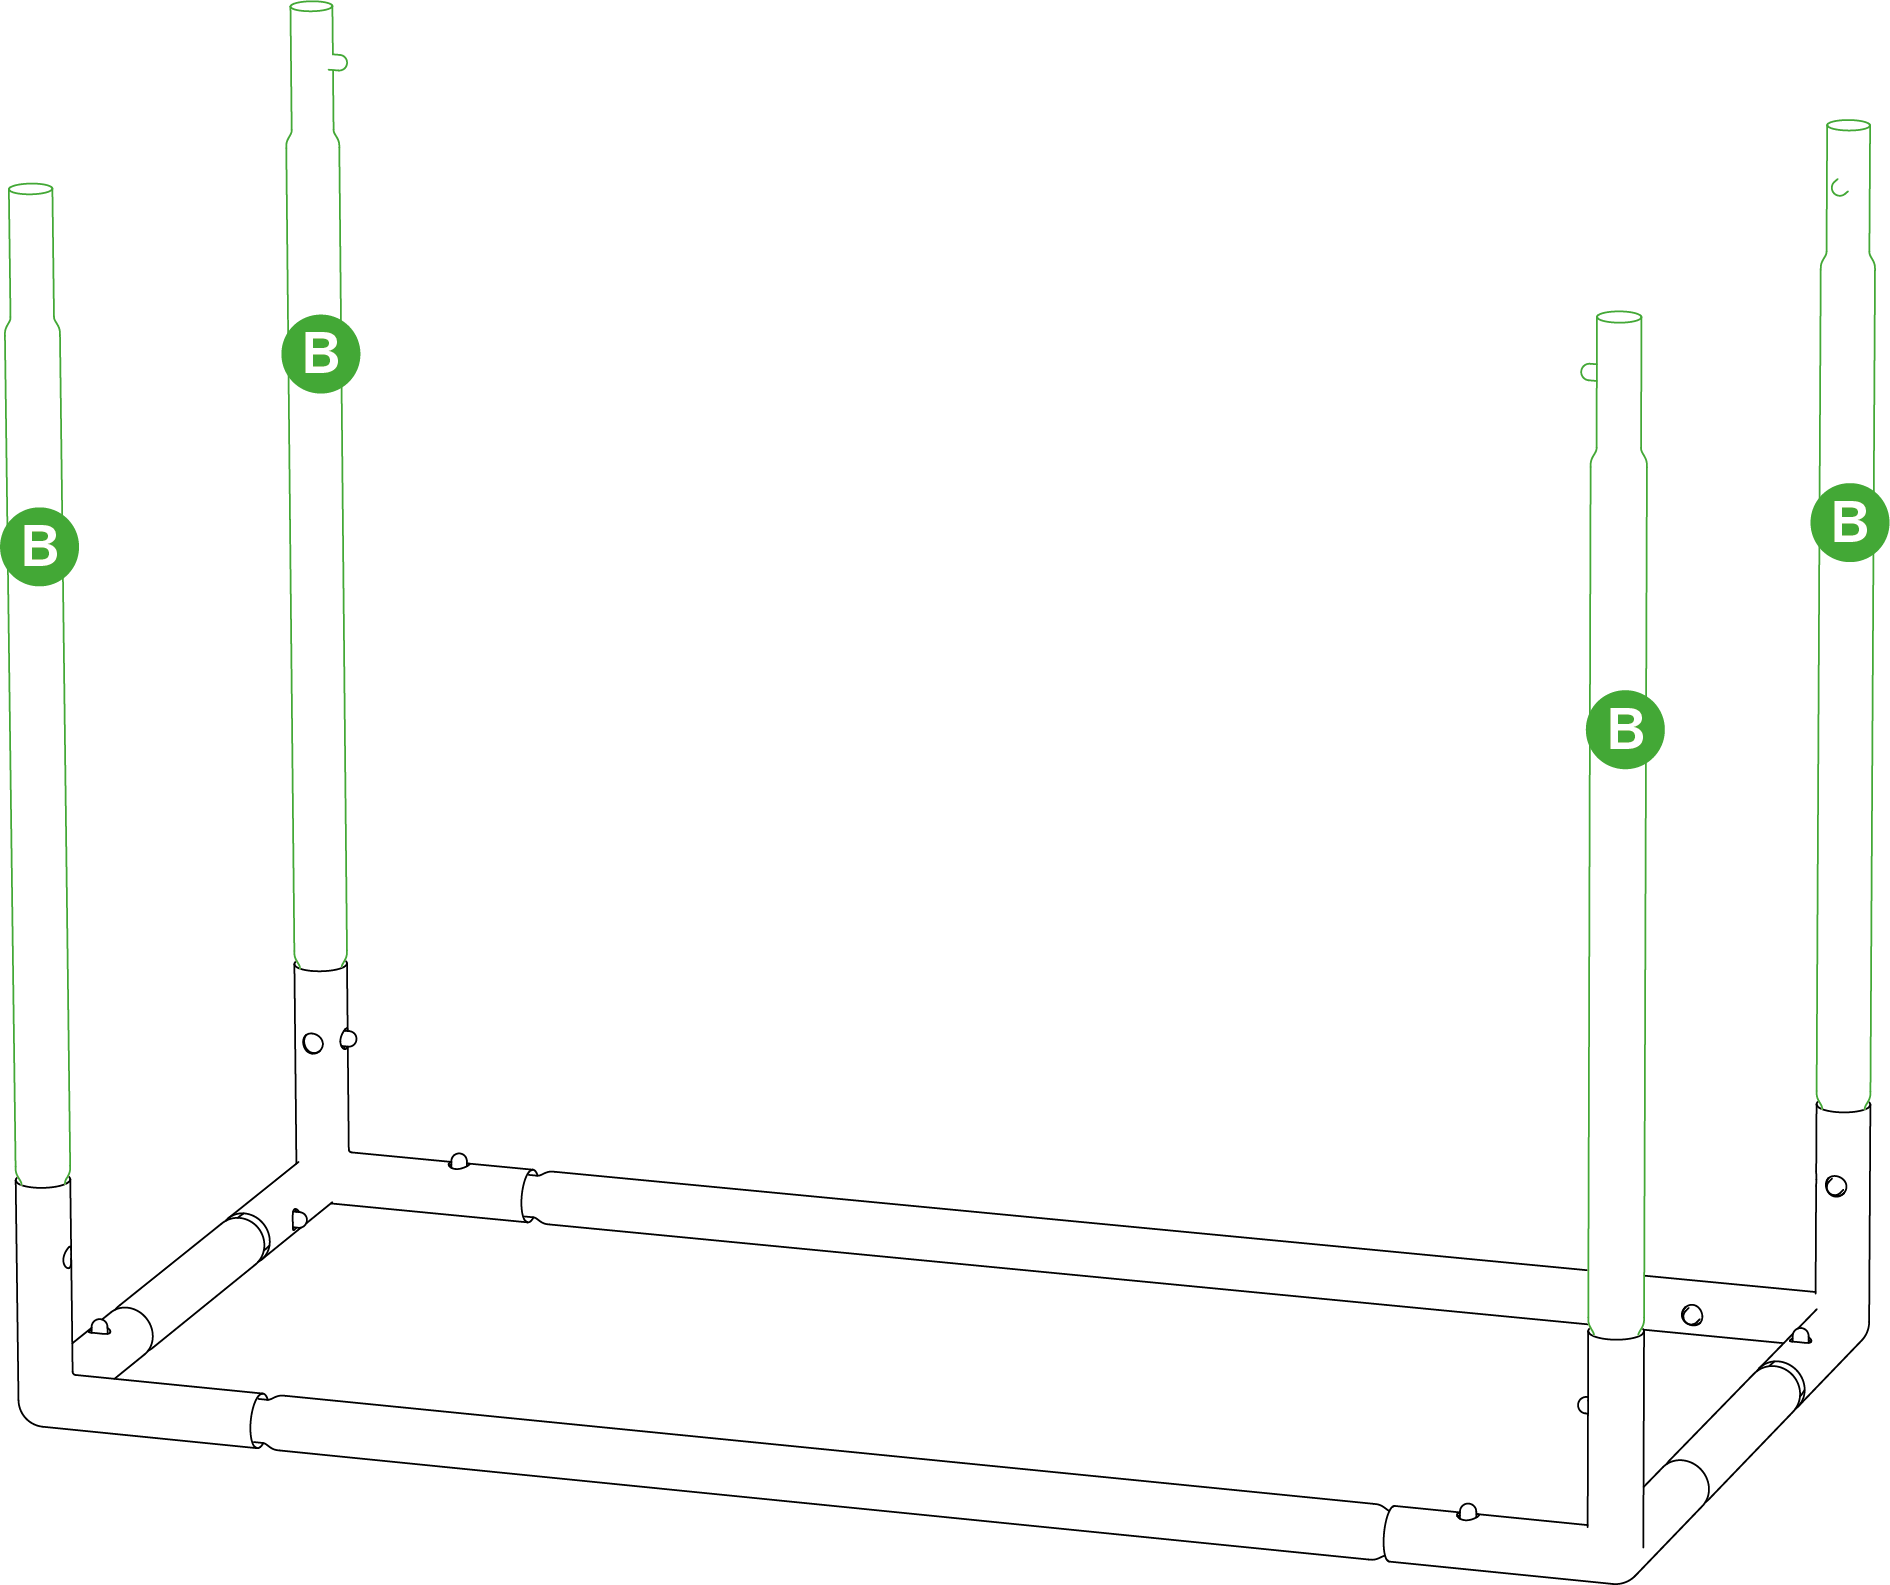
Connect four (B) Poles to the Corner Supports (4) of the tent base.
STEP 3
Connect four ( C ) Poles to the (B) Poles .
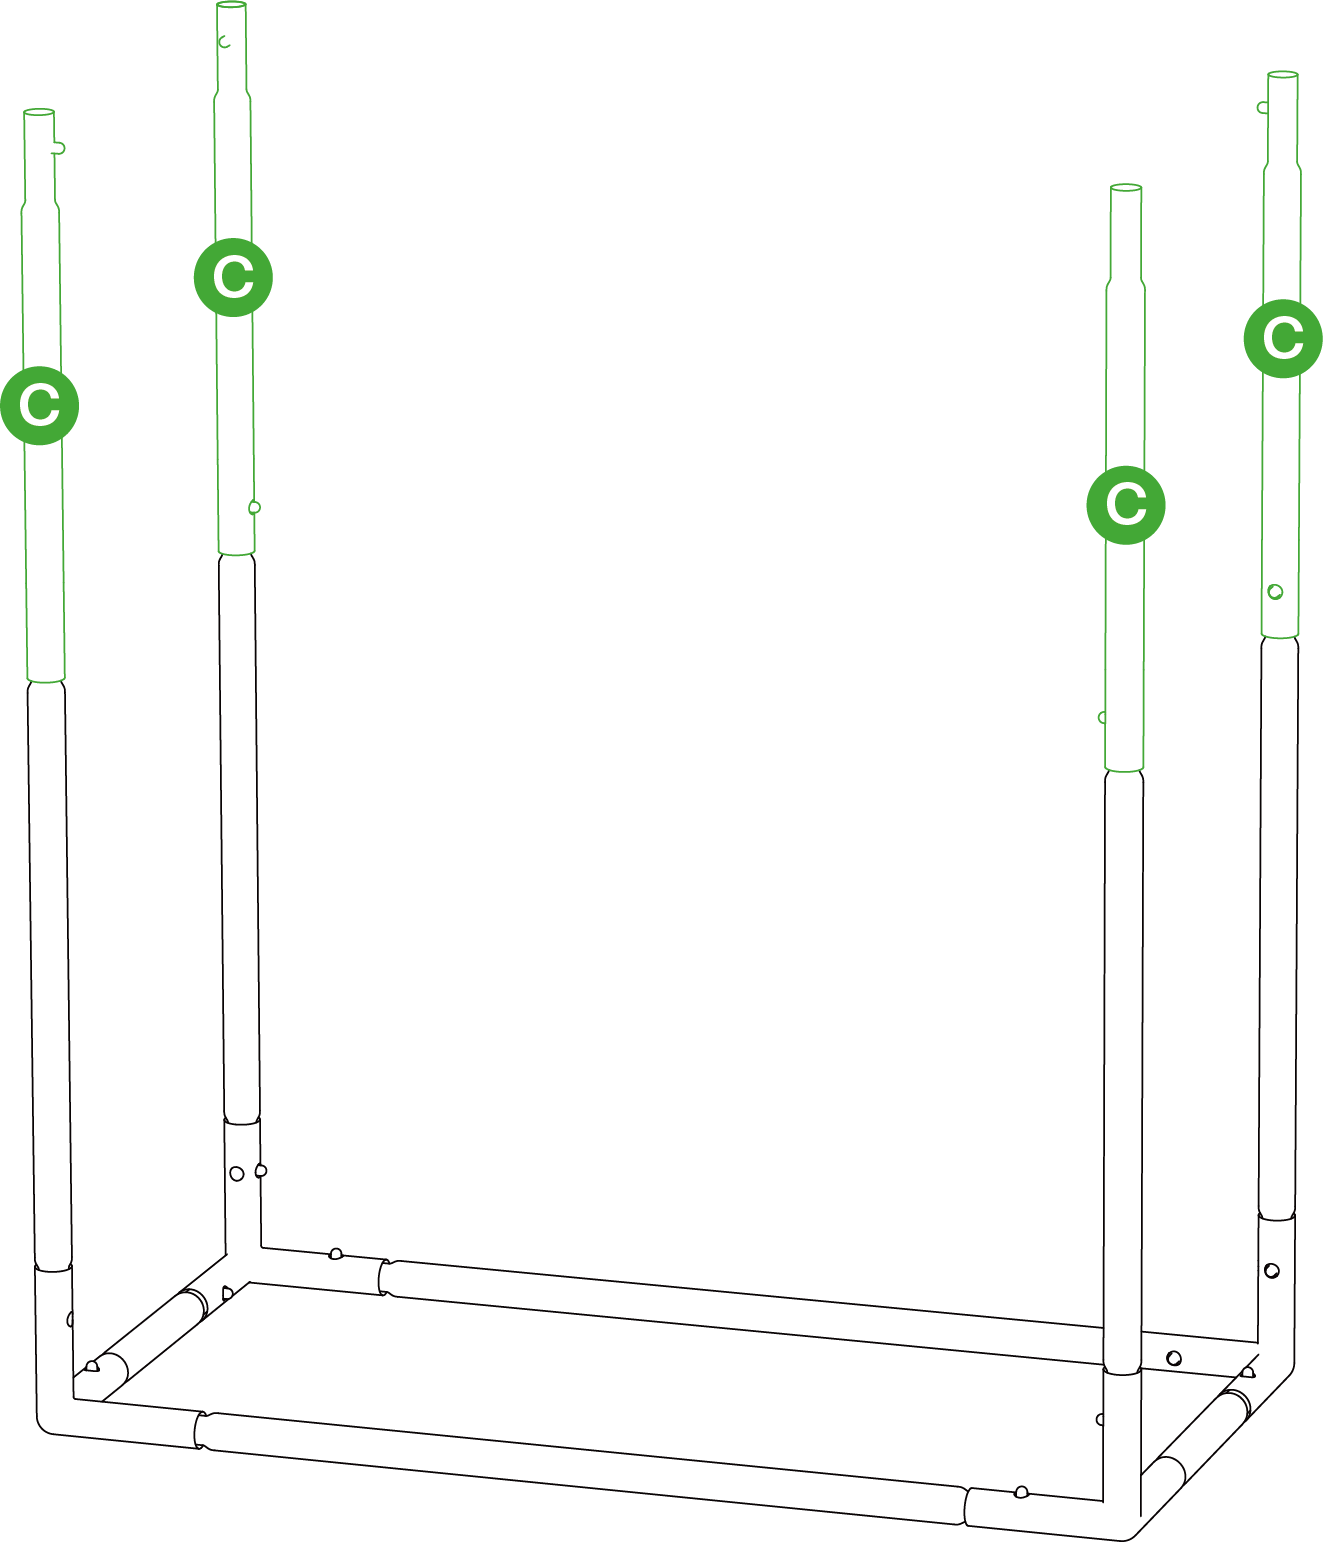
STEP 4
Attach the other four Corner Supports (4) to the ( C ) Poles as shown.
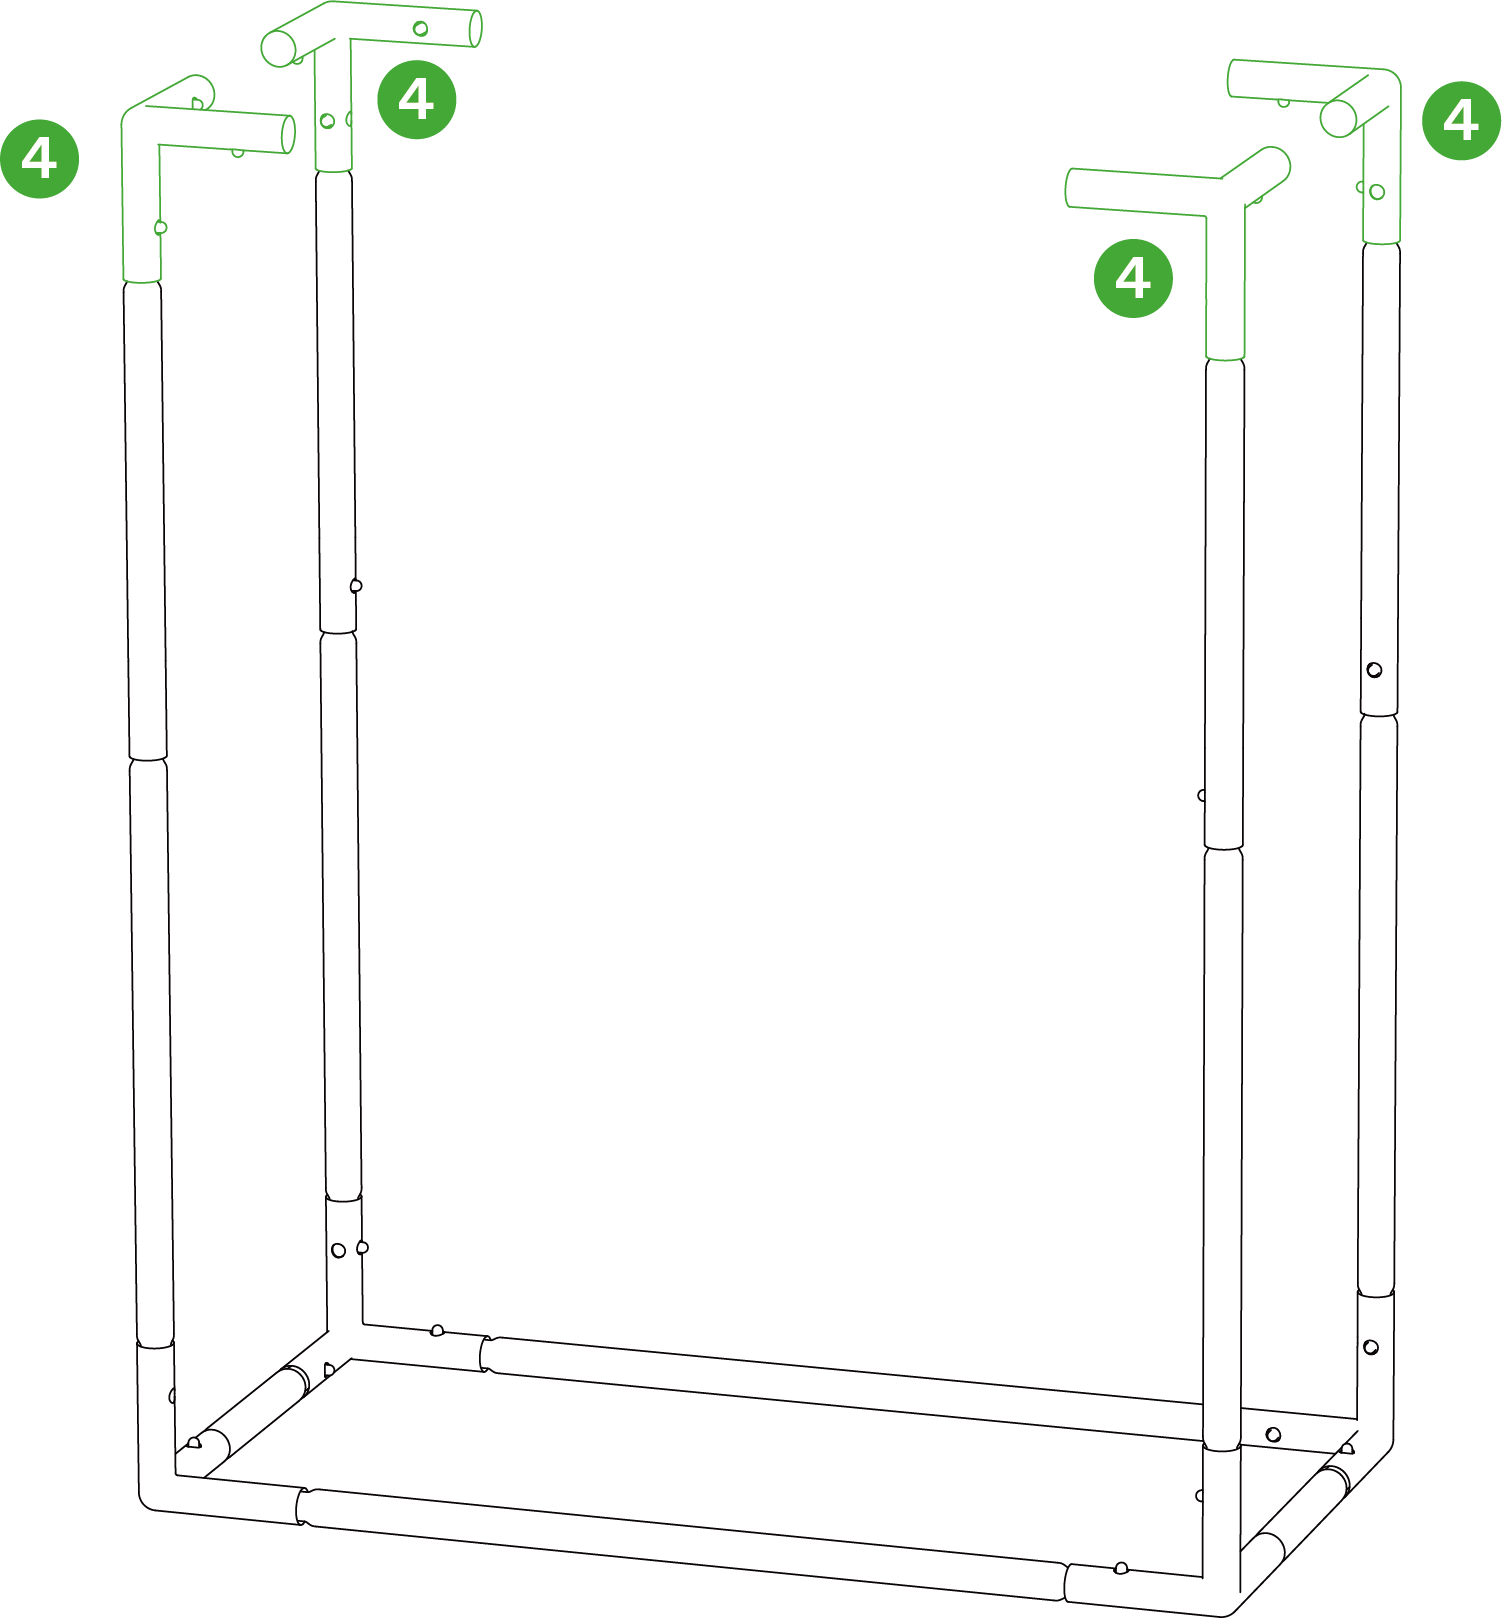
STEP 5
Connect two (A) Poles and two (D) Poles to the Corner Supports (4) to form the top frame of the tent.
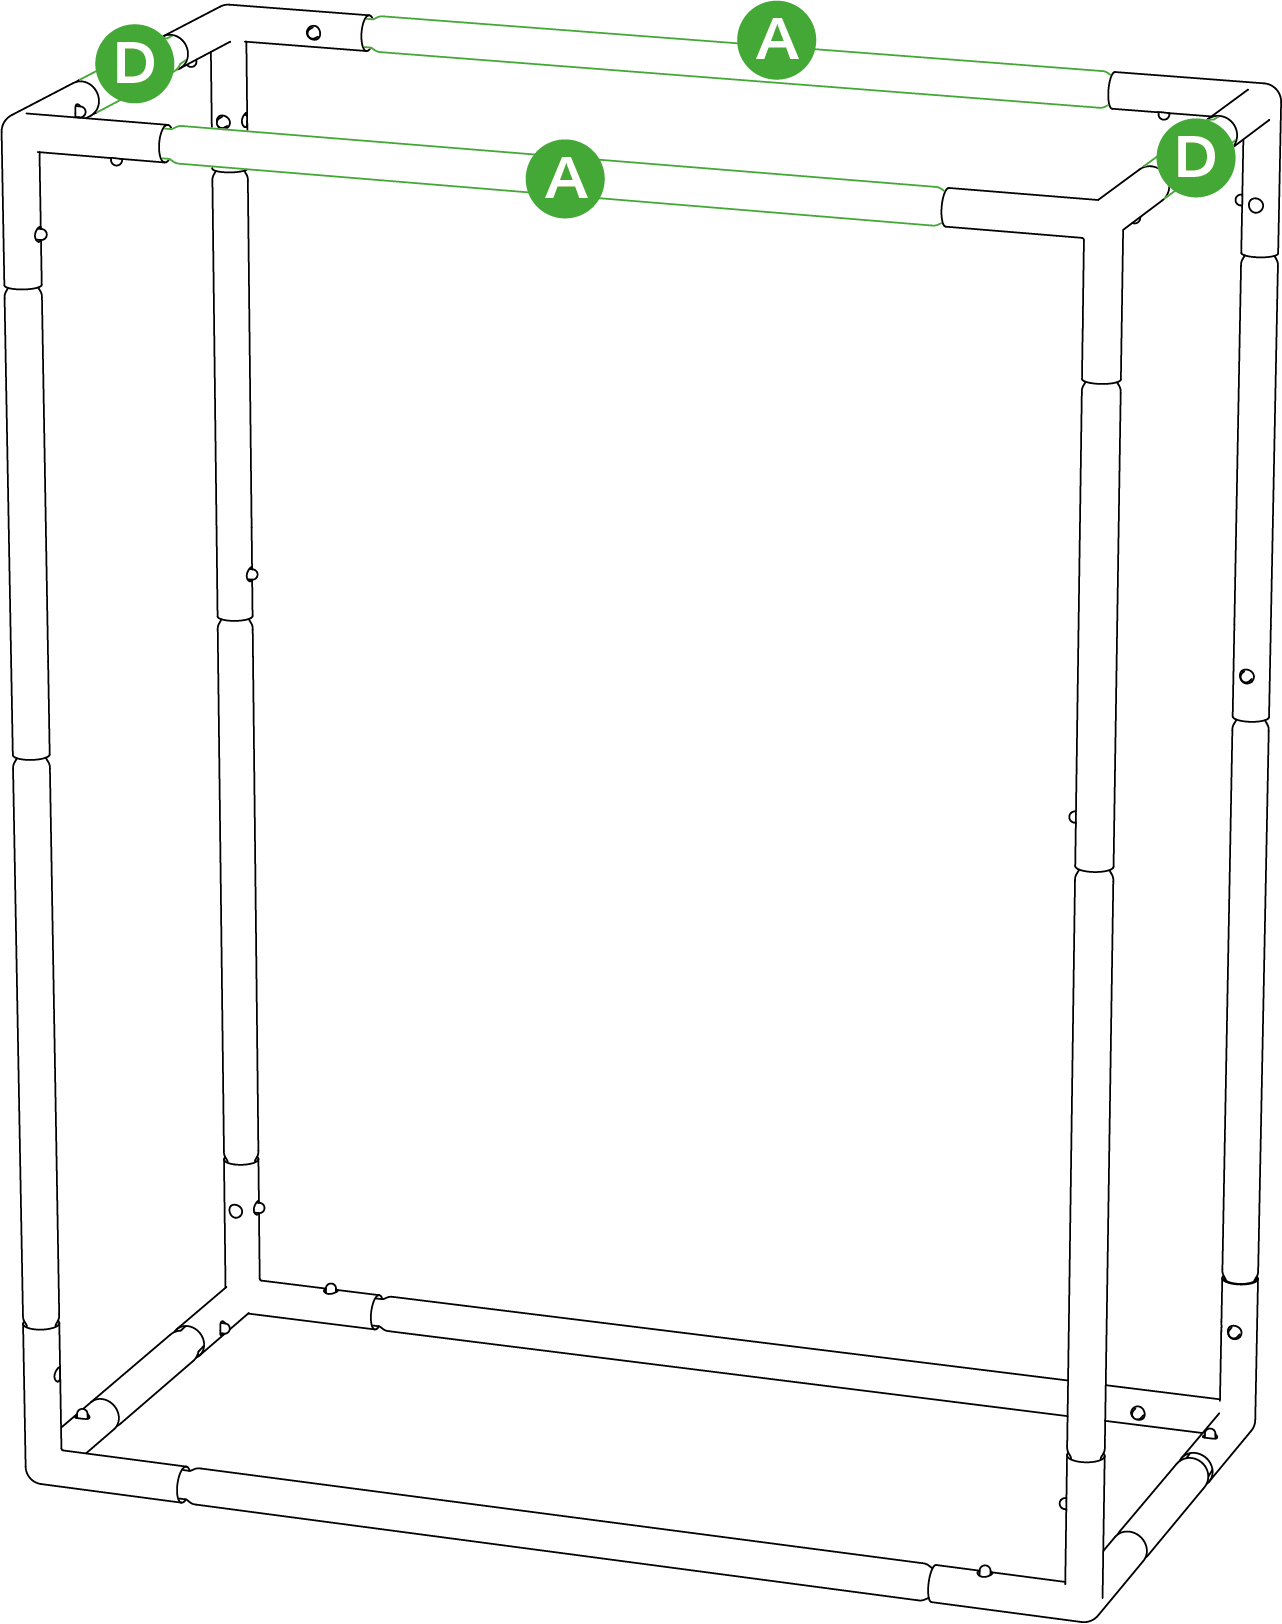
STEP 6
Unzip and unfold the Tent Coat (1) and place the frame base in the bottom section of the Tent Coat.
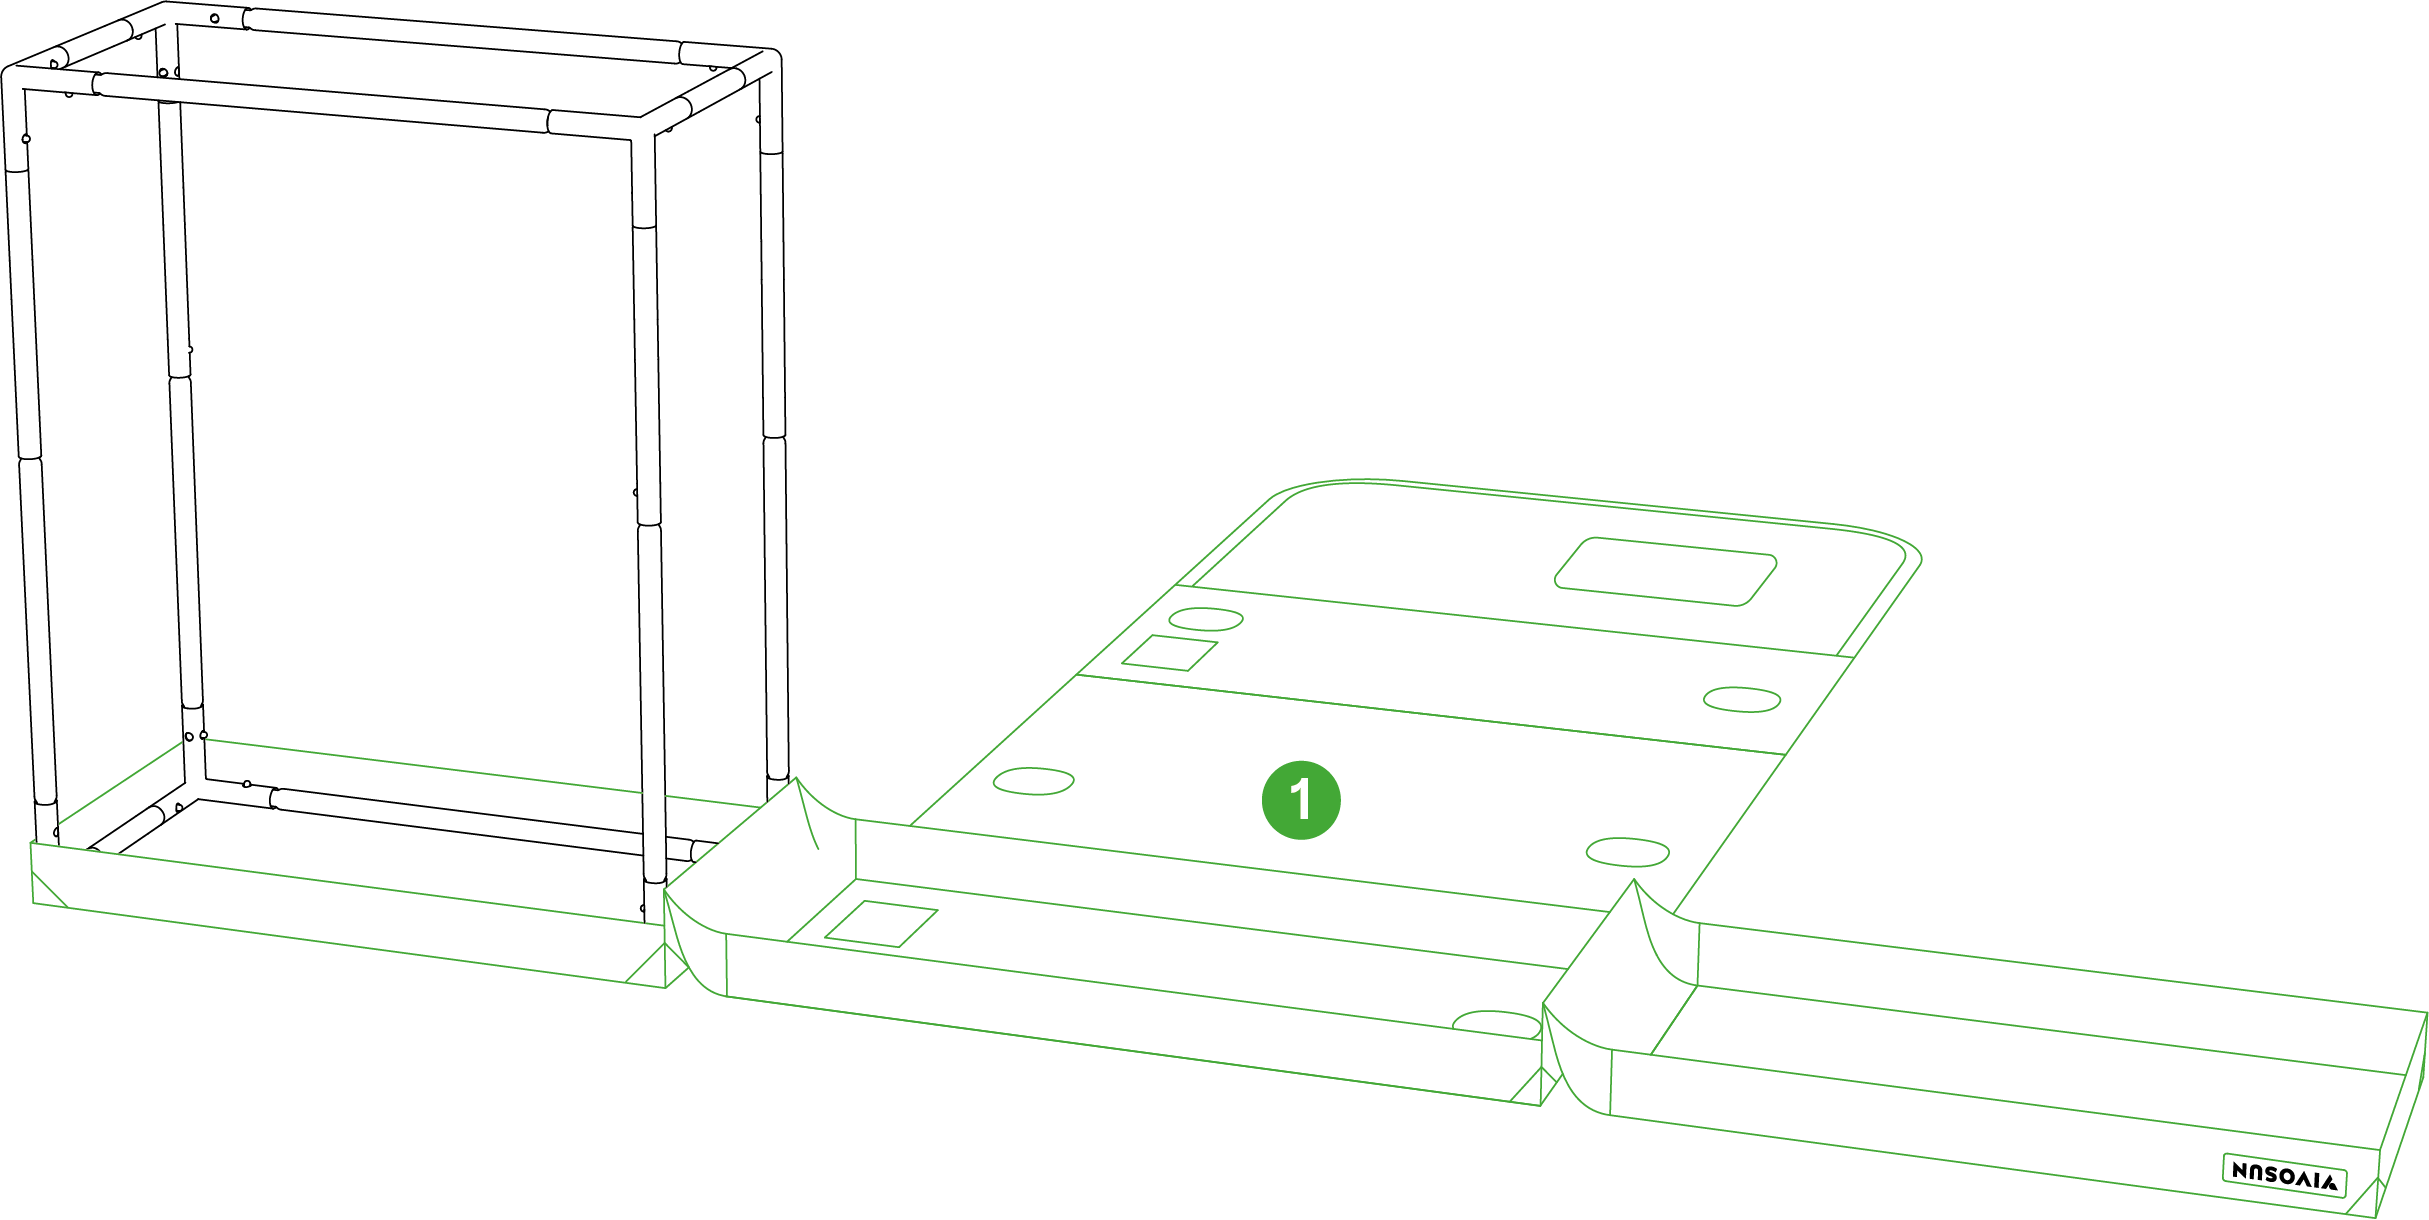
STEP 7
Pull up the tent roof and cover the top of the frame.
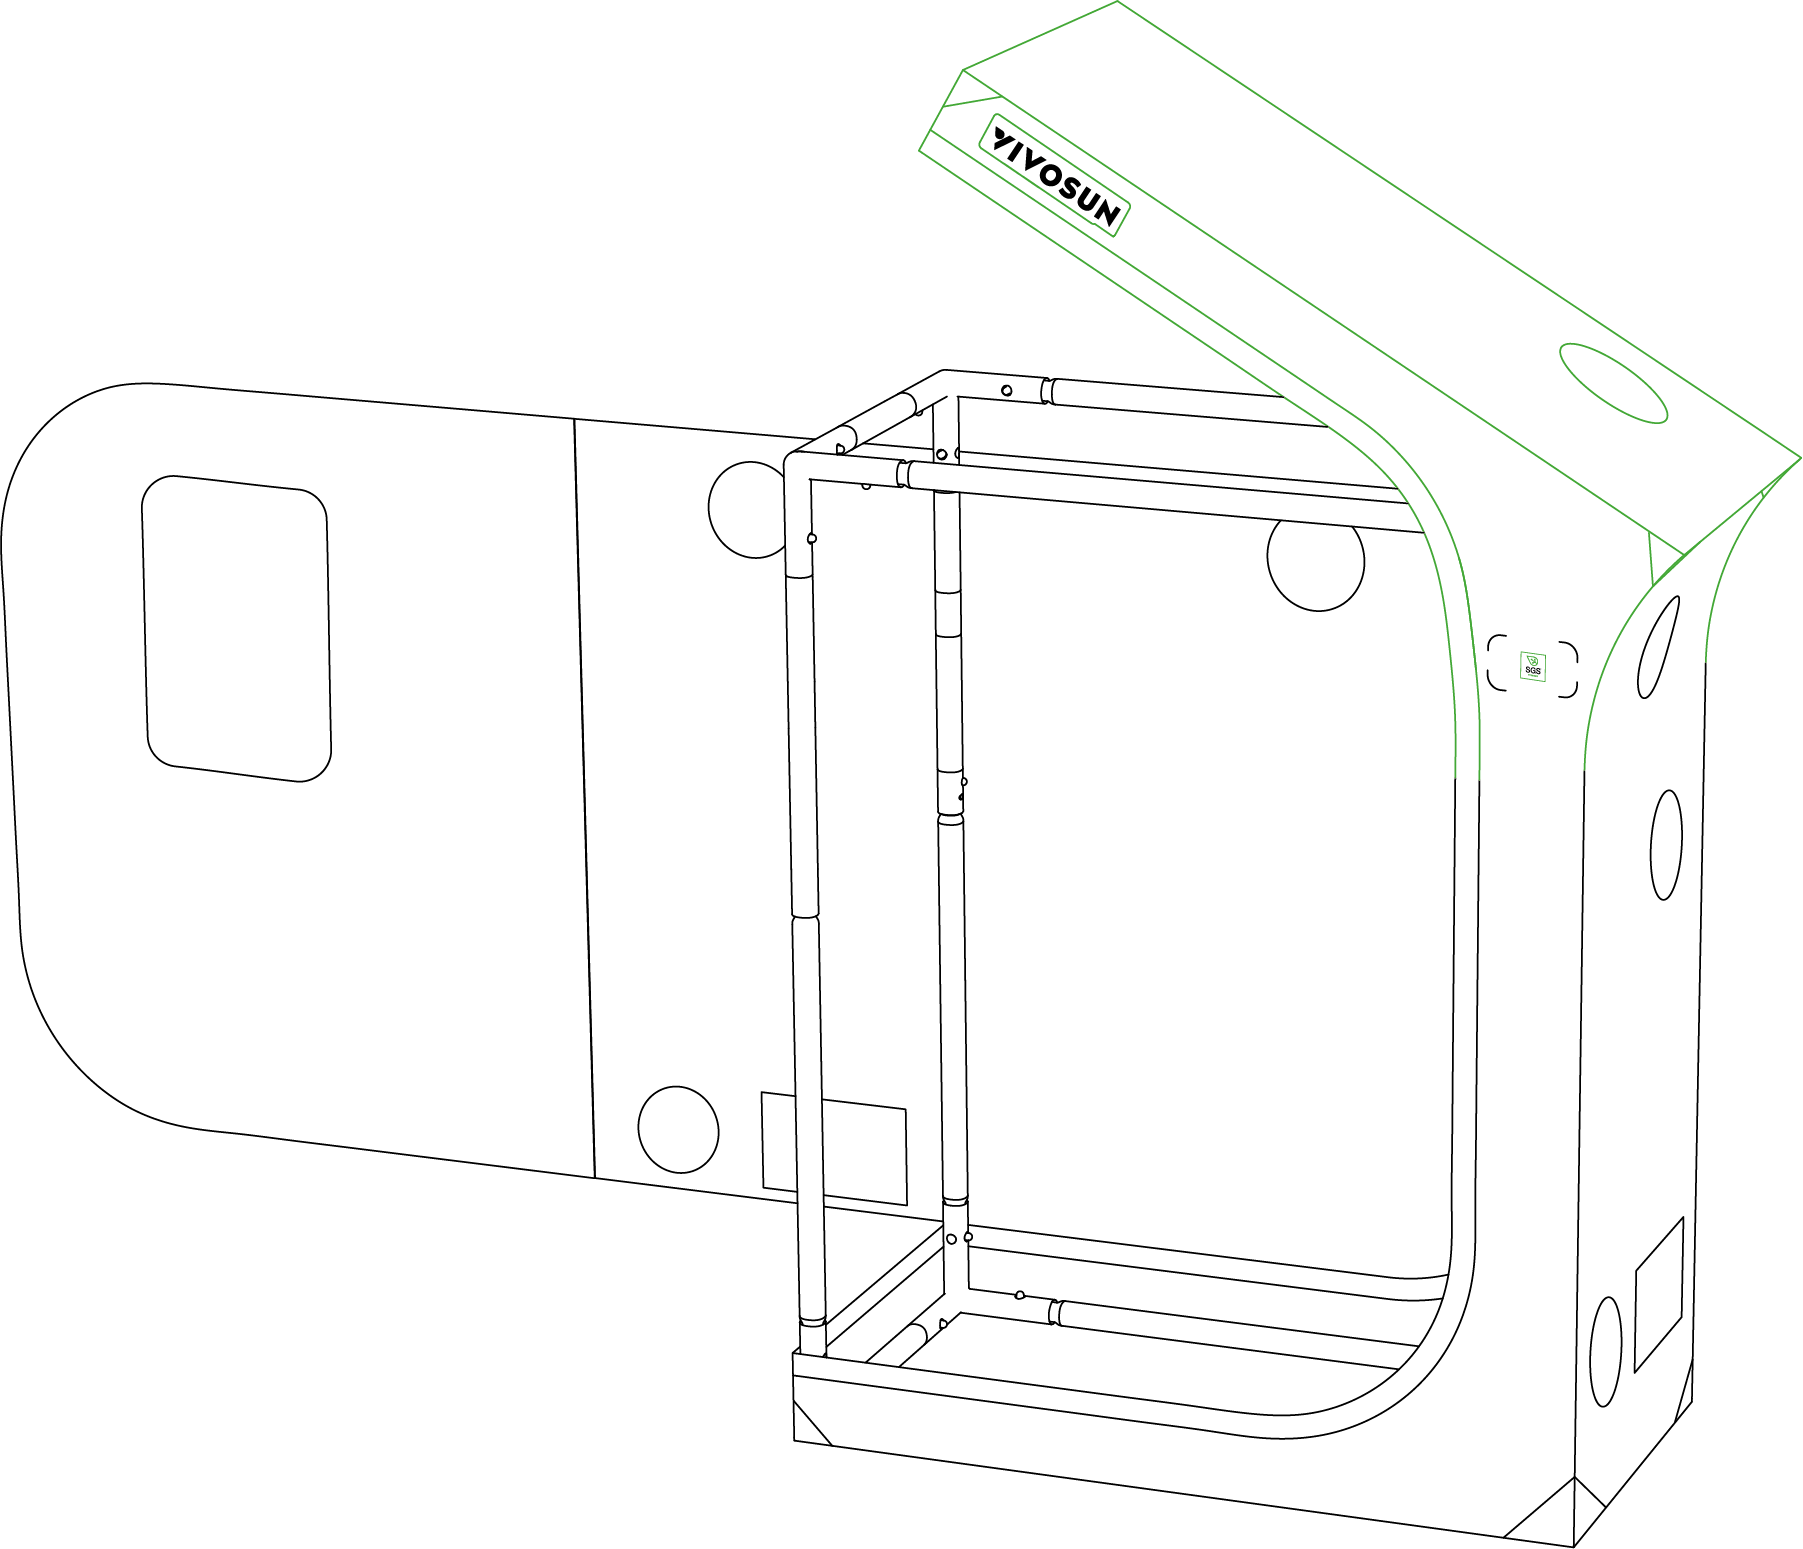
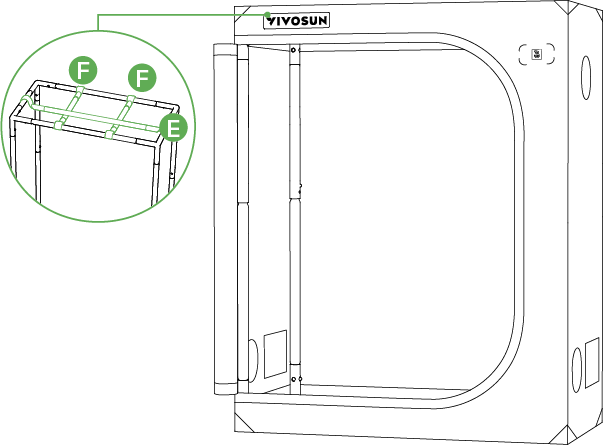
STEP 8
Place the Ceiling Bars (E, F) on the top frame for hanging devices like lights and ventilation.
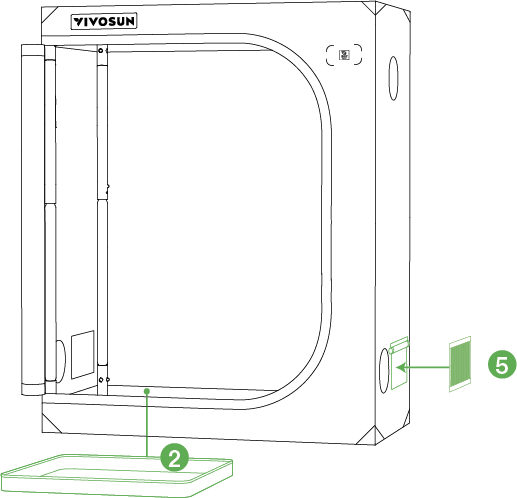
STEP 9
Place the Floor Tray (2) into the tent.
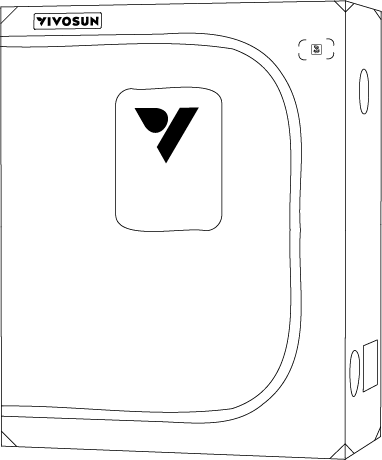
STEP 10
Pull the zippers to close the tent walls and door. Make sure the tent coat fits the frame at the corners.
STEP 11
Install horizontal Support Rods (G) in accordance with your specific needs.
VST-GTP848/105
STEP 1
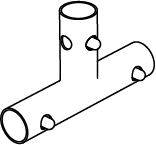
Connect six (A) Poles to four Corner Supports (4) and two Three-way Connectors (6) as shown to form the base frame of the tent.
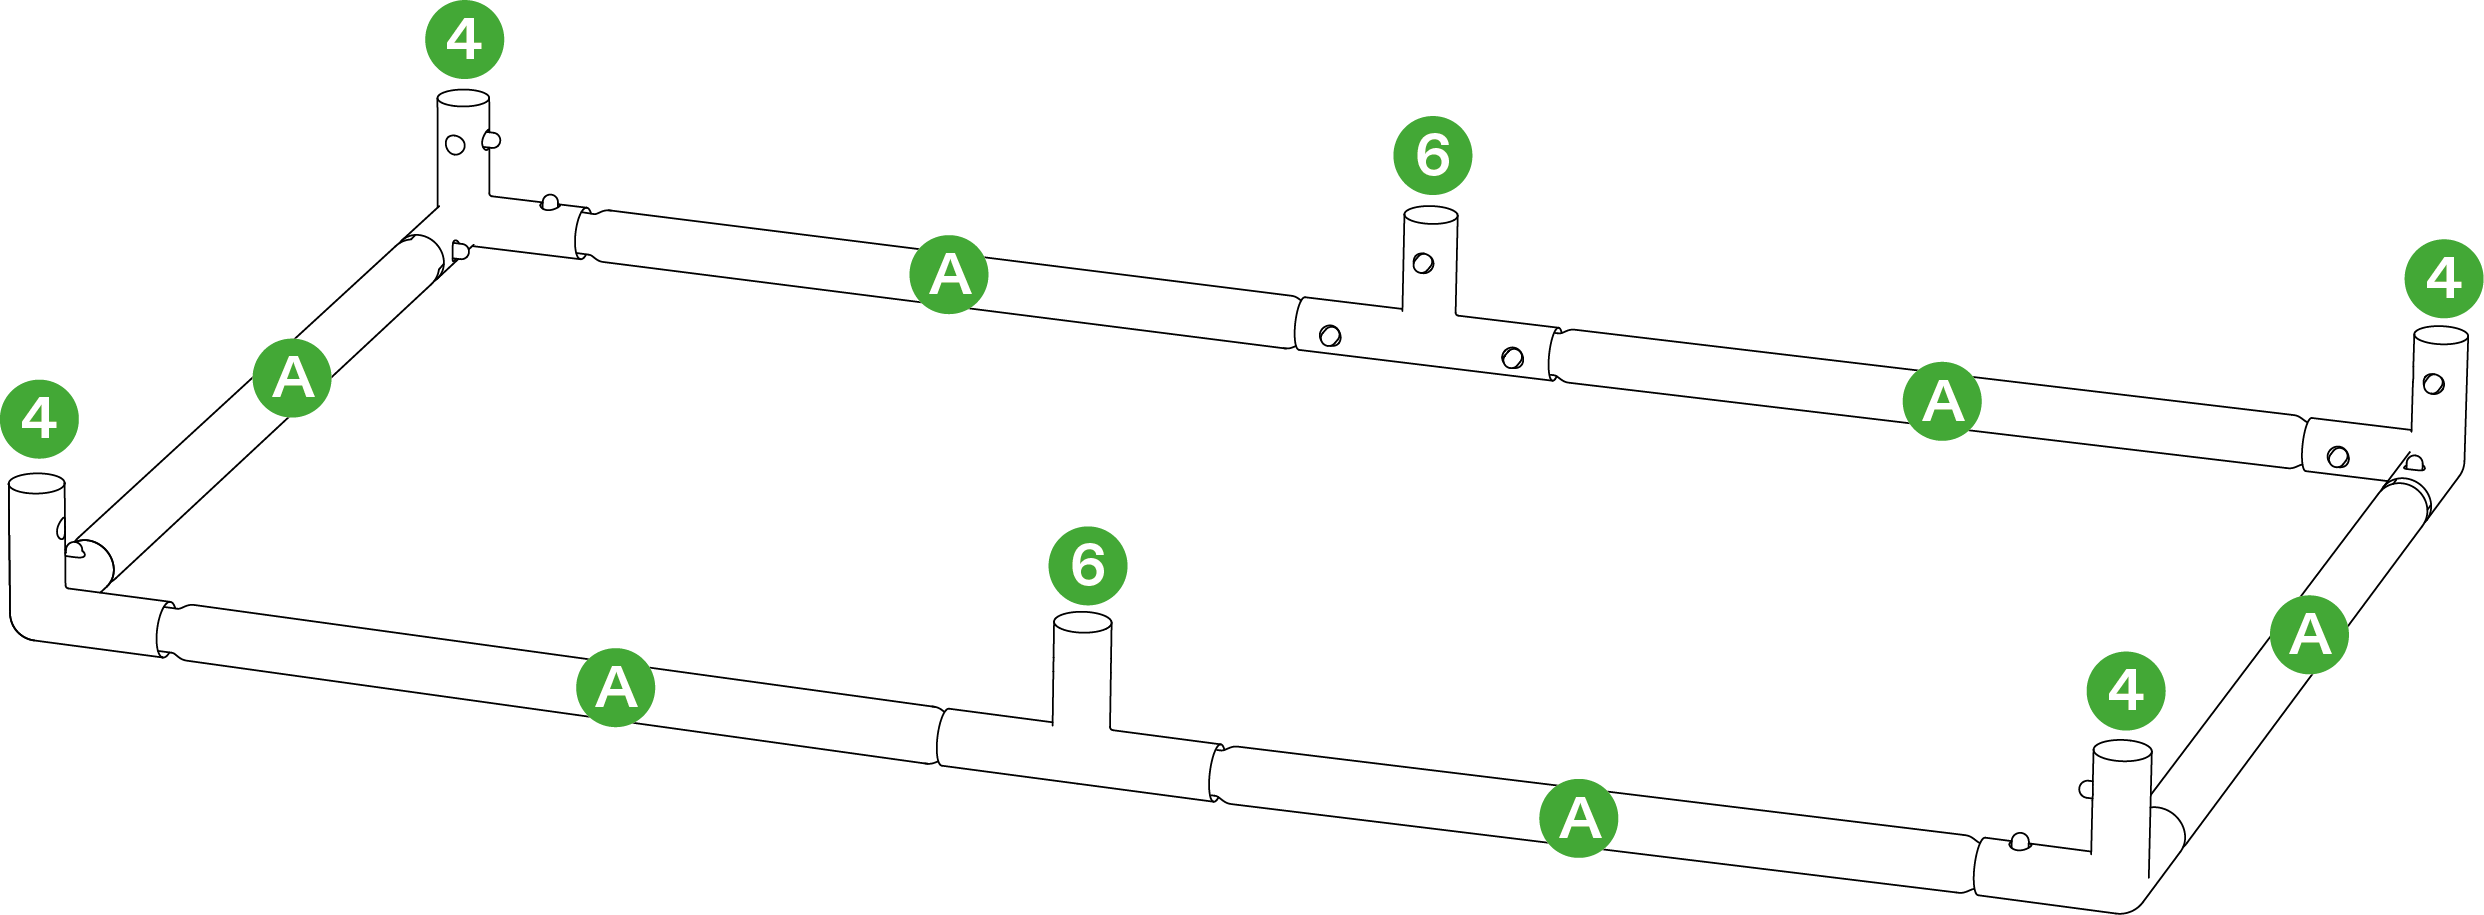
STEP 2
Connect six (B) Poles to the Corner Supports (4) and Three-way Connectors (6) to the tent base.
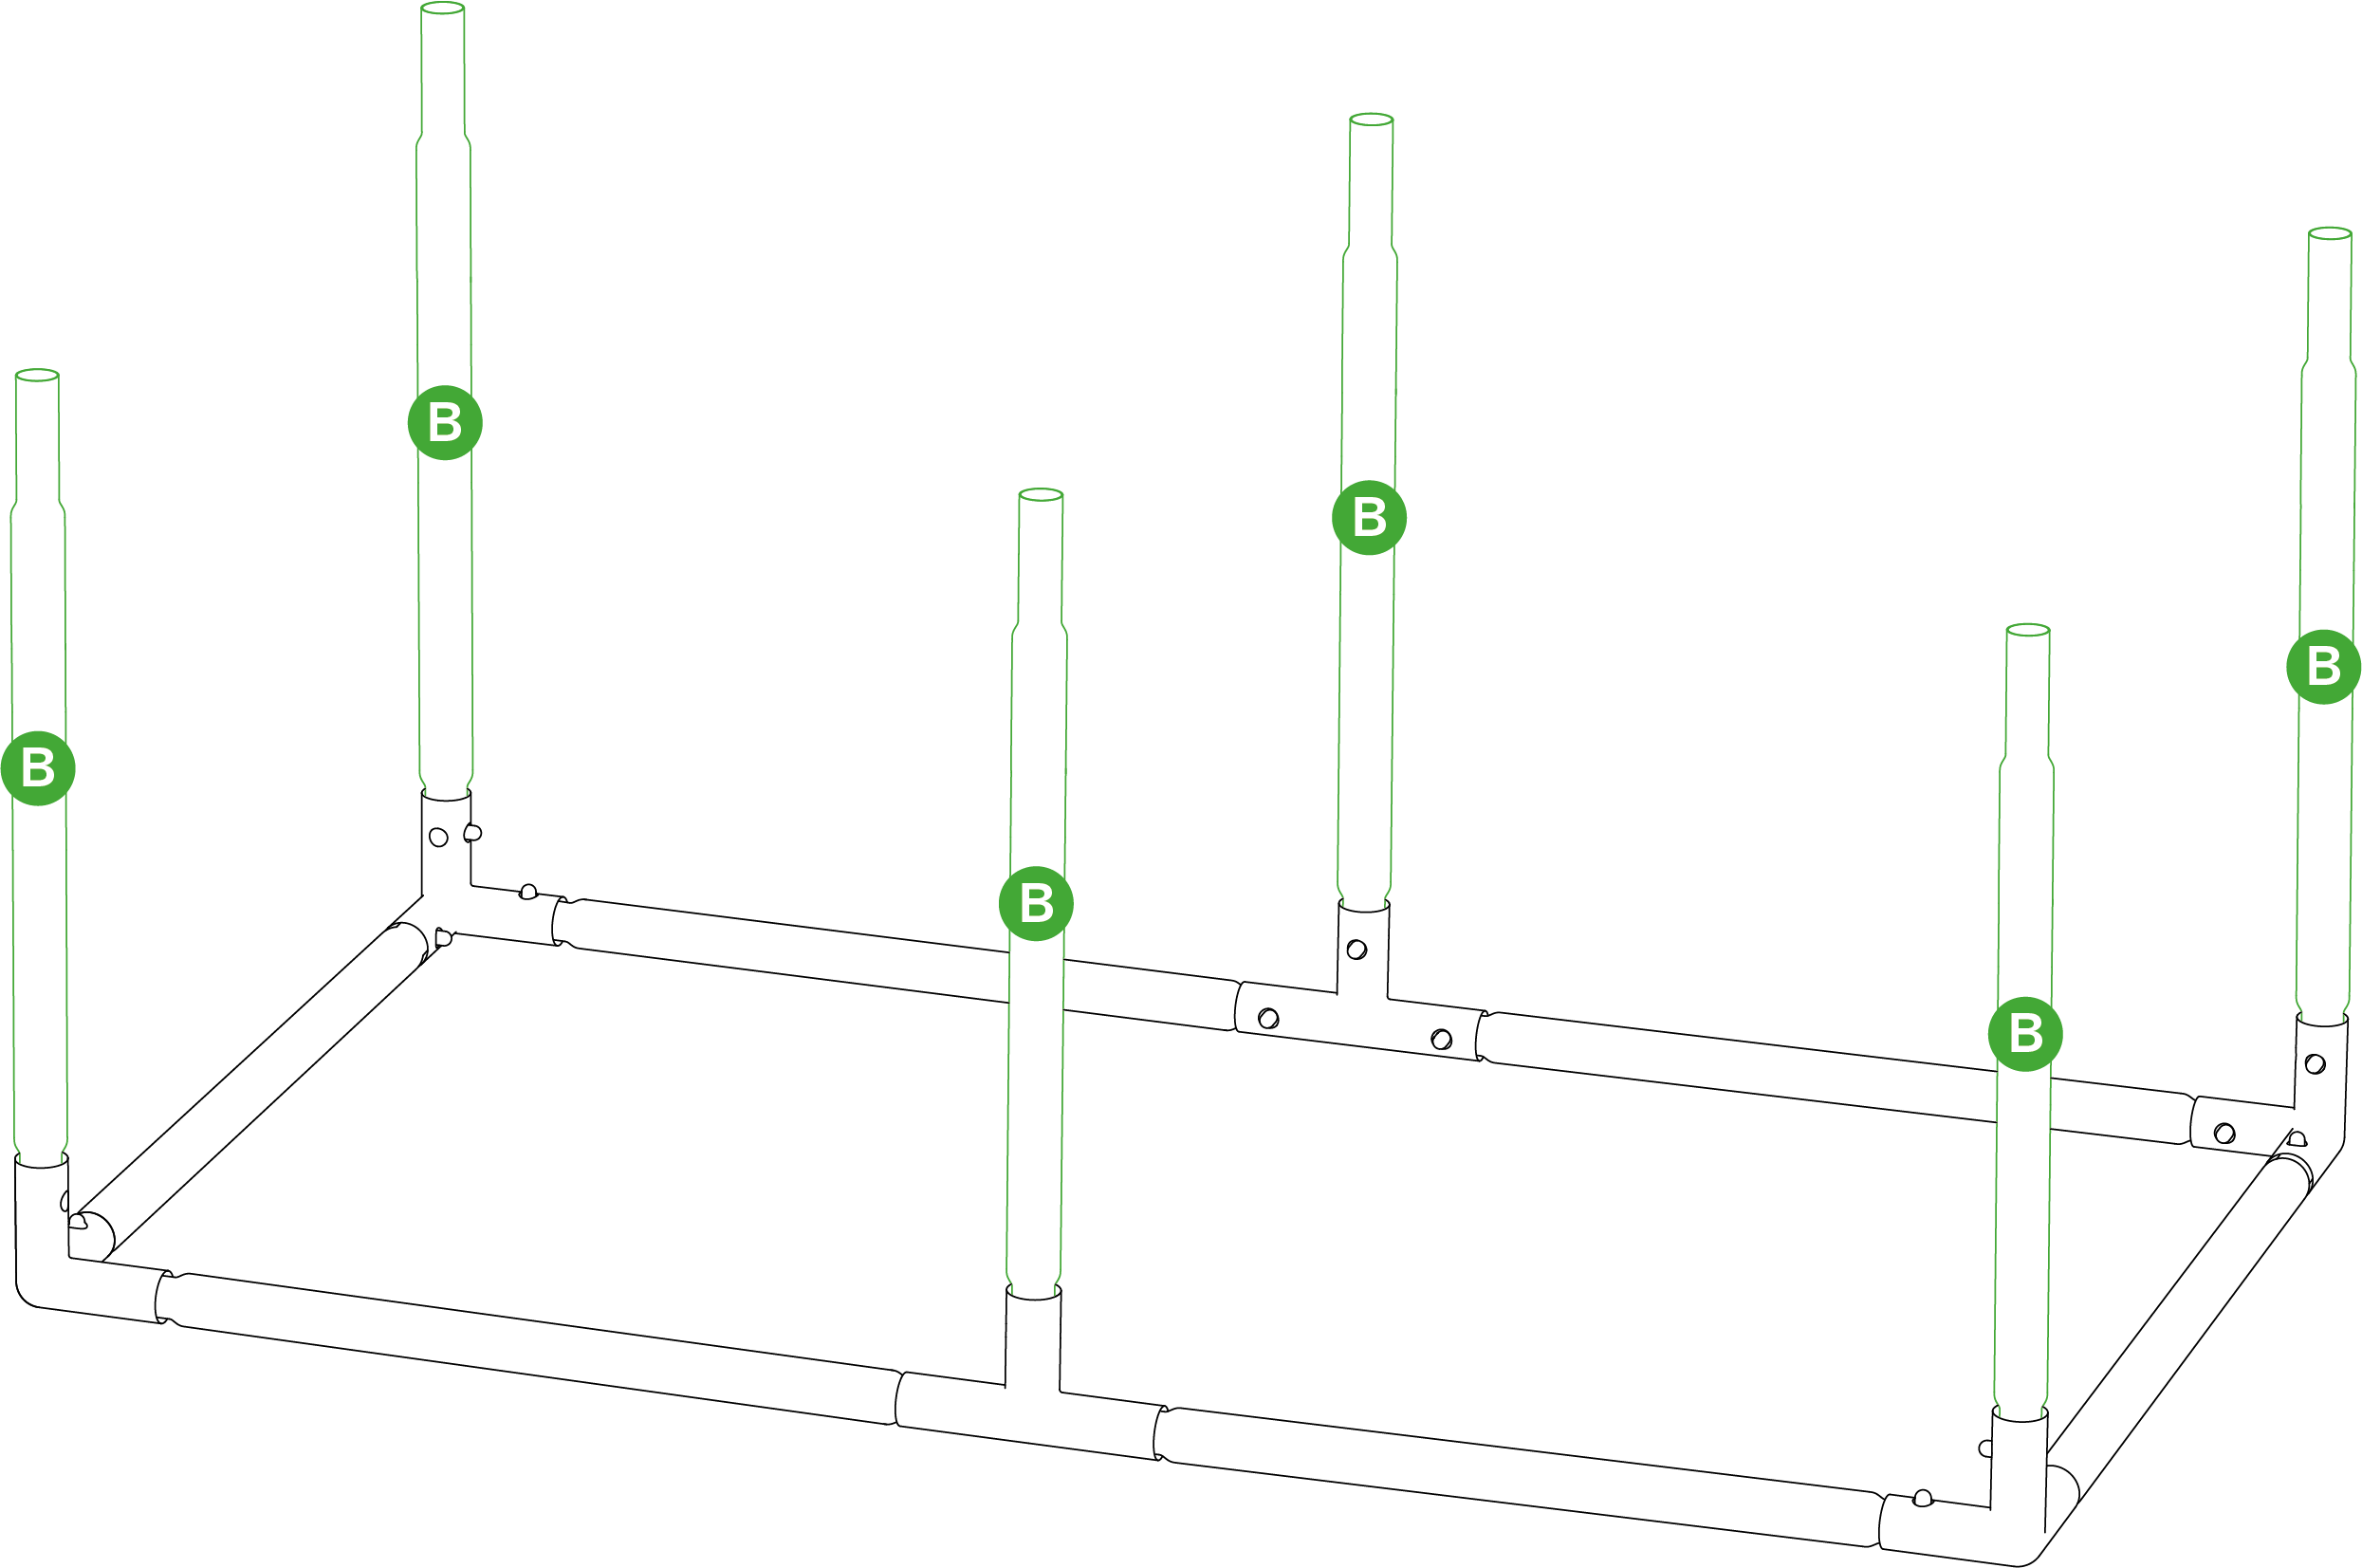
STEP 3
Connect six (C) Poles to the ( B ) Poles .
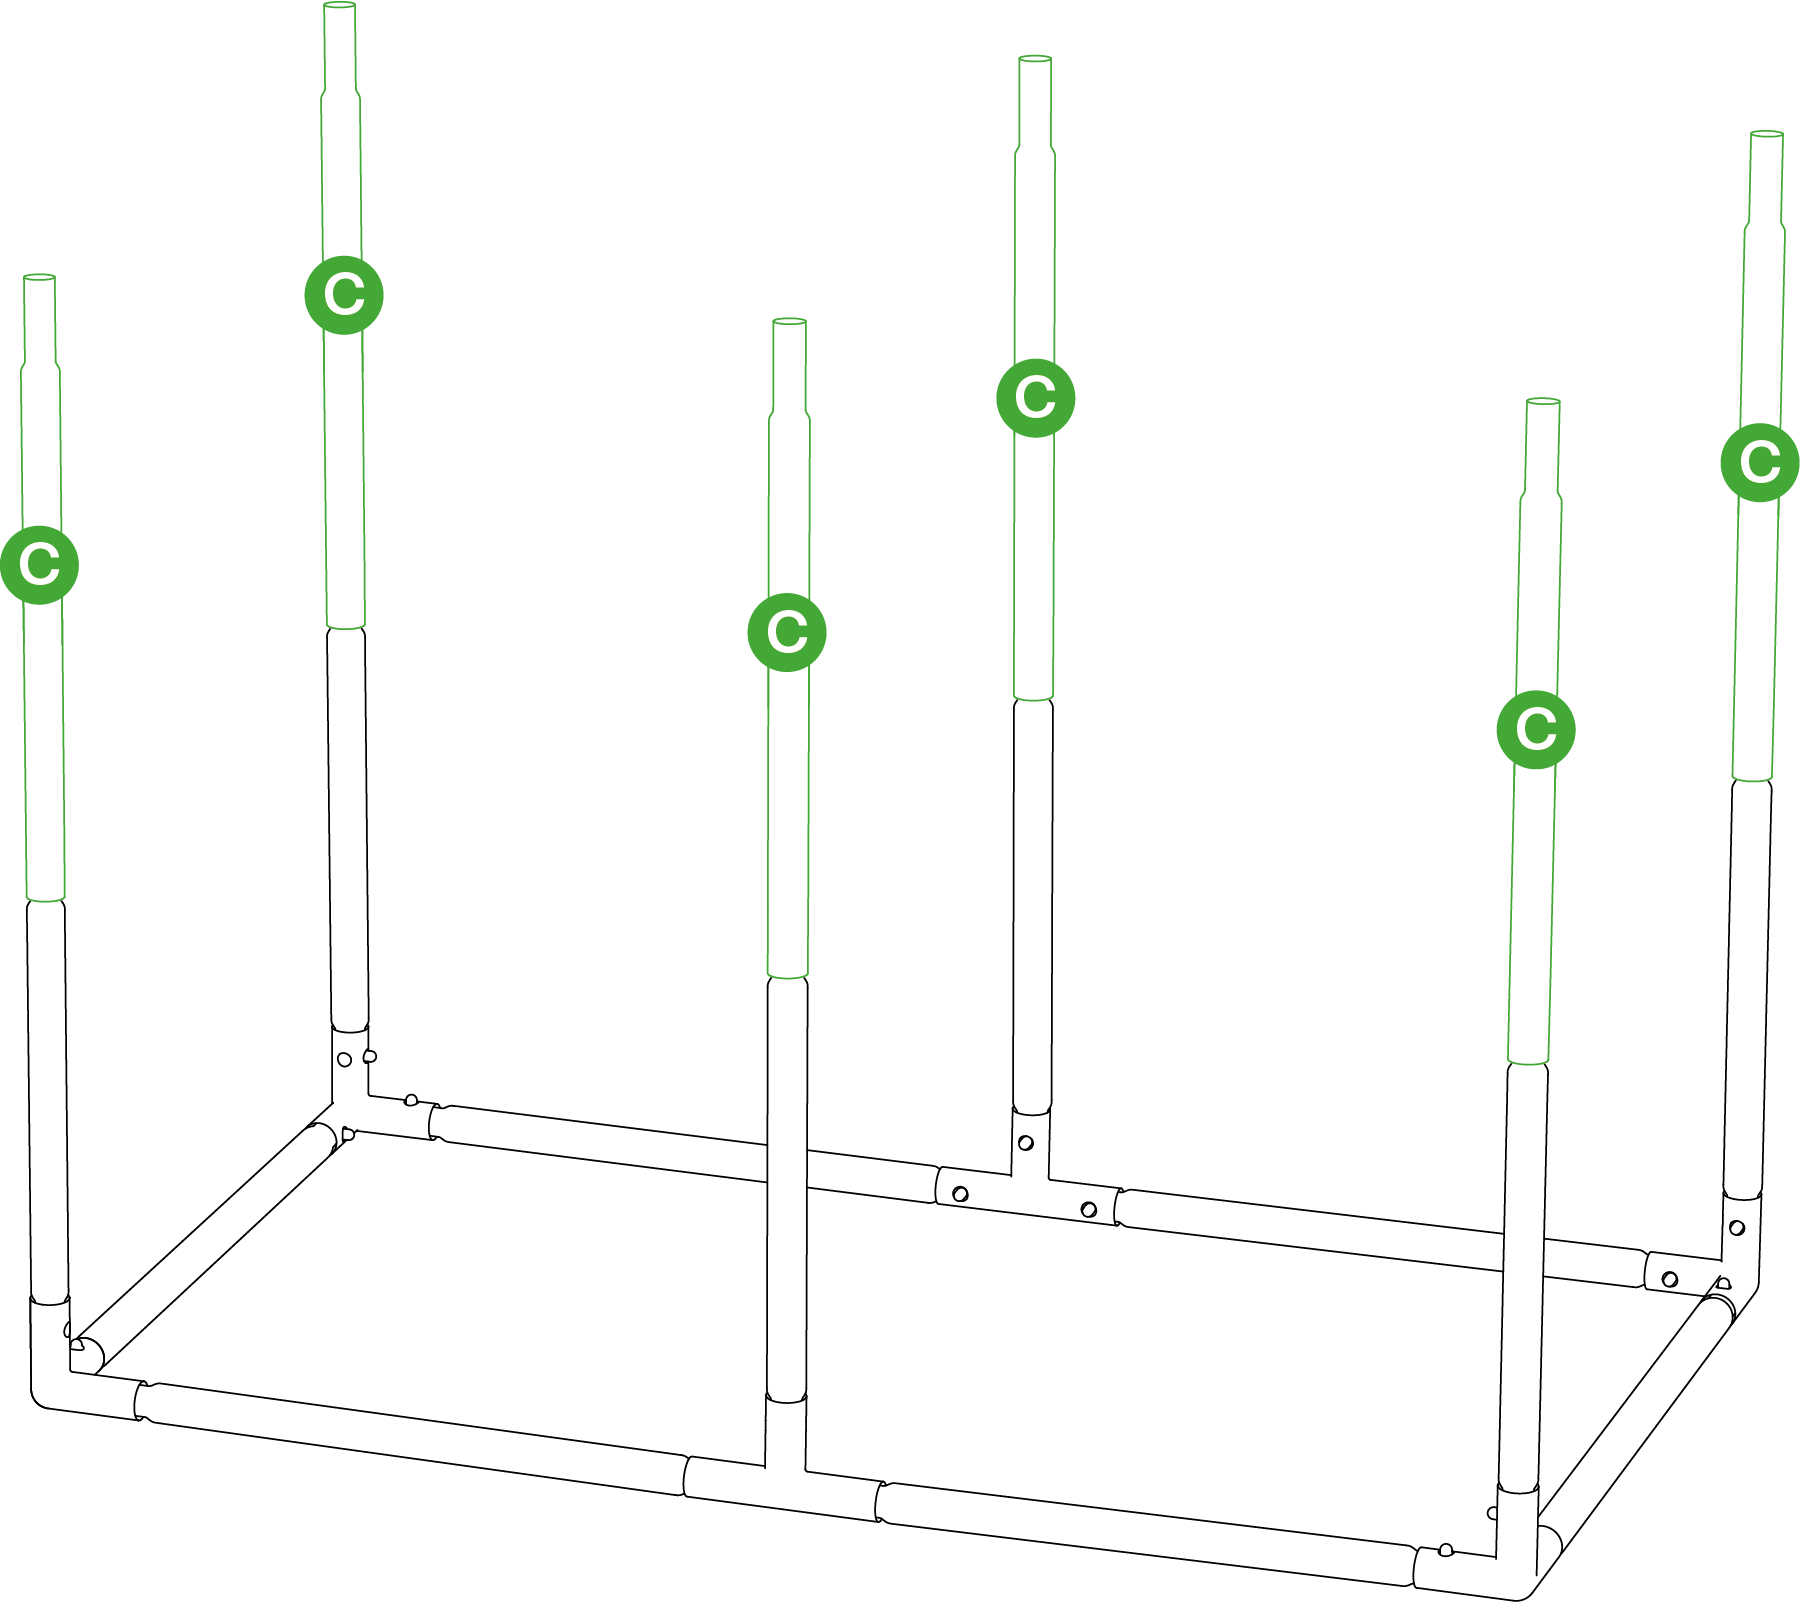
STEP 4
Attach the other four Corner Supports (4) and two Four-way connectors (5) to the (C) Poles as shown.
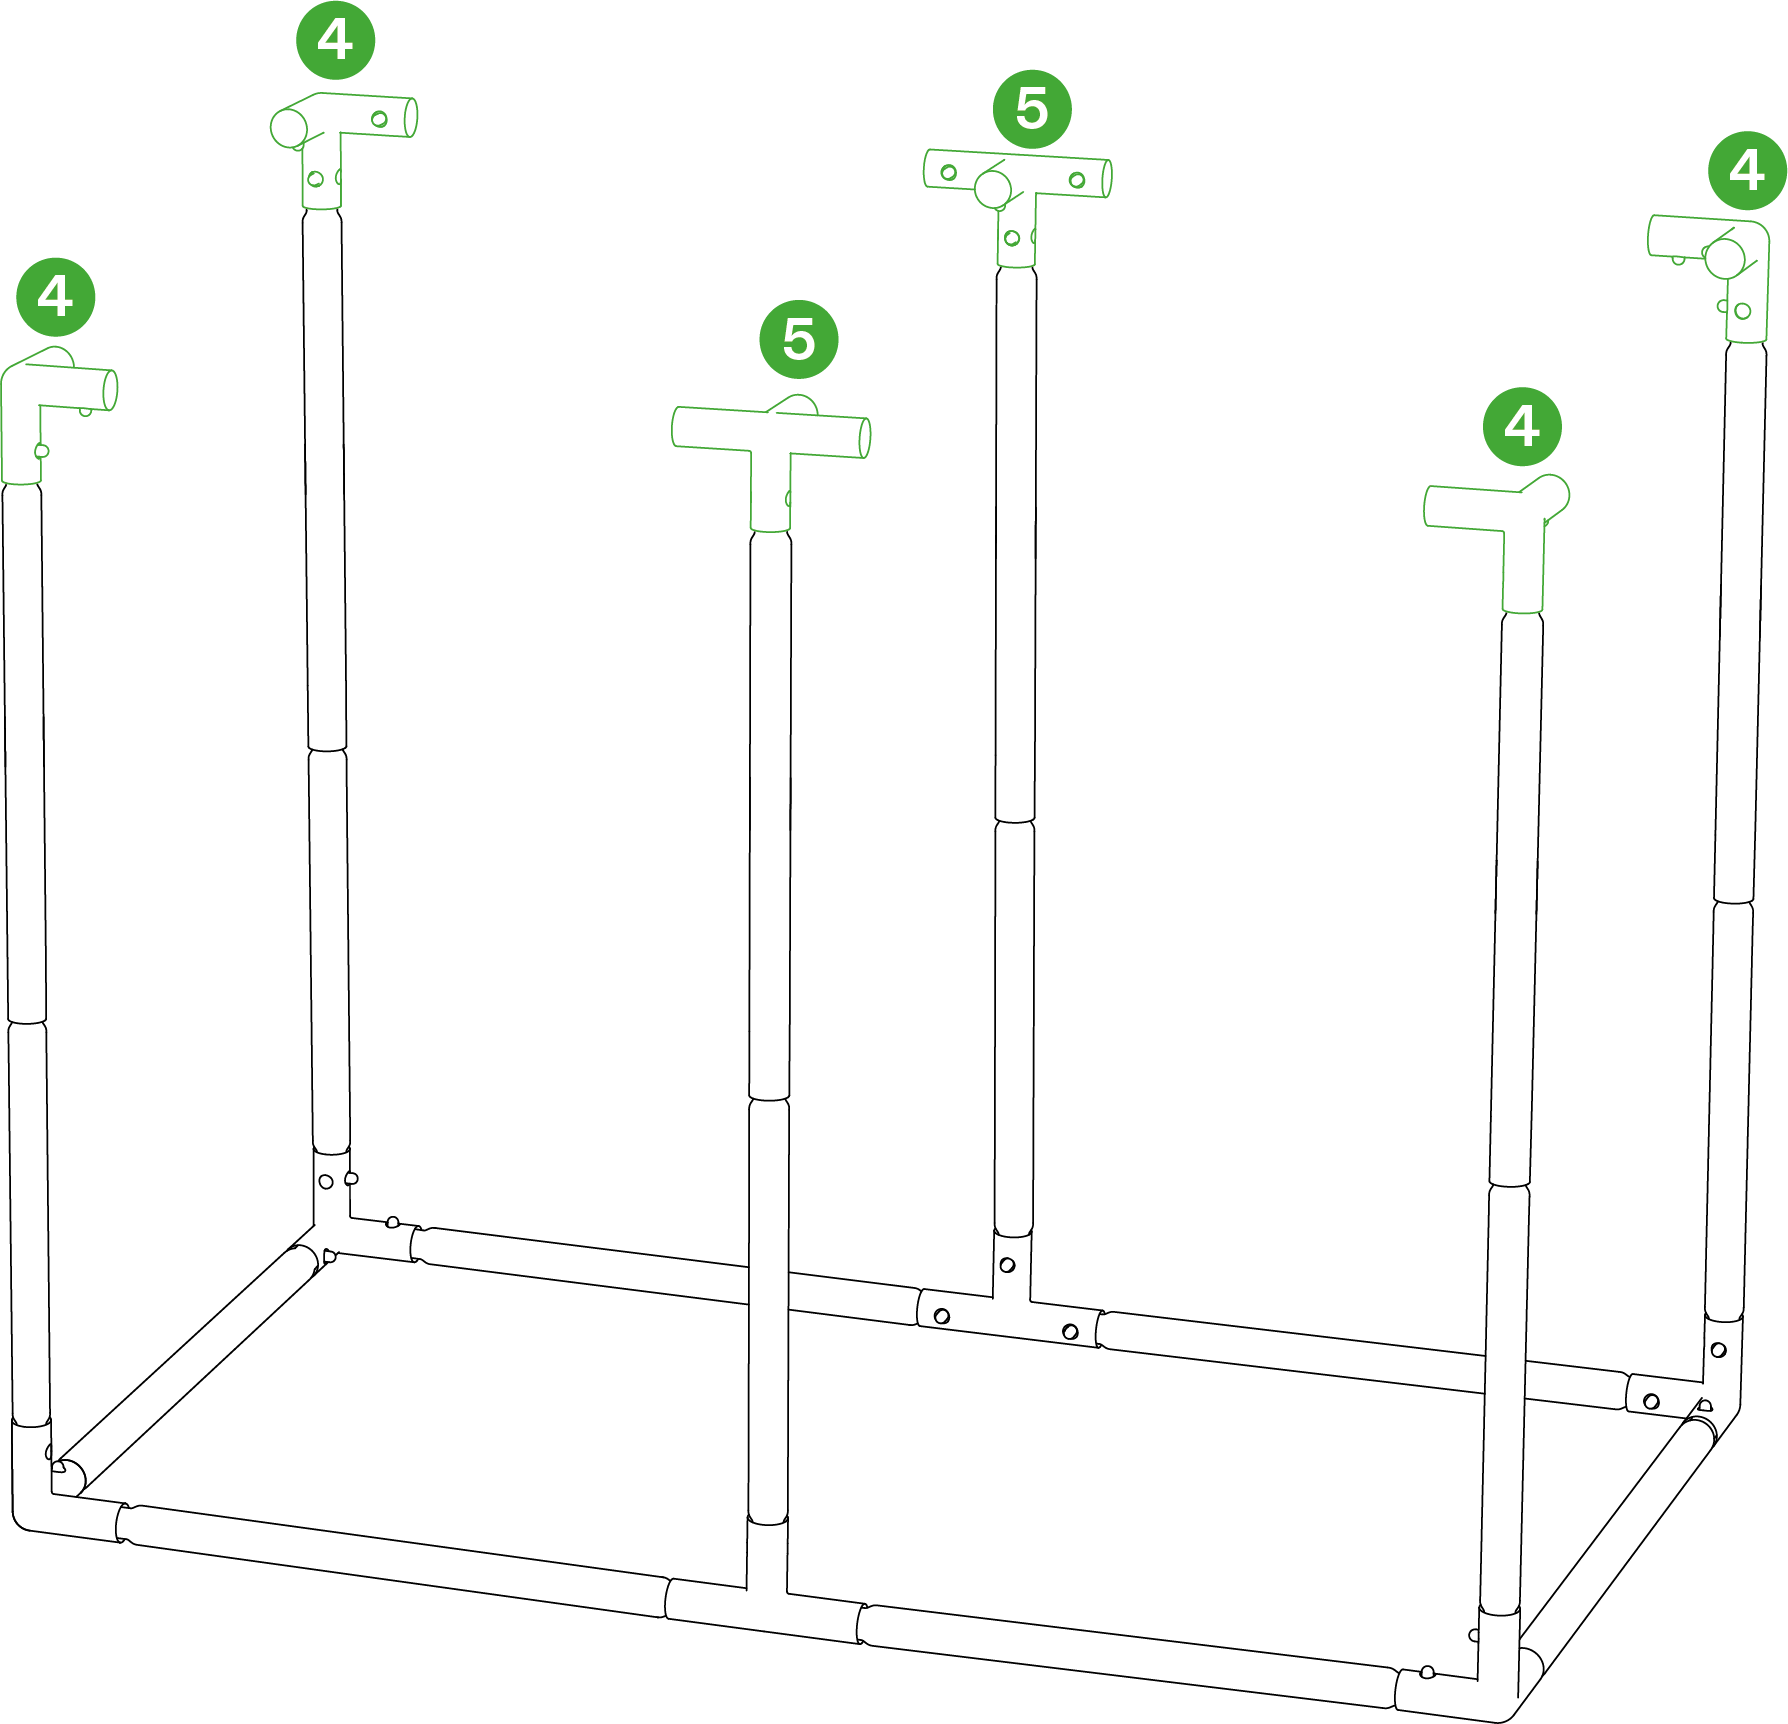
STEP 5
Connect the other seven (A) Poles to the Corner Supports (4) and Four-way connectors (5) to form the top frame of the tent.
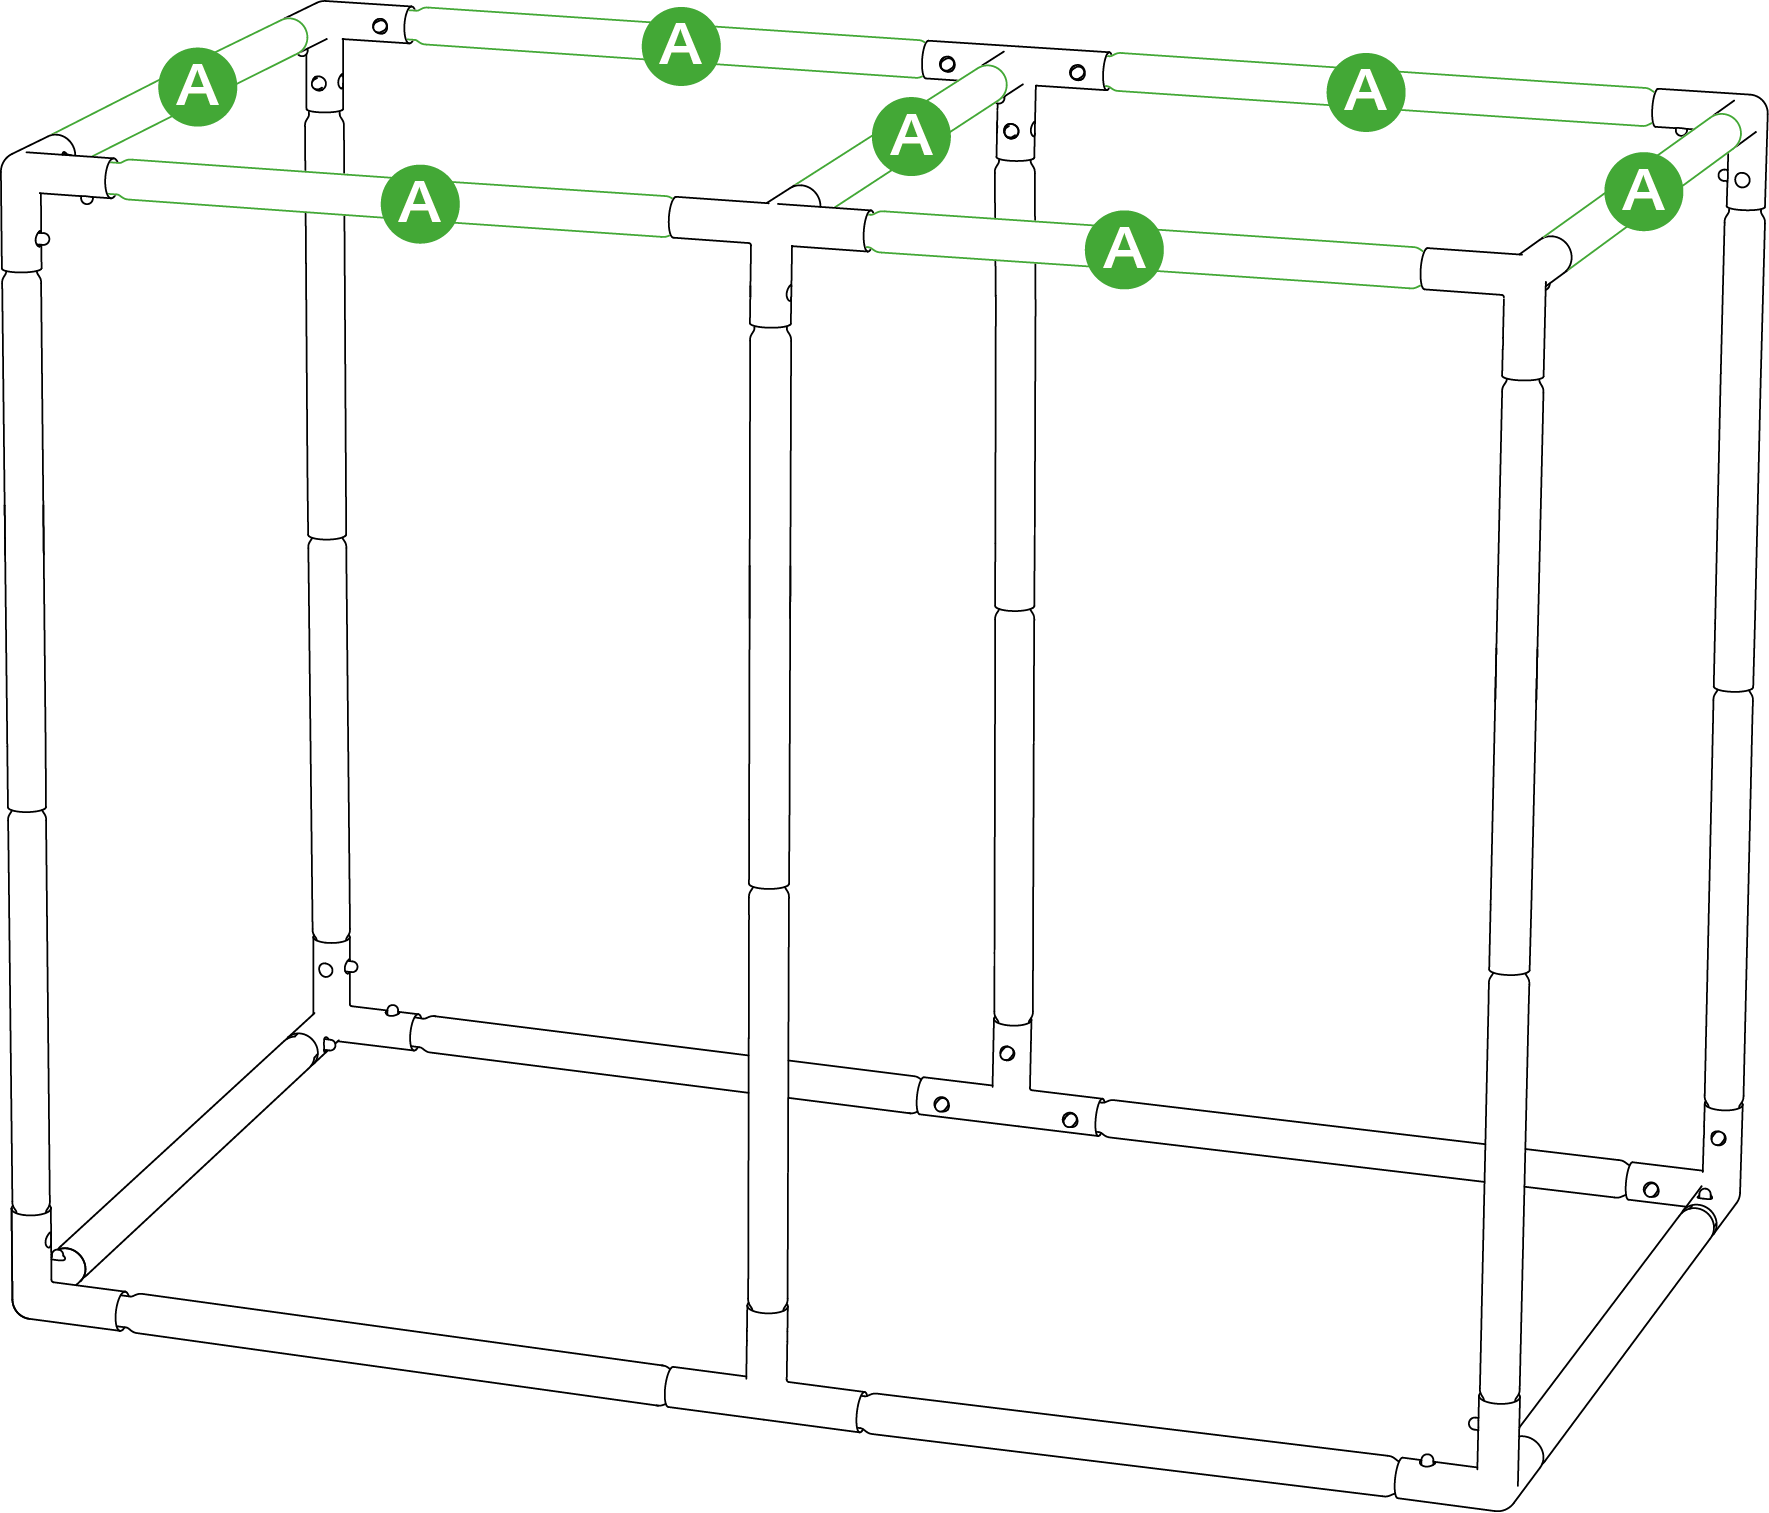
STEP 6
Unzip and unfold the Tent Coat (1) and place the frame base in the bottom section of the Tent Coat.
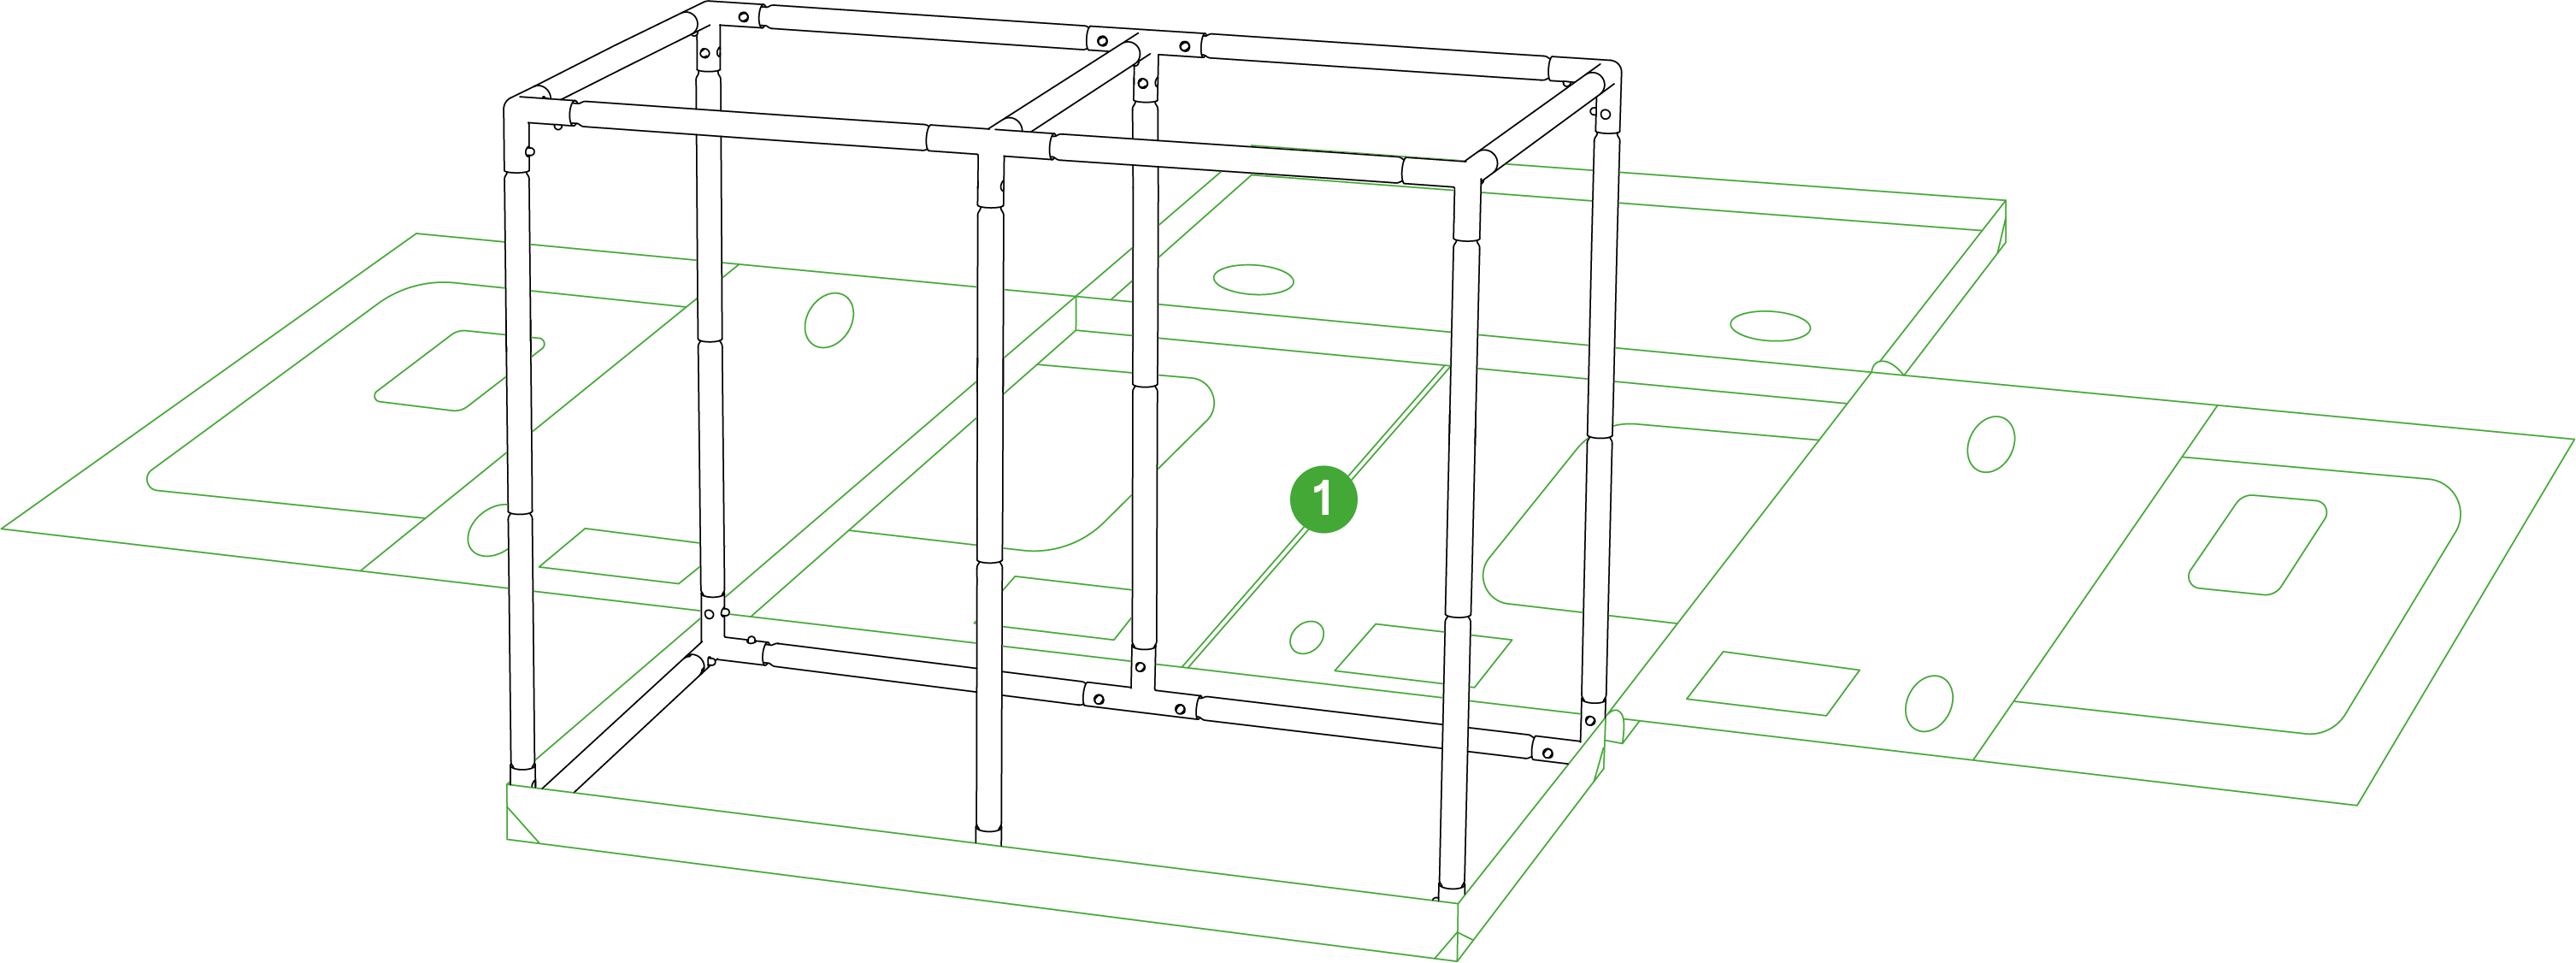
STEP 7
Pull the tent roof and cover over the top of the frame.
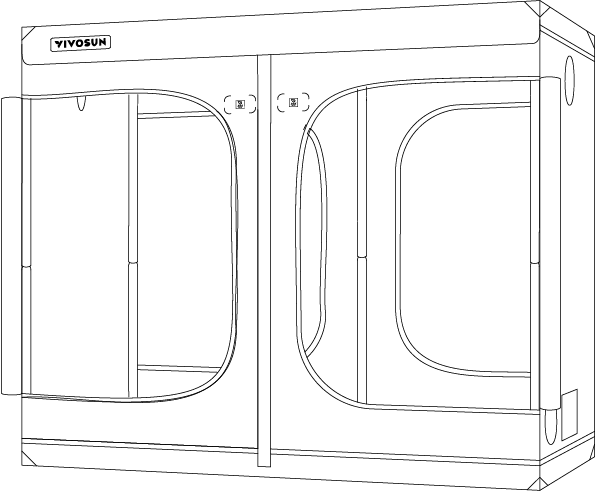
STEP 8
Place the Ceiling Bars (E, F) on the top frame as shown for hanging devices.
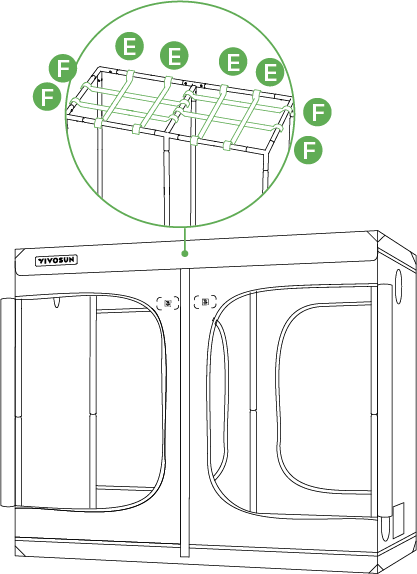
STEP 9
Place the Floor Tray (2) into the tent.
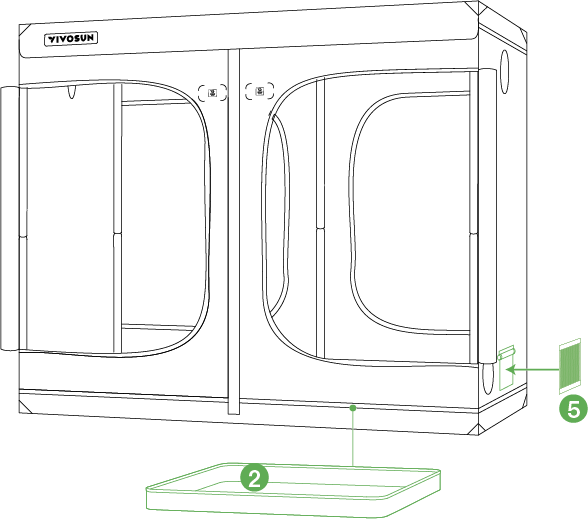
STEP 10
Pull the zippers to close the walls and doors of the tent. Make sure the tent coat fits the frame at the corners.
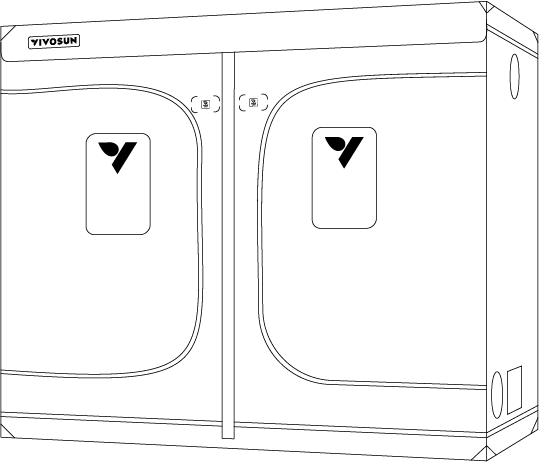
STEP 11
Install horizontal Support Rods (G) in accordance with your specific needs .
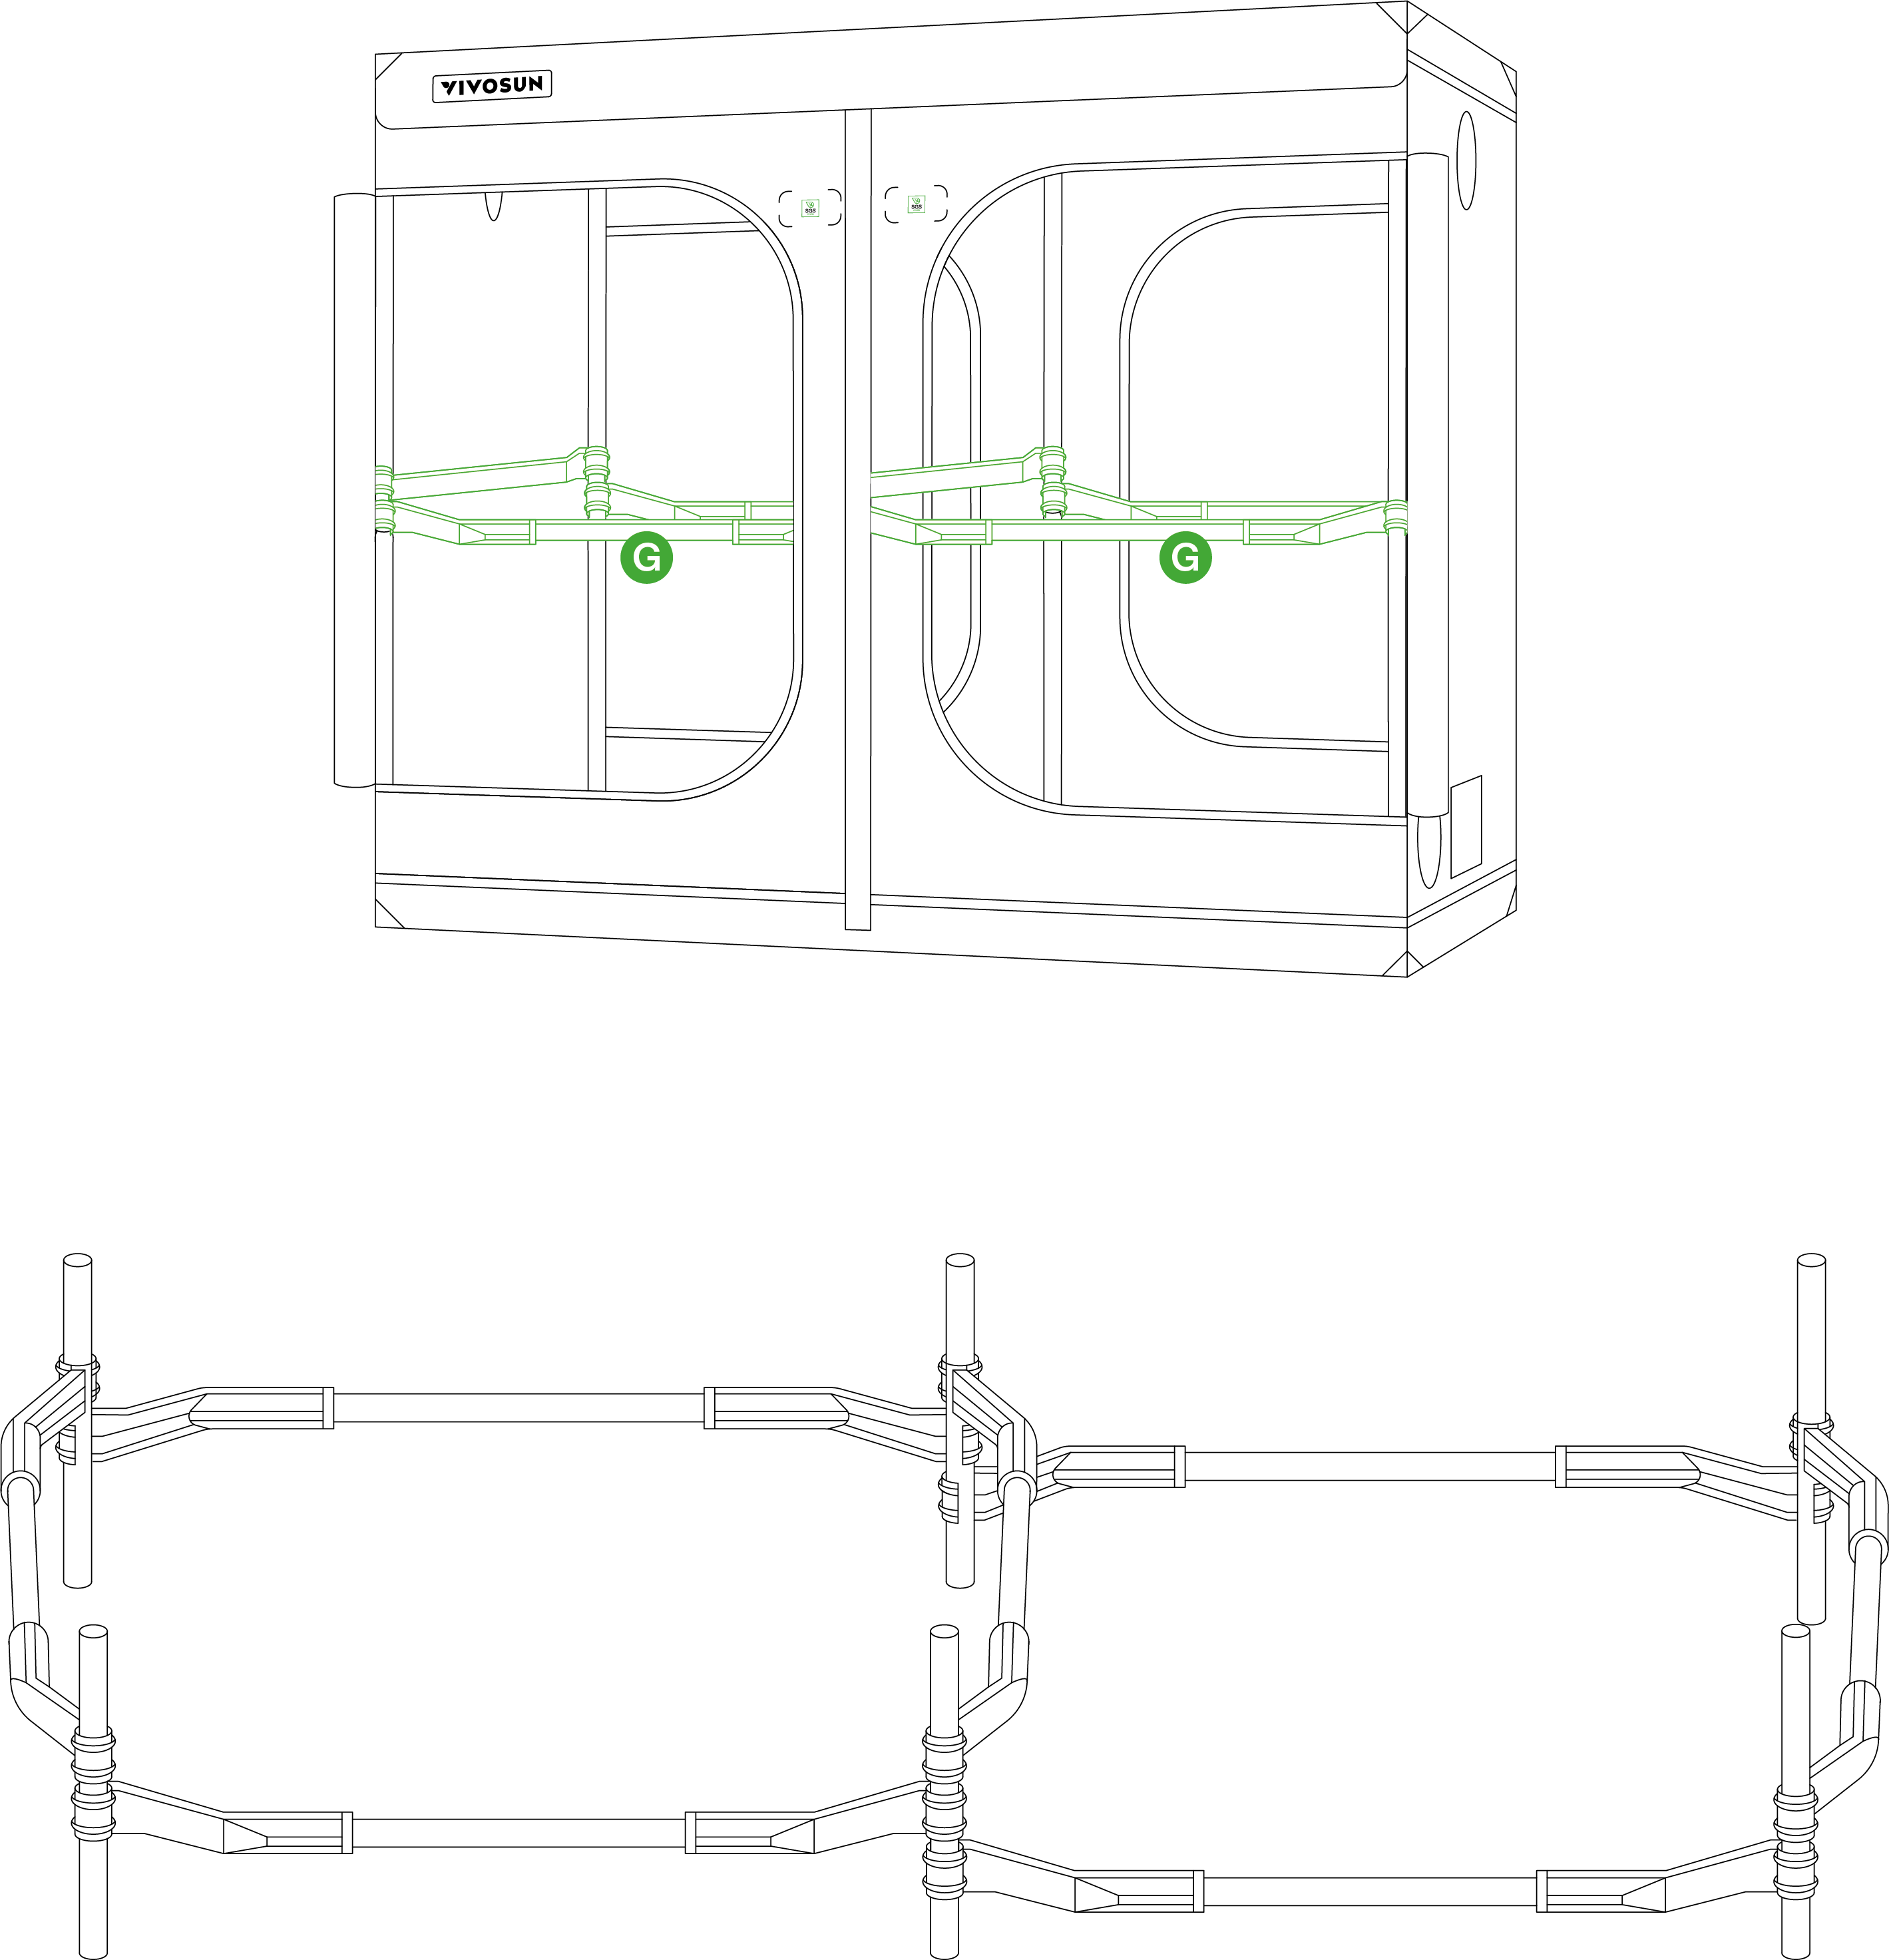
Warning
-
Ensure proper ventilation to avoid fire hazards and overheating. Use only certified electrical equipment and prevent overloading circuits to reduce the risk of fire or electric shock.
-
Do not exceed the weight limit to preserve the tent’s structural integrity.
-
Keep the tent out of reach of children to prevent suffocation or injury.
-
Avoid placing the tent near heat sources or open flames to reduce fire risks.
-
Regularly inspect poles and connectors to ensure the tent is securely assembled.
-
Handle metal components with care during assembly to prevent injury from sharp edges.
-
Use Grow Lights as directed, avoiding direct UV exposure to skin and eyes.
-
Clean the removable floor tray regularly to prevent water stagnation and mold growth.
-
Keep ducting and ventilation openings clear to ensure optimal airflow and prevent overheating.
Usage Note:
Before closing the zipper, smooth and align the inner light-proof flap to prevent it from getting caught.
If the zipper becomes stuck, do not force it open or closed, as this may damage the zipper.
Warranty
VIVOSUN offers a 2-year limited warranty on this product purchased directly from us or our authorized dealers, beginning on the original date of purchase.This warranty is provided in addition to, and does not affect, your statutory rights under applicable consumer protection laws in the country where the product was purchased.For the full Warranty Policy, please visit: https://www.vivosun.com/help/warranty-policy
Alternatively, you may contact customer service at support@vivosun.com / +1 888-505-8486.
Contents

We help you grow your best green.

We provide the highest quality.

We relentlessly pursue the future.

We make growing more enjoyable.

We support every grower.
Sign up and get 8% off your first order
©2026 Vivosun All Rights Reserved