
English
AeroZesh G Manual
MODEL NAME
-
VSV-AZG4
-
VSV-AZG6
-
VSV-AZG8
-
VSV-AZG4E42A
-
VSV-AZG6E42A
-
VSV-AZG8E42A
KEY FEATURES
-
QUIET PWM EC MOTOR : EC motor with PWM tuning provides low noise and energy saving.
-
EFFICIENT AIR FLOW : Efficient airflow delivery with hydro-mechanical stator blades in high static pressure.
-
SPEED CONTROL& ON/OFF CYCLE¹ : 10-level speed control and three ON/OFF cycle modes via E12 controller.
-
DUAL BALL BEARINGS : Dual ball bearings in motor provide an estimated 67,000 hours lifespan. Enables the fan to be mounted in any direction.
-
MULTIPLE MODES² : Manual, ON/OFF cycle, and intelligent Auto modes, quick and easy setup via the VIVOSUN GrowHub.
-
WI-FI & APP CONTROL² : Smart settings based on variable environment conditions via GrowHub and VIVOSUN App remotely
-
Only on models of VSV-AZG4/VSV-AZG6/VSV-AZG8
-
Only on models of VSV- AZG4E42A/VSV-AZG6E42/VSVAZG8E42
-
PRODUCT CONTENTS
VSV-AZG4/VSV-AZG6/VSV-AZG8
| Image | Name | Quantity |
|---|---|---|
Duct Fan |
1PC |
|
|
Type C Extension Cable |
1PC |
|
E12 Controller |
1PC |
|
Hanging Straps |
2 PCS |
Screw Set |
4 PCS |
|
Wall Anchor |
4 PCS |
VSV-AZG4E42A/VSV-AZG6E42/VSV-AZG8E42
| Image | Name | Quantity |
|---|---|---|
|
Duct Fan System |
1PC |
|
|
Type C Extension Cable |
1PC |
|
|
Hanging Straps |
1PC |
Duct Fan Screw Set |
4 PCS |
|
Wall Anchor |
4 PCS |
|
|
Smart Controller |
1 PC |
|
Temperature/ Humidity Sensor |
3 m |
|
Expansion Screws |
2 PCS |
|
Iron Plate |
1 PC |

|
Cable Tie |
3 PCS |
|
Wire Tie |
1 PC |
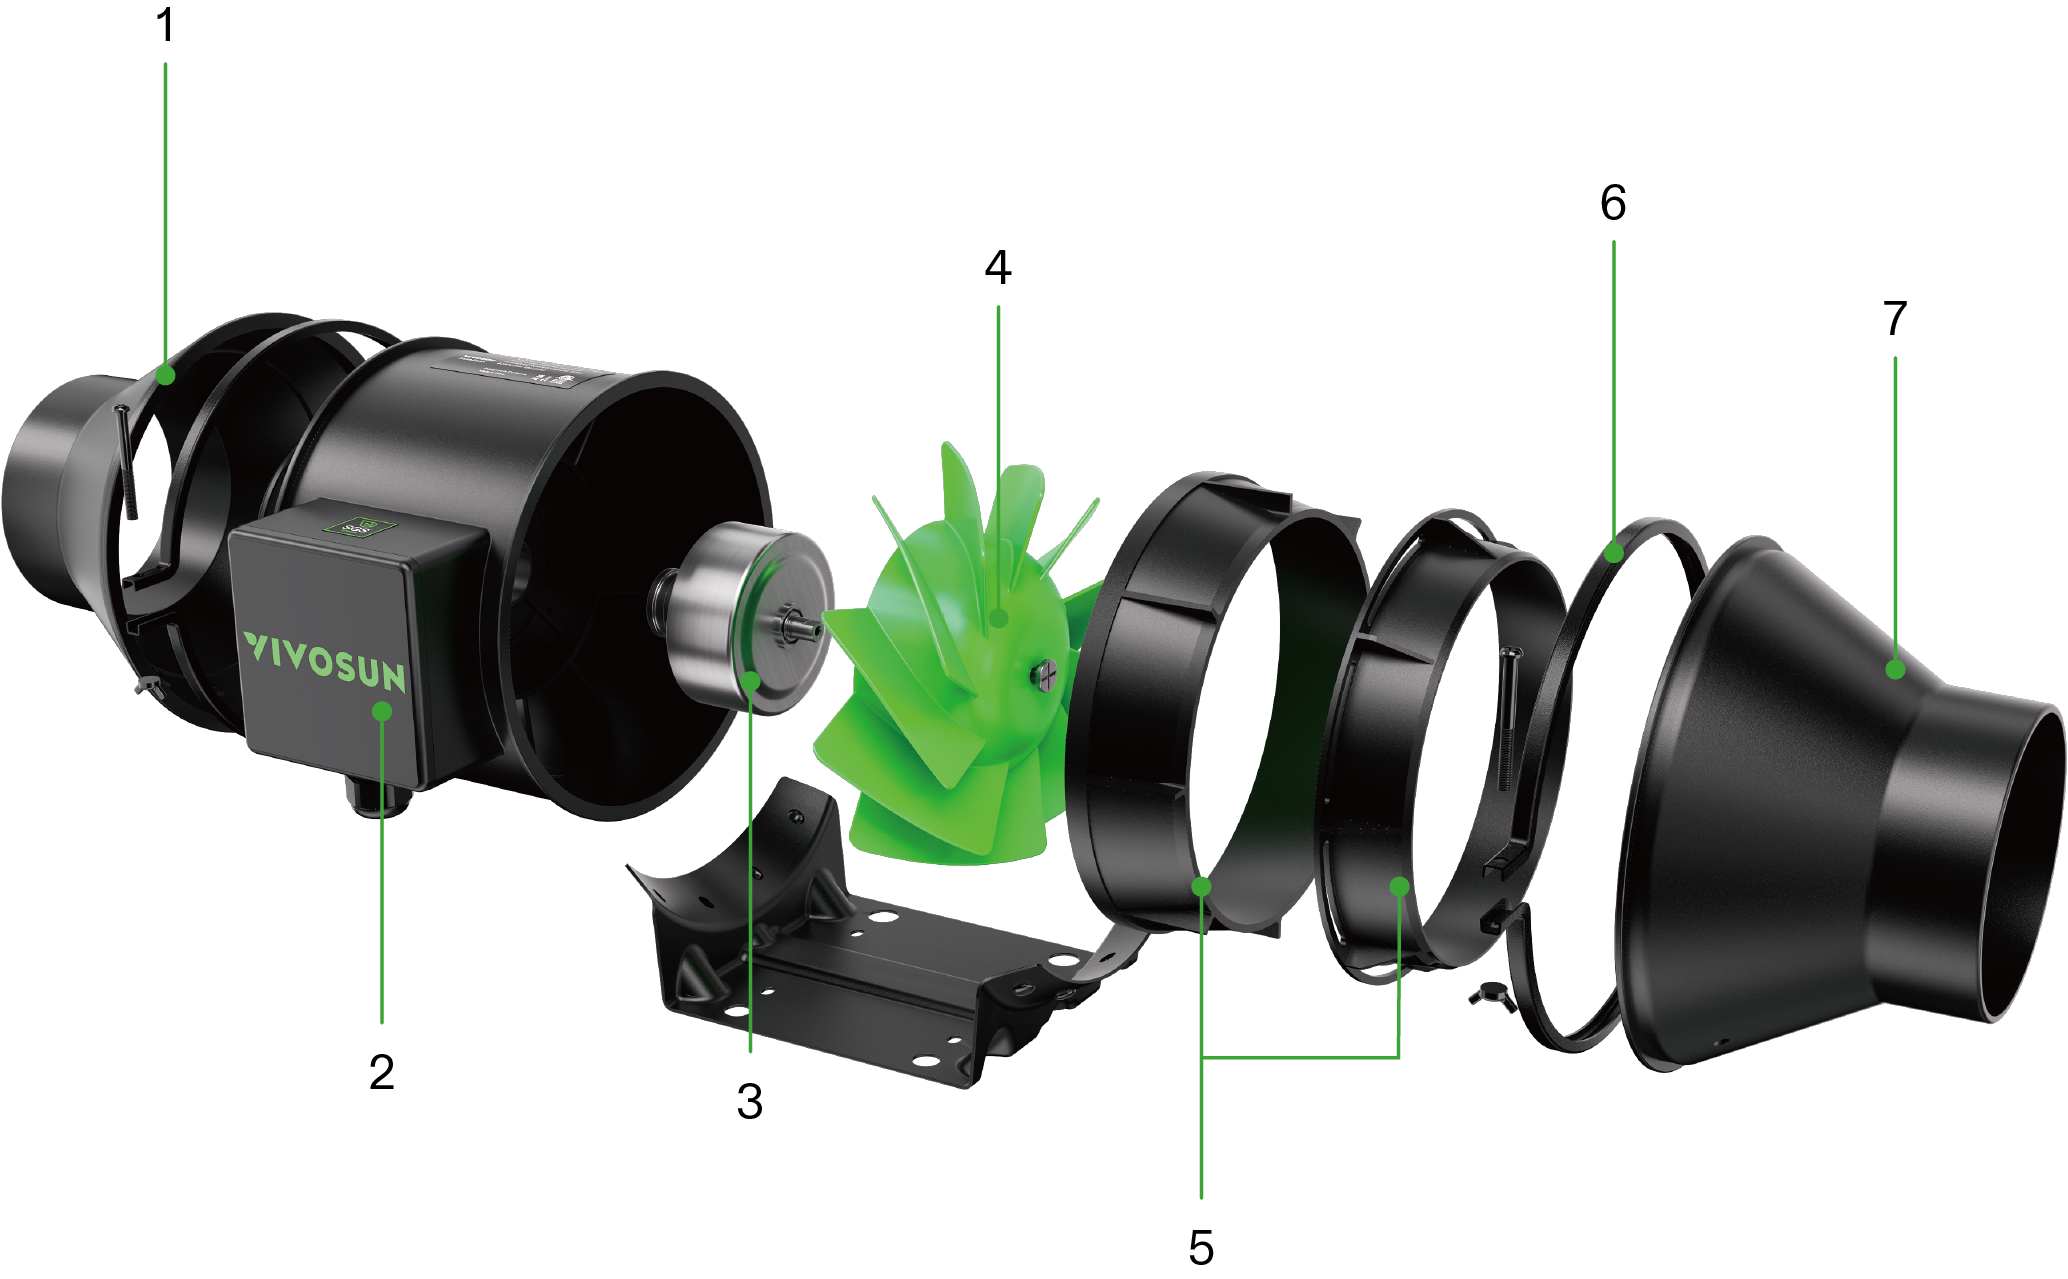
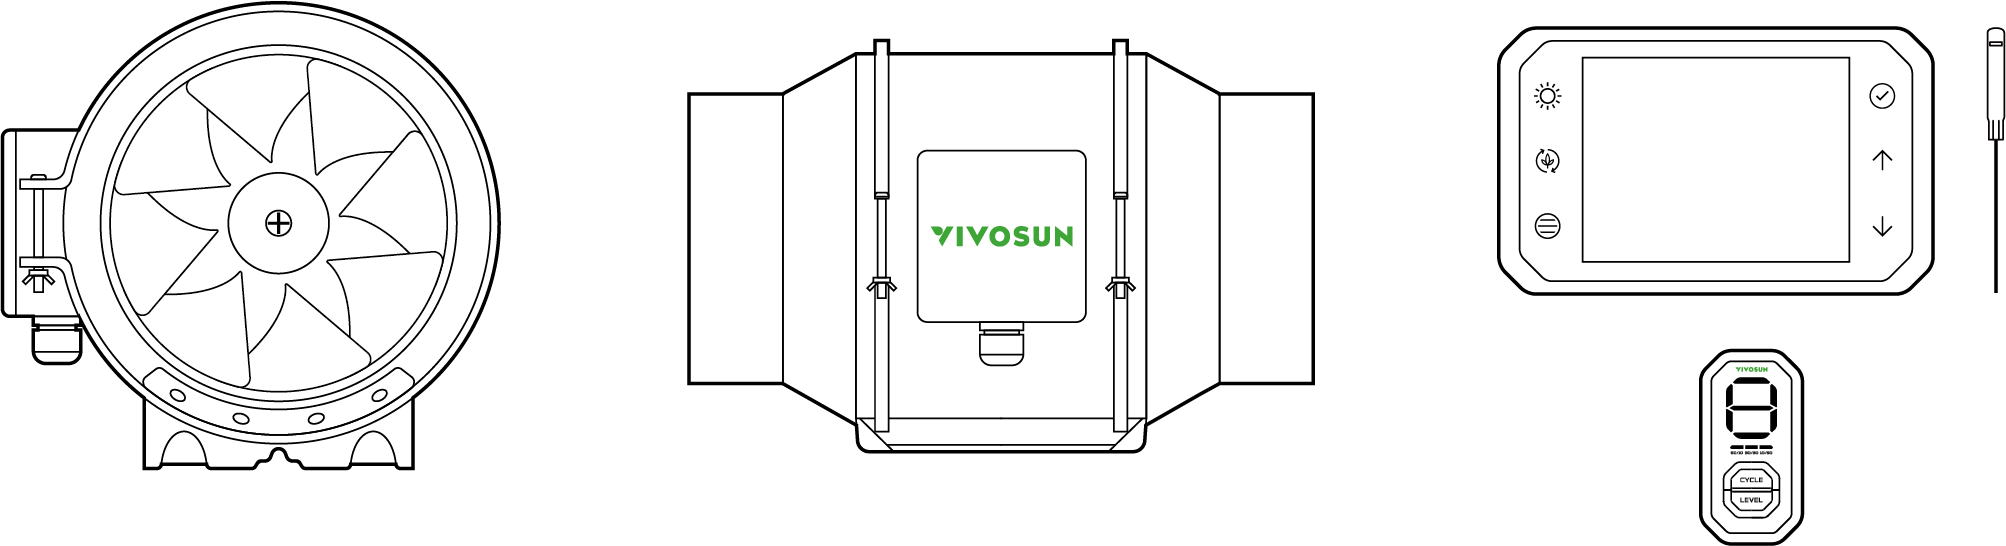
① |
Exhaust Flange |
② |
Fan Unit |
③ |
EC Motor |
④ |
Rotor Blades |
⑤ |
Wind Circle |
⑥ |
Buckle |
⑦ |
Intake Flange |
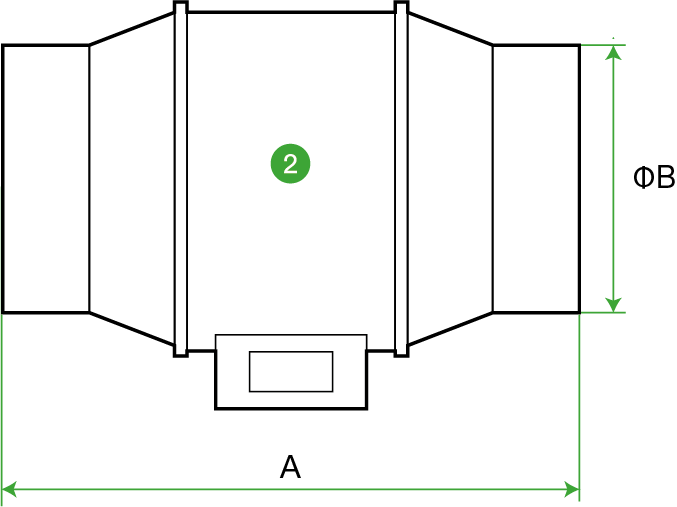
DIMENSION
|
|
|
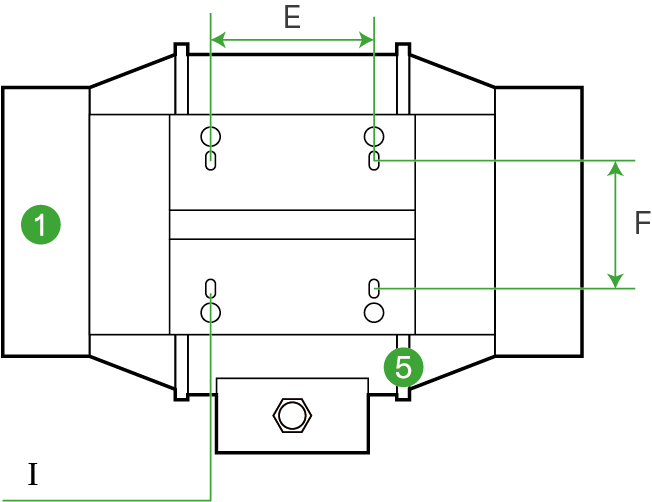
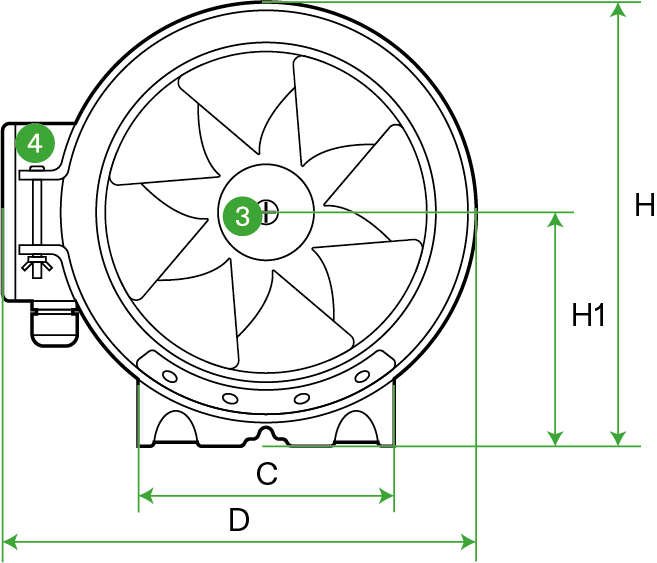
Series No. |
Part |
Quantity |
① |
Flange |
2 |
② |
Fan Unit |
1 |
③ |
Rotor Blades |
1 |
④ |
Terminal Box |
1 |
⑤ |
Buckle |
2 |
Unit: inch
Model No. |
VSV-AZG4 |
VSV-AZG6 |
VSV-AZG8 |
A |
11.9 |
12.4 |
13.0 |
ΦB |
Φ4 |
Φ6 |
Φ8 |
C |
4.7 |
4.7 |
5.3 |
D |
7.9 |
8.9 |
9.9 |
E |
3.2 |
3.2 |
3.9 |
F |
2.4 |
2.4 |
3.1 |
G (Long hole) |
0.3x0.2 |
0.3x0.2 |
0.3x0.3 |
H |
7.4 |
8.3 |
9.3 |
H1 |
3.9 |
4.3 |
4.9 |
SPECIFICATIONS
VSV-AZG4 |
VSV-AZG6 |
VSV-AZG8 |
|
Size |
4 inch |
6 inch |
8 inch |
Input |
110-240V 50/60Hz |
110-240V 50/60Hz |
110-240V 50/60Hz |
Average Power Usage |
20W |
35W |
78W |
MAX Power Usage |
27W |
50W |
180 W |
Airflow |
195 CFM |
388 CFM |
725 CFM |
Noise |
28 dB(A) |
32 dB(A) |
51 dB(A) |
Fan Speed (Max) |
2700RPM |
2500RPM |
3000RPM |
Electric Motor |
EC-motor |
EC-motor |
EC-motor |
Bearing |
Dual Ball Bearing |
Dual Ball Bearing |
Dual Ball Bearing |
Bearing IP |
IP44 |
IP44 |
IP44 |
Bearingsrated |
67000H |
67000H |
67000H |
Certification |
FCC,CE,ETL |
FCC,CE,ETL |
FCC,CE,ETL |
APPLICATION
AeroZesh can be used as an exhaust fan or an intake fan for your grow space, and each has different setup position for optimal ventilation.
Exhaust fan: Hung or mounted on the highest opposite corner inside your grow space. Airflow arrow points away from your grow space.
Intake fan: Mounted at a bottom corner outside of your grow space. Airflow arrow points toward your grow space.
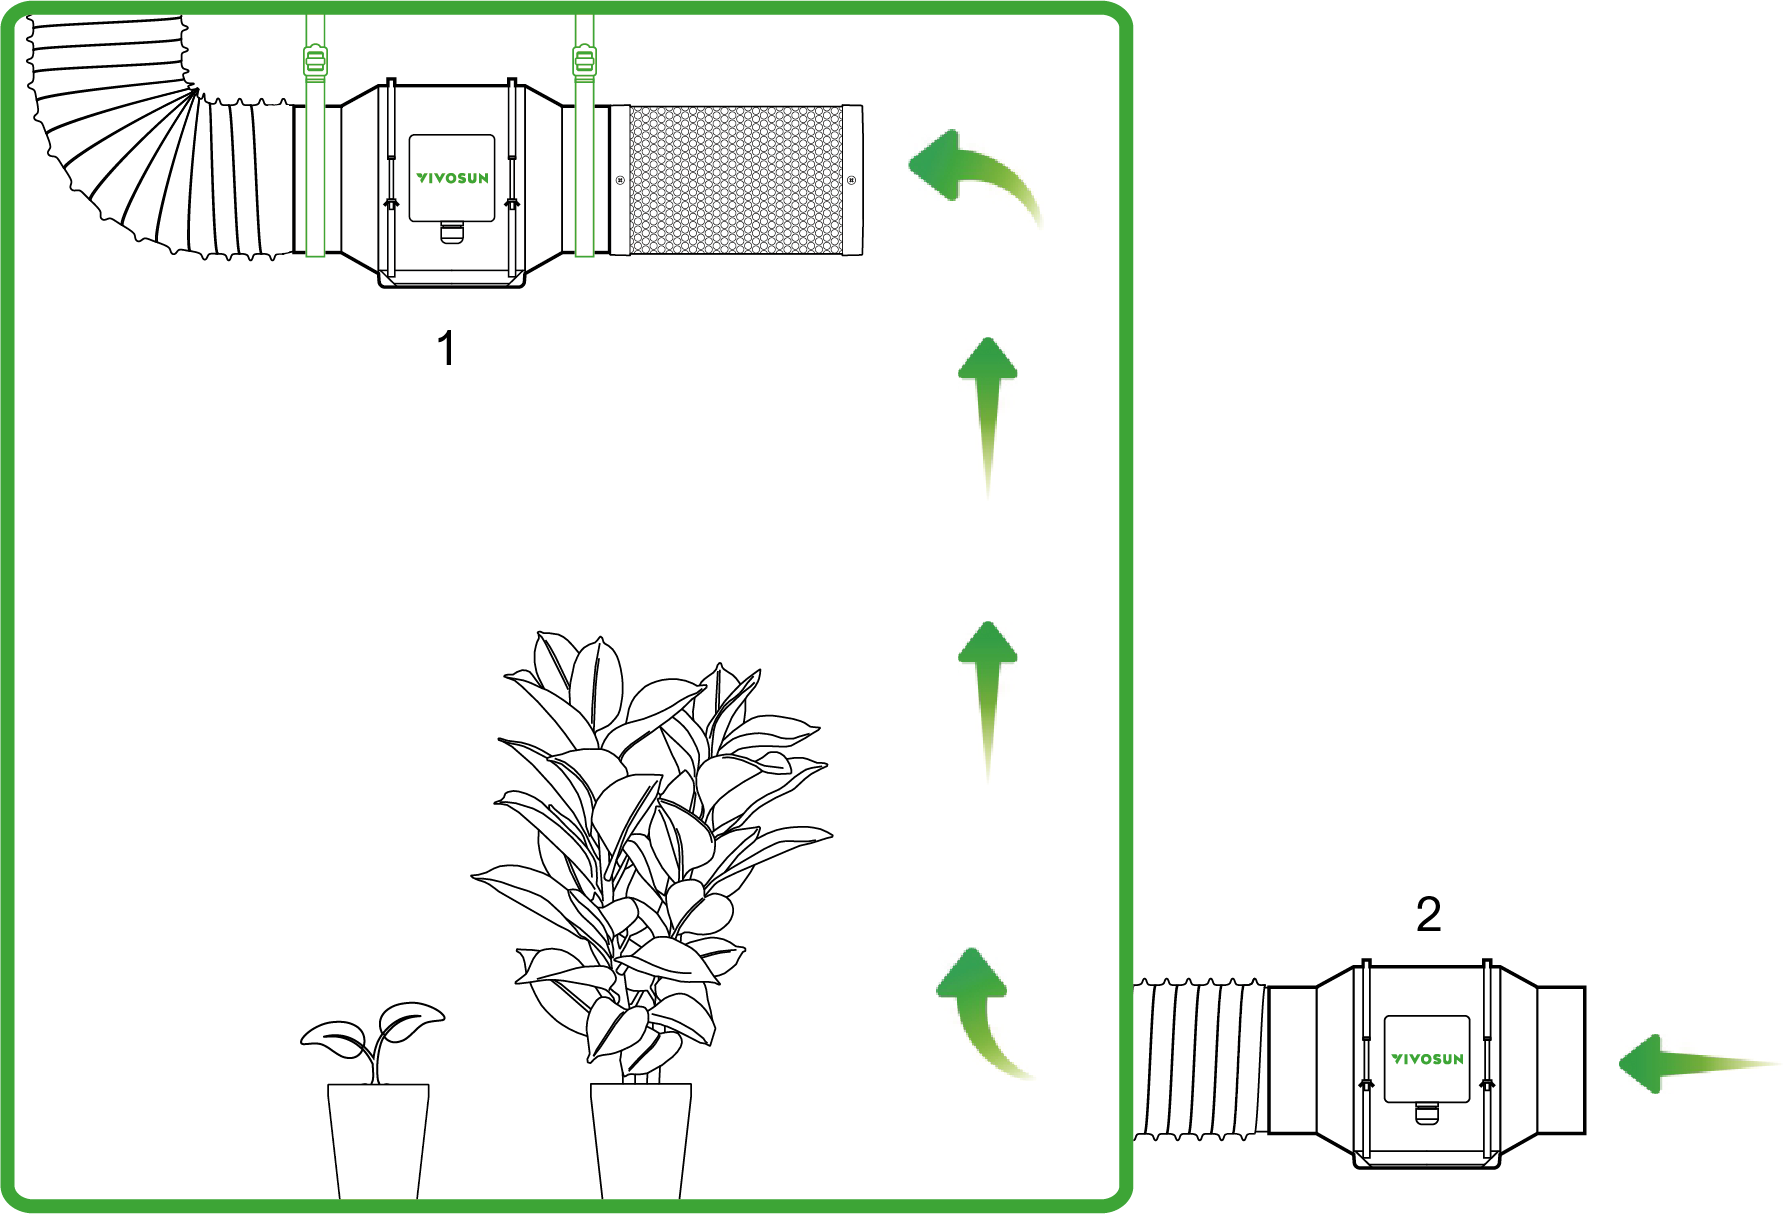
1.Exhaust Fan
2.Intake Fan
INSTALLATION
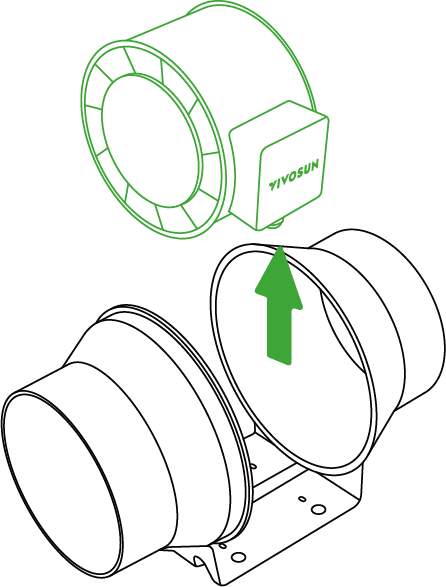
1. MOUNTING AS AN INTAKE FAN
STEP 1
Unscrew and loosen the buckles on the fan unit.
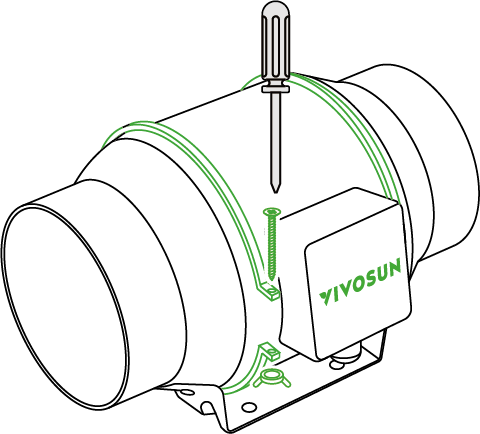
STEP 2
Remove the fan unit from the flange bracket.
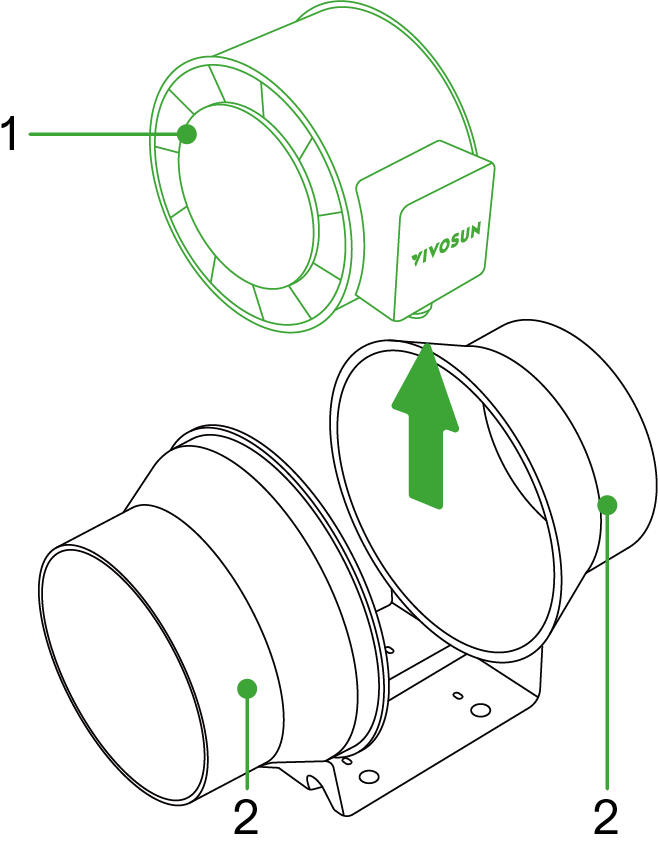
*1.Fan Unit
*2.Flange
STEP 3
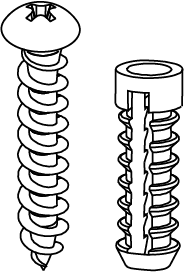
Drill four holes and attach the two flange brackets on the desired position on a wood support or stud with four wood screws. If you want to mount the fan on a surface other than wood, attach the wall anchors through the holes before screwing the wood screws to attach the flange bracket.
STEP 4
Slide the fan unit back between two flanges brackets, make sure the airflow arrow on the fan unit is the same direction with that on the flange bracket. Then tighten the metal clamps to secure the fan unit .
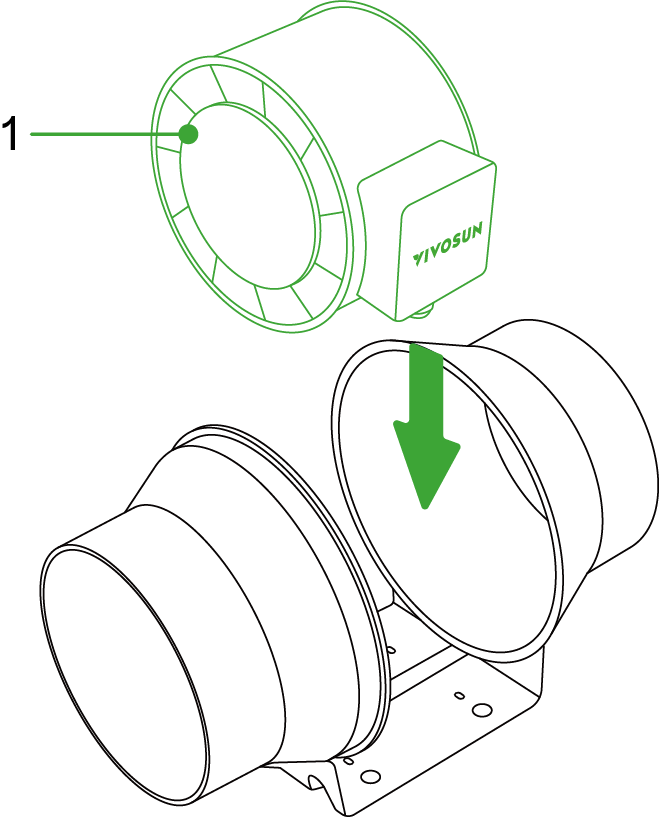
*1.Fan Unit
STEP 5
Put the buckles back on the fan unit and fix with screws.
*1.Buckle
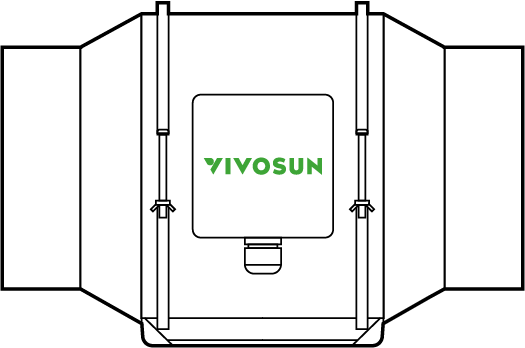
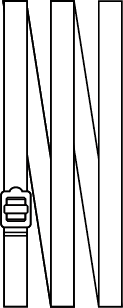
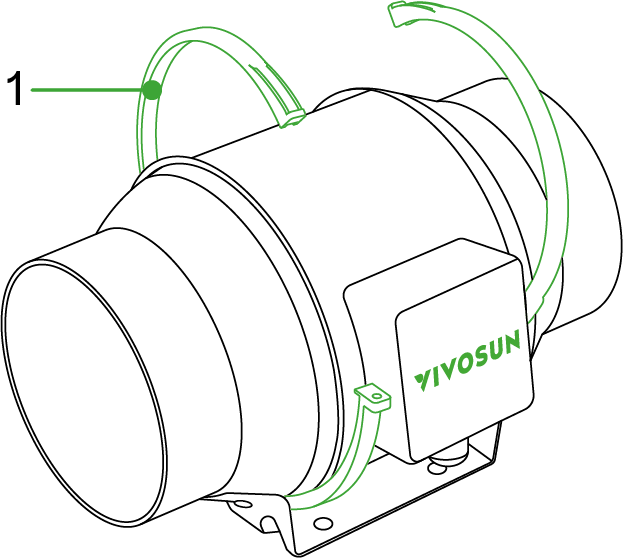
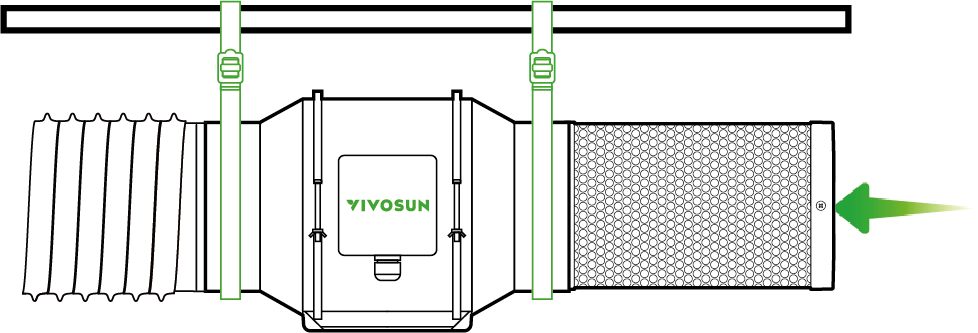
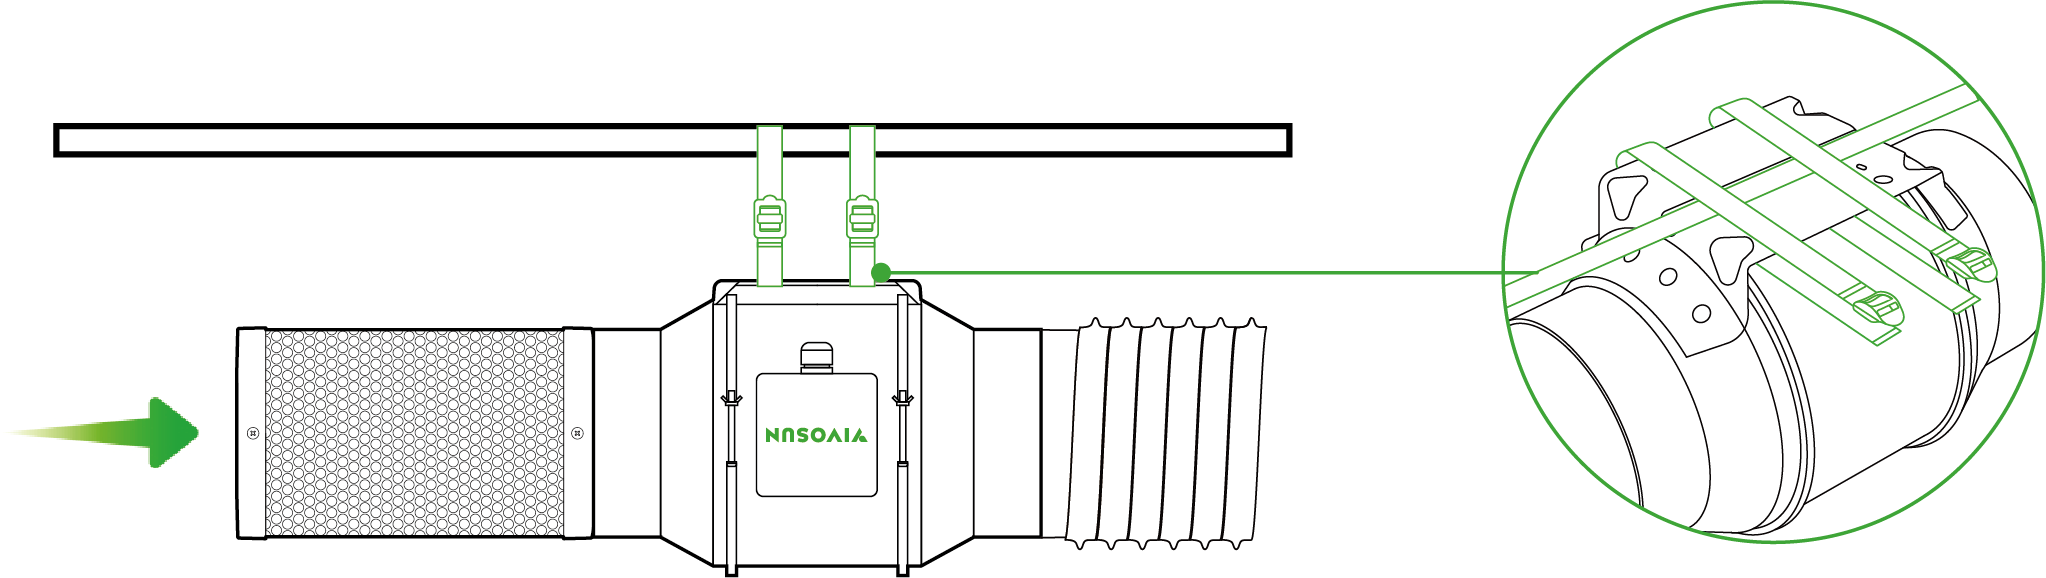
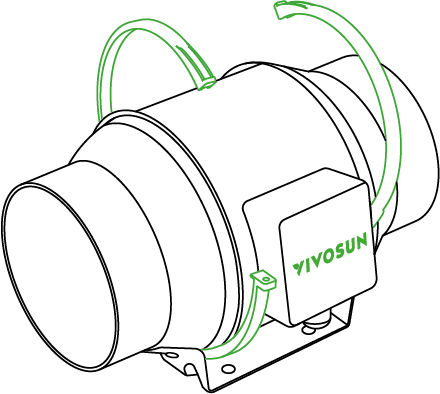
2. HANGING AS AN EXHAUST FAN
A. HANGING UPWARD
A.1 Hanging Straps
STEP 1
Loop the two hanging straps around the flanges as shown in the diagram.

STEP 2
Slip the strap through the inner ladder lock slot from the bottom.
STEP 3
Pass the strap into the outer ladder lock slot from the top. Adjust the length of the completed loop as needed.
|
|
|
STEP 4
Tuck the loose end through the center gap of the ladder lock to secure the loop.
STEP 5
Loop the other end of two hanging straps around a pole as showed in picture.
Hang the fan by the duct flanges to secure it. Adjust the height as needed to fit your space.
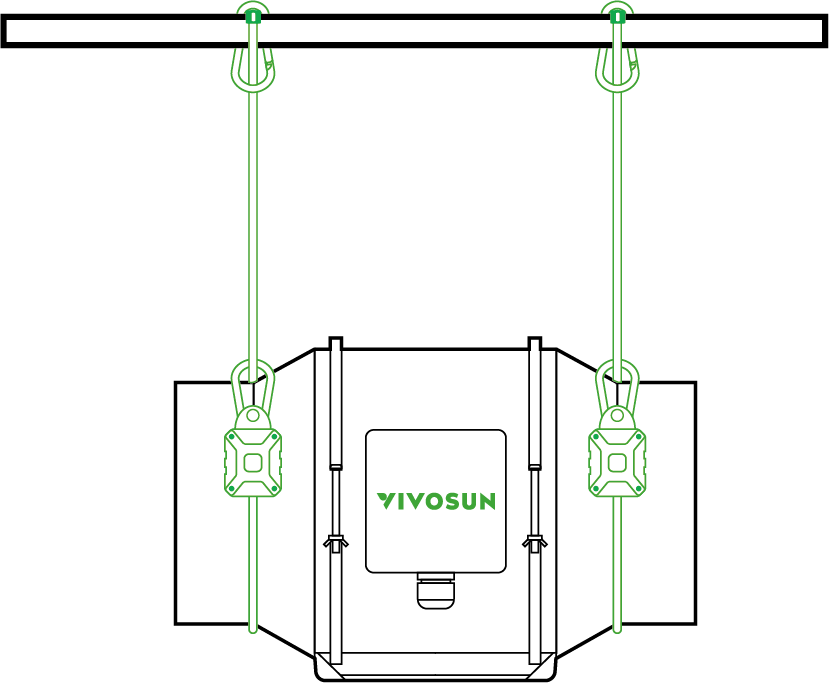
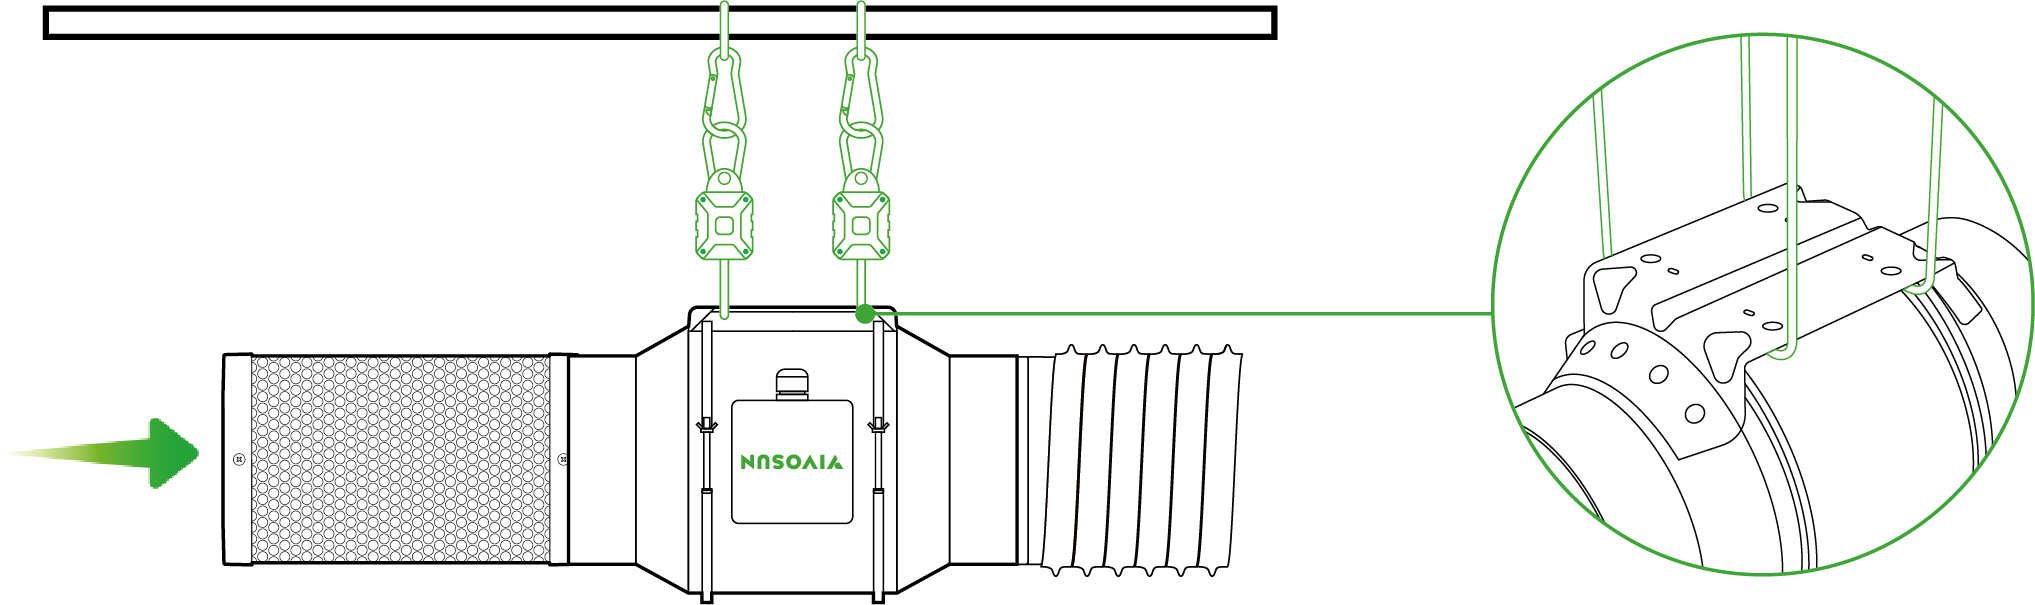
A.2 Rope Hangers (sold separately)
STEP 1
Loop the two rope hangers around the flanges as shown in the diagram. Lock the carabiners to the ropes to secure the fan.
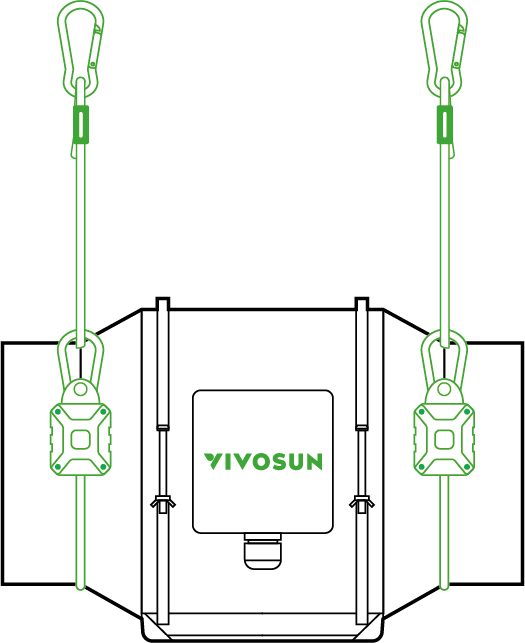
STEP 2
Loop the other end of the rope hangers around the crossbeam as shown in the diagram. Lock the carabiners to the rope to secure the fan to the pole.
Press the yellow adjustment button to raise and lower the fan to your desired height.
B. HANGING DOWNWARD
B.1 Hanging Straps
Loop the hanging straps around the pole and the flange brackets of the fan. Adjust and tighten the hanging straps, as show in part A.1, Steps 2-4. Let the fan hang on the pole once the straps are secure.
B.2 Rope Hangers(sold separately)
Loop the two rope hangers around the pole and the flange bracket of the fan. Secure the two hooks to their respective ropes to hang the fan.
Press the yellow button on the rope hanger to adjust the height of the fan to the desired level.
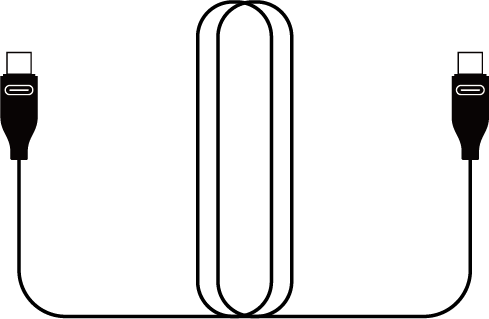
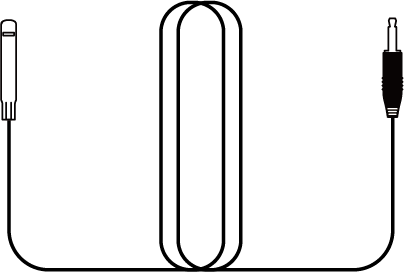
3. CONNECTING TO THE E12 CONTROLLER
VSV-AZG4/VSV-AZG6/VSV-AZG8
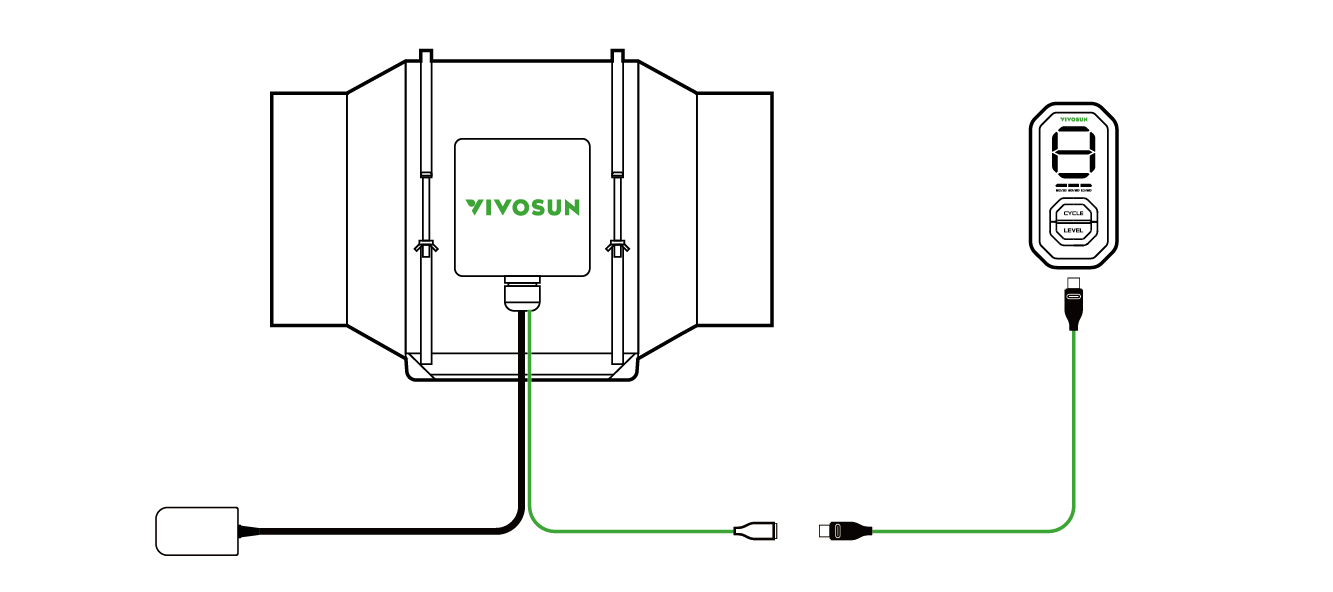
Use a Type-C extension cord to connect an AeroZesh to an E12 Controller. The controller will get power from the duct fan.
4. CONNECTING TO THE VIVOSUN GROWHUB CONTROLLER
VSV-AZG4E42A/VSV-AZG6E42/VSV-AZG8E42
A
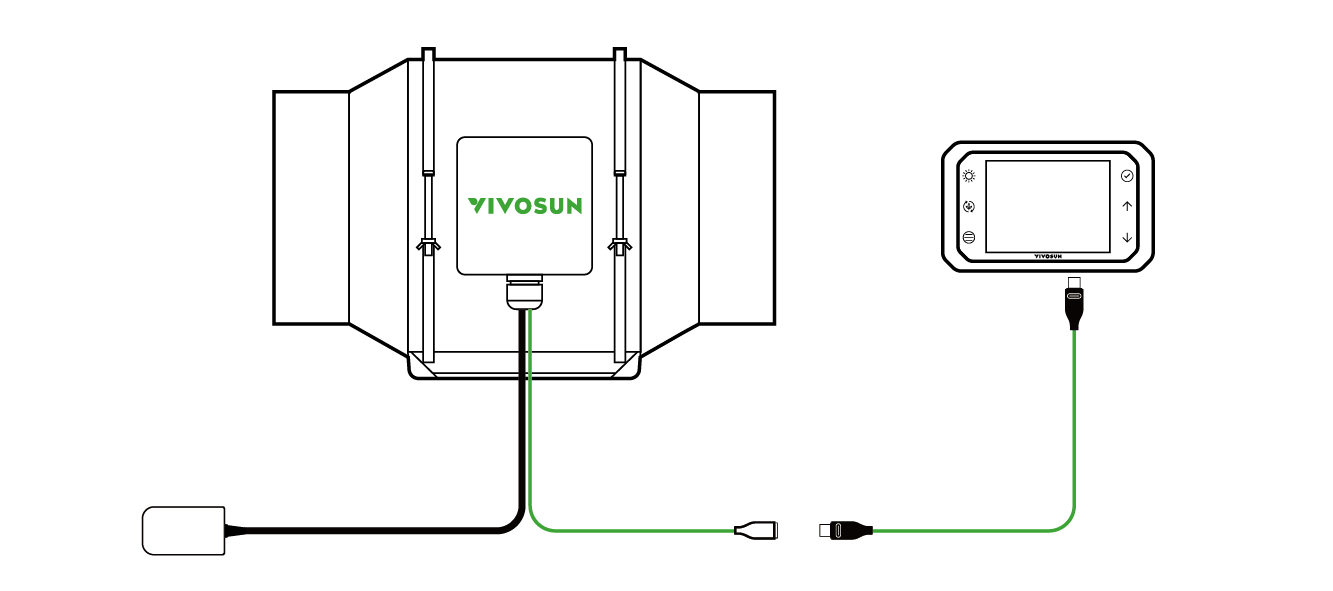
B
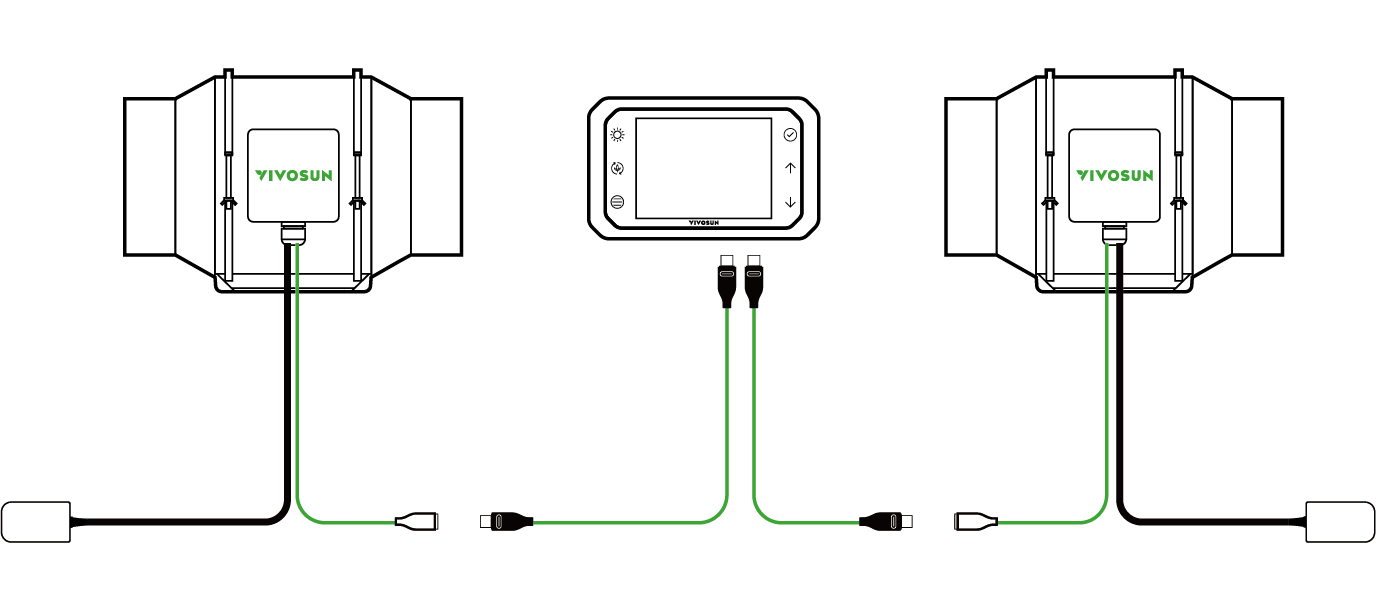
Use a Type-C extension cord to connect an AeroZesh to a GrowHub controller (A). A GrowHub controller has two Type-C ports to control two AeroZesh fans (B). The controller will get power from the AeroZesh.
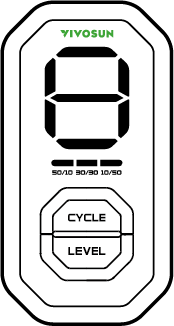
FAN CONTROL
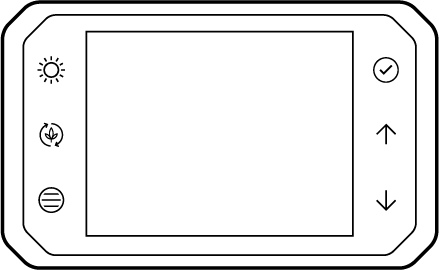
CONTROLLED BY E12 (VSV-AZG4/VSV-AZG6/VSV-AZG8)
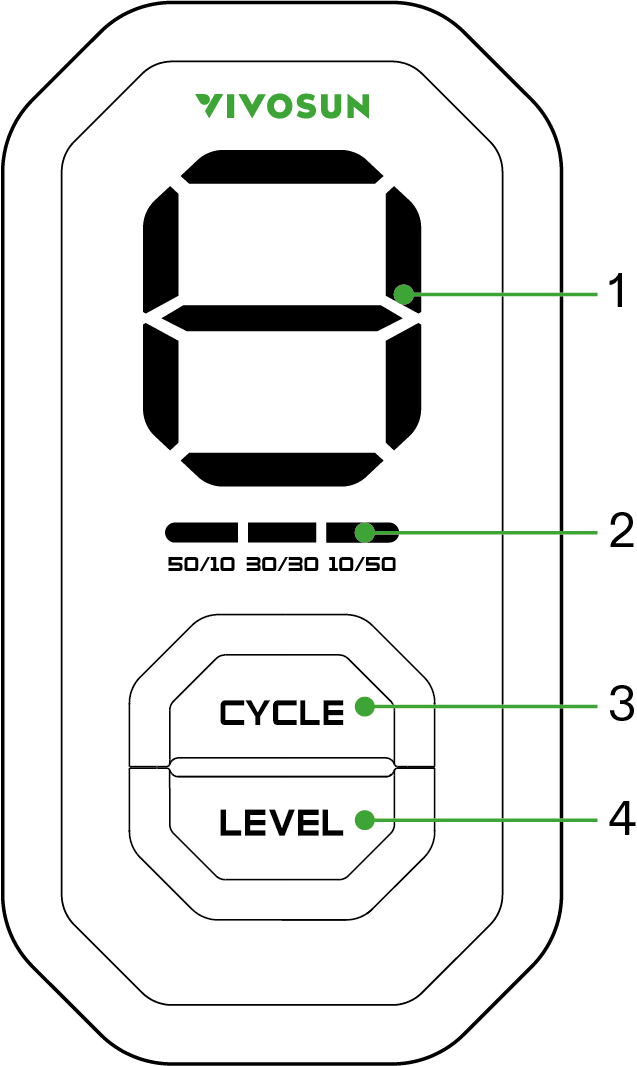
① |
Current speed level |
② |
Current ON/OFF cycle |
③ |
Control button of ON/OFF cycle mode |
④ |
Control button of speed level |
Fan Speed Setting
Press the ''LEVEL'' button to change the fan speed level from 0 to Max. The speed level will display above (''A'' indicates the max speed level).
Long press "LEVEL" button for 3 seconds to quick turn off the duct fan. The speed level will be saved and restored if you turn on the duct fan by pressing the "LEVEL" button again.
ON/OFF Cycle Setting
Press the ''CYCLE'' button to switch between three ON/OFF cycle modes and the corresponding indicator light will on:''50/10'': 50min ON, 10min OFF ''30/30'': 30min ON, 30min OFF. ''10/50'': 10min ON, 50min OFF. No lights on: Manual mode.
All the indicating lights and display screen will turn off after no operation for 10 seconds. Press any button to turn on the screen.
Notice: Suggest to use E12 outside the grow tent for longer life span.
CONTROLLED BY GROWHUB E42A (VSV-AZG4E42A/VSV-AZG6E42/VSV-AZG8E42)
Please see the manual of GrowHub E42A about duct fan control and App connection.
MAINTENANCE
Regular cleaning each year is suggested. Make sure to turn off power before cleaning.
|
STEP 1 Unscrew and loosen the buckles on the fan unit and remove it from the flange brackets. |
|
STEP 2 Use a damp cloth to clean the fan blades and the impeller. Remove the wind circle in between the fan unit and intake flange. Clean the inside of intake and exhaust flanges and the wind circle. |
|
STEP 3 After cleaning, put the fan unit and wind circle back into the flange brackets and secure the buckles. |
Warranty
VIVOSUN offers a 2-year limited warranty on this product purchased directly from us or our authorized dealers, beginning on the original date of purchase.
This warranty is provided in addition to, and does not affect, your statutory rights under applicable consumer protection laws in the country where the product was purchased.
For the full Warranty Policy, please visit: https://www.vivosun.com/help/warranty-policy
Alternatively, you may contact customer service at support@vivosun.com / +1 888-505-8486.
WARNING
-
Installation must comply with local regulations and country-specific specifications.
-
The equipment must meet the following standards:
-
2014/35/EU Low Voltage Directive
-
2014/30/EU Electromagnetic Compatibility Directive
-
-
The fan operates with an input voltage of 110V AC to 240V AC. DO NOT use with higher voltages.
-
Ensure the air being transferred is not flammable, explosive, or corrosive. The environment temperature must not exceed 40°C (104°F).
-
DO NOT spray or clean the fan with water or other liquids, as this may cause short circuits or electric shock.
-
Installation on windows or outdoor locations is prohibited.
-
Prevent air backflow from open flues or other fired equipment.
-
DO NOT use chemicals like gasoline, benzene, or solvents to clean the fan.
-
Keep water away from the motor and electrical components. DO NOT immerse plastic parts in water above 60°C (140°F).
-
Keep the fan out of reach of children.
-
During operation, disassembly, maintenance, and servicing of the fan are strictly prohibited.
-
DO NOT start the fan unless it is securely fastened.
-
Ensure that no objects are near the fan’s intake before operation.
-
When installing, confirm that all accessories are properly installed and the fan’s structure can support its full load during operation.
-
If the fan exhibits increased noise, temperature spikes, blade stoppage, or foreign object interference, immediately unplug the power, stop usage, and resolve the issue before resuming operation.
-
Store the fan in an environment with the specificied temperature and humidity conditions. If stored for more than six months, test the fan before use to ensure proper functionality.
-
DO NOT cut or reconnect the power cord. If the power cord is damaged, contact customer service. Unauthorized modifications will void the warranty.
DO NOT dispose of this product with your regular trash. Electrical appliances contain hazardous materials that can harm the environment if not disposed of properly.
Please contact your local government for information on nearby drop-off centers or recycling programs that accept electronic waste.
Contents

We help you grow your best green.

We provide the highest quality.

We relentlessly pursue the future.

We make growing more enjoyable.

We support every grower.
Sign up and get 10% off your first order
©2026 Vivosun All Rights Reserved